background image

iHome Products, a division of SDI Technologies Inc. (hereafter referred to as SDI Technologies), warrants this product to be 

free from defects in workmanship and materials, under normal use and conditions, for a period of One Year from the date of 

original purchase.
Should this product fail to function in a satisfactory manner, it is best to first return it to the store where it was originally 

purchased. Should this fail to resolve the matter and service still be required by reason of any defect or malfunction during 

the warranty period, SDI Technologies will repair or, at its discretion, replace this product without charge (except for a $10.00 

charge for handling, packing, return UPS/postage, and insurance). This decision is subject to verification of the defect or 

malfunction upon delivery of this product to the Factory Service Center listed below. The product must include proof of 

purchase, including date of purchase. The fee for service without proof of purchase is $25.00.
Before returning this product for service, please first replace the batteries (if applicable) with fresh ones, as exhausted or 

defective batteries are the most common cause of problems encountered.
If service is still required:
1. Remove the batteries (if applicable) and pack the unit in a well padded, heavy corrugated box.
2. Enclose a photocopy of your sales receipt, credit card statement, or other proof of the date of purchase, if within the 

warranty period.

3. Enclose a check or money order payable to the order of SDI Technologies, for the sum of $10.00 ($25.00 without proof 

of purchase).

4. Send the unit prepaid and insured, to the Factory Service Center listed below.

Consumer Repair Department

SDI Technologies Inc.

1330 Goodyear Drive

El Paso, TX 79936-6420

Disclaimer of Warranty

NOTE:

 This warranty is valid only if the product is used for the purpose for which it was designed. It does not cover (i) 

products which have been damaged by negligence or willful actions, misuse or accident, or which have been modified 

or repaired by unauthorized persons; (ii) cracked or broken cabinets, or units damaged by excessive heat; (iii) damage 

to digital media players, CD’s or tape cassettes (if applicable); (iv) the cost of shipping this product to the Factory Service 

Center and its return to the owner.
This warranty is valid only in the United States of America and does not extend to owners of the product other than to 

the original purchaser. In no event will SDI Technologies or any of its affiliates, contractors, resellers, their officers, directors, 

shareholders, members or agents be liable to you or any third party for any consequential or incidental damages, any 

lost profits, actual, exemplary or punitive damages. (Some states do not allow limitations on implied warranties or exclusion 

of consequential damages, so these restrictions may not apply to you.) This warranty gives you specific legal rights, and 

you may also have other rights which vary from state to state.
Your acknowledgement and agreement to fully and completely abide by the above mentioned disclaimer of warranty is 

contractually binding to you upon your transfer of currency (money order, cashier's check, or credit card) for purchase 

of your SDI Technologies product.

© 2012 SDI Technologies, Inc. All rights reserved

Questions? Visit www.ihomeaudio.com 

or call 1-800-288-2792 Toll Free

Limited 1 Year Warranty Information

Printed in China

iC16-042712-A

Содержание SMARTDESIGN iC16 series

Страница 1: ...Model iC16 Portable Alarm Clock Speaker System for your Android Fold 4 fold Size 130W x 130H mm QUESTIONS Visit www ihomeaudio com SMARTDESIGN for android ...

Страница 2: ...t cloth moistened only with mild soap and water Stronger cleaning agents such as Benzine thinner or similar materials can damage the surface of the unit NOTE Be careful not to touch the surface of the speakers at either end of the unit Maintenance Getting Started Thank you for purchasing the iHome iC16 Audio Speaker System for your Android Designed specifi cally to work with your Android device th...

Страница 3: ...tlet on a circuit different from that to which the receiver is connected Consult the dealer or an experienced radio TV technician for help This Class B digital apparatus complies with Canadian ICES 003 Cet appareil numérique de la classe B est conforme à la norme NMB 003 du Canada This device complies with Part 15 of the FCC Rules Operation is subject to the following two conditions 1 This device ...

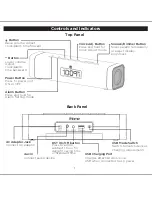
Страница 4: ...me backward Silence alarm temporarily or adjust display brightness Press to add or subtract 1 hour for daylight saving time or Standard time Aux in Connect audio device Button Raise volume Adjust clock alarm time forward Charges attached device via USB when connected to AC power Clock Adj Button Press and hold for Clock Adjust mode Switch to match device s charging requirements Connect AC adaptor ...

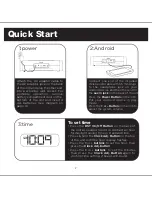
Страница 5: ... other end to the aux in jack on the back of the unit Press the Power Button on the iC16 Put your Android device in play mode Press the or Button on the iC16 to adjust the system volume 3 time Quick Start To set time Press the DST On Off Button on the back of the unit as needed to add or subtract an hour for daylight saving time or standard time Press hold the Clock Adj Button on the top of the un...

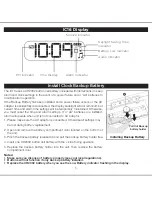
Страница 6: ...you must reset the time and alarm settings If 4 AA batteries are installed alarm will operate when unit is not connected to AC adaptor 1 Please make sure the AC adaptor is connected Otherwise all settings may be lost during battery replacement 2 Open and remove the battery compartment door located on the bottom of the unit 3 Pinch the backup battery release tab and pull the backup battery holder f...

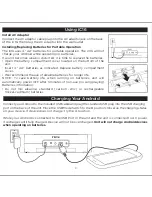
Страница 7: ...ne batteries for longer life NOTE To save battery life when running on batteries unit will automatically power OFF after 3 minutes of non use no song playing Batteries information Do not mix alkaline standard carbon zinc or rechargeable nickel cadmium batteries Connect your Android to the included USB cable and plug the standard USB plug into the USB charging port on the back of the unit Move the ...

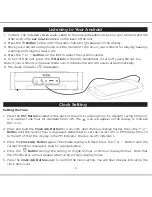
Страница 8: ...r 24 hour display format Note that the PM indicator will not appear when using 24 hour display mode 5 Press the Clock Adj Button again to confirm the clock setting You will hear 2 beeps indicating the clock time is set Clock Setting 1 Connect the included stereo audio cable to the output headphone jack on your Android and the other end to the aux in jack located on the back of the unit 2 Press the...

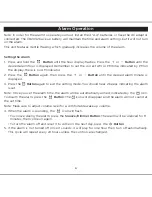
Страница 9: ...is displayed 3 Press the Button again to exit the setting mode You should hear 2 beeps indicating the alarm is set Note Once you set the alarm time the alarm will be automatically armed indicated by the icon To disarm the alarm press the Button The icon will disappear and the alarm will not sound at the set time Note Make sure to adjust volume level for a comfortable wake up volume 4 When the alar...

Страница 10: ... Dimmer Button to confirm Using the Snooze Dimmer Button 1 Press the Snooze Dimmer Button after the alarm sounds The alarm will be silenced and will come on again after the set snooze duration You may repeat this cycle several times during the one hour alarm cycle 2 During normal operation with the AC adaptor press the Snooze Dimmer Button to control the brightness high medium low and off of the L...

Страница 11: ...t to where it is plugged into an AC socket 6 Cleaning The unit should be cleaned only as recommended See the Maintenance section of this manual for cleaning instructions 7 Objects and Liquid Entry Care should be taken so that objects do not fall and liquids are not spilled into any openings or vents located on the product 8 Attachments Do not use attachments not recommended by the product manufact...

Страница 12: ...let is working Turn on any switch that controls the outlet Unit is operating on batteries not connected to AC adaptor Unit will not charge Android when running on batteries Connect unit to AC adaptor to charge Android Android USB cable is not properly connected and or USB Mode Switch needs to be switched Make sure the USB cable is properly and securely connected to the USB port on the back of the ...

Страница 13: ... insured to the Factory Service Center listed below Consumer Repair Department SDI Technologies Inc 1330 Goodyear Drive El Paso TX 79936 6420 Disclaimer of Warranty NOTE This warranty is valid only if the product is used for the purpose for which it was designed It does not cover i products which have been damaged by negligence or willful actions misuse or accident or which have been modified or r...

Страница 14: ......

Отзывы: