21
• Extraer la linea de succión de gasolina (54),
comprobar si hay suciedades en el tubo de fieltro
(59) y sustituirlo en caso necesario. Soplar con
aire comprimido en sentido inverso en el tubo
con filtro.
• Comprobar se el collar (95) de la bomba de aire
de arranque (91) está en posición correcta y, en
caso de que esté dañado, cambiarlo.
D) El aparato funciona irregularmente y se para
Si el equipo no funciona regularmente y se para,
se deben considerar los siquientes pasos:
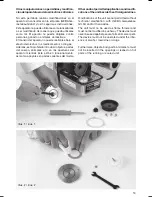
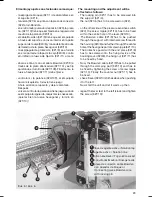
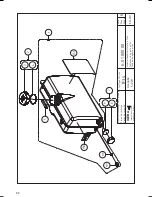
• Sacar la vávula de aire (30), limpiar la menbrana
(33), la placa de válvula (34) y la placa perforadora
(32).La menbrana debe estar limpia y sin pliegues
(ilustr. 2.)
• Extraer y controlar el cuerpo de desplazamiento
(26): Las aristas de la placa de rebotamiento
que se encuentran en el extremo del cuerpo de
desplazamiento deben estar limpias y de canto
vivo. Si es necesario, limpiar el cuerpo de des-
plazamiento con un cepillo (145/8).
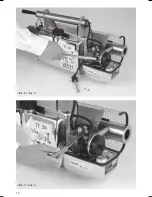
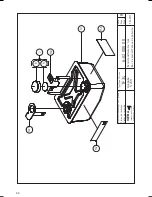
• Limpiar la cámara de mezcla (23) con el limpia-
tubos (145/3) (ilustr. 3)
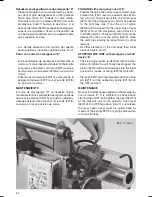
• Destornillar el pitón nebulizador (114), eliminar
residuos de agente activo que se encunetren
en el extremo del resonador (97), y en el pitón
nebulizador (108). ( ilustr. 5).
¡Atencion! Quando se destornilla el pitón de
nebulizador, se tiene que soltar antes la boquilla
de dosificación. Quando se cambia la boquilla
(117) a atornillar y desatornillas se tiene que usar
incondicional una segunda llave replicando el
pitón nebulizador (114).
• Si las medidas descritas hasta ahora no dan el
resultado deseado, extraer y limpiar (sólo con
aire comprimido) la boquilla atmoizadora (19).
E) Niebla insuficiente o ninguna niebla
Si del equipo no sale niebla suficiente, se deben
considerar los siquientes pasos:
• La tapa del tanque de agente activo (2) tiene
fugas. Comprobar la junta (4) y sustituirla si es
necesario.
• Comprobar si hay residuos de agente activo en el
tornillo hueco doble (132) y limpiarlo con alambre
fino.
• Controlar se el grifo de agente activo (120) está
obstruido.
• Controlar la boquilla dosificadora de agente activo
(117) respectivamente el taladora de la boquilla
• Controlar si está obstruido el pitón nebulizador
(114).
• Extraer la válvula de presión (38) de la cámara
de mezcla (23) y controlar si la membrana (40)
está limpia y en posición correcta! En caso de
cambiar la membrana, siempre se debe sustituir
junto con el anillo de junta (41 y con la junta (42).
• Remove gasoline suction line (54), check felt
tube (59) for dirt and if necessary replace. Blow
compressed air through opposite end of hose
with filter (58).
• Check collar (95) of pump spindle (91) for proper
position and replace if damaged.
D) Unit runs unevenly and stops
If the unit does not run evenly and stops, the
following steps should be considered:
• Remove air intake valve (30), clean diaphragm (33),
valve and spacer plates (34 and 32). Diaphragm
must be clean and free of bucklings and cracks.
See illus. 2.
• Unscrew swirl vane (26) and check: The edges of
the plate at the end of the swirl vane (26) must be
clean and sharp edged: if necessary clean swirl
vane with brush (145/8).
• Clean mixing chamber (23) with pipe cleaning
tool (145/3). See illus. 3.
• Unscrew fog solution socket (114), remove residue
from resonator end (97) and fog tube (108) with
the pipe cleaning tool (145/3). See illus 5.
Attention! If you remove the fog solution socket
(114), you must unscrew the dosage nozzle (117)
at first. It is necessary to hold a second spanner
against the fog solution socket (114) when scre-
wing off and when tightening the dosage nozzle.
• Should the stated measures be without success,
remove and clean atomizer nozzle (19) only with
compressed air.
E) Insufficient fog or no fog:
If the unit does not fog sufficiently, the
following steps should be considered:
• Tank cap (2) of solution tank leaks. Check gasket
(4) and if necessary replace.
• Check for residue in double hollow screw (132)
and clean with fine wire.
• Check solution tap (120).
• Check dosage nozzle (117) for free passage.
• Check fog solution socket (114) passage.
• Unscrew air valve (38) on the mixing chamber (23)
and check if diaphragm (40) is clean and properly
placed. When replacing diaphragm (40) always
replace it together with O-ring (41)and gasket
(42).

