IFM Electronic Efector250 E3D304 Скачать руководство пользователя страница 7

7

UK

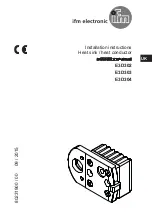
3�  Place the heat sink 

 on the bore holes of the heat conductor 

4�  Tighten countersunk head screws 

 with maximum 2,0 - 3,0 Nm�

5�  Hold the heat conductor 

 on one of the two device sides 

� 


> The hook 

 of the heat conductor gets caught in the front of the device�

6�  Insert nuts 

⑦ 

in the heat conductor and tighten by hand with cylinder head 

bolts M5x75 


> If the device has countersunk bore holes for the bolt heads, use the cylinder 

head bolts M5x70�

7�  Align the heat conductor 

 in a straight line to the device�

8�  Tighten set screws 

 evenly�


> Tightening reduces the distance between the heat conductor and the device� 

The heat conductor must lie flat on the device without air gap�

9�  Tighten cylinder head bolts 

 with maximum 0,5 - 1,0 Nm�

10�  Check that the heat conductor is aligned in a straight line and lies flat on the 

device without gap�


> The surface temperature can only be reduced if the heat conductor lies flat on 

the device without gap�

11� Mount the device on a 14 mm rod using a clamp�

Содержание Efector250 E3D304

Страница 1: ...Installation instructions Heat sink heat conductor E3D302 E3D303 E3D304 80231900 00 09 2015 UK...

Страница 2: ...3 E3D304 4 4 Installation 4 4 1 Mount E3D302 4 4 1 1 Mount E3D302 for horizontal operation of the device 5 4 1 2 Mount E3D302 for vertical operation of the device 6 4 2 Mount E3D303 8 4 3 Mount E3D30...

Страница 3: ...entire duration of use of the accessories 1 1 Symbols used Instructions Reaction result Designation of keys buttons or indications Cross reference Important note Non compliance may result in malfunct...

Страница 4: ...bolts M5x70 2 cylinder head bolts M5x75 4 countersunk head screws M5x16 Installation instructions 3 3 E3D304 2 heat sinks and heat conductors pre mounted 2 cylinder head bolts M5x75 2 M5 nuts Clamp I...

Страница 5: ...ontal operation of the device Follow the instructions 1 Hold the heat conductor on one of the two device sides The hook of the heat conductor gets caught in the front of the device 2 Insert nuts in th...

Страница 6: ...ed if the heat conductor lies flat on the device without gap 7 Mount the device on a 14 mm rod using a clamp 4 1 2 Mount E3D302 for vertical operation of the device Below you find a description how to...

Страница 7: ...the bolt heads use the cylinder head bolts M5x70 7 Align the heat conductor in a straight line to the device 8 Tighten set screws evenly Tightening reduces the distance between the heat conductor and...

Страница 8: ...of a heat conductor with pre mounted nuts Mount the heat conductor E3D303 to a fixture with sufficient heat conductivity Below you find a description how to mount the heat conductor to a fixture and h...

Страница 9: ...75 with nuts by hand If the device has countersunk bore holes for the bolt heads use the cylinder head bolts M5x70 4 Align the device in a straight line to the heat conductor 5 Tighten set screws even...

Страница 10: ...with vertically aligned cooling fins This increases the degree of efficiency 4 3 1 Mount E3D304 for horizontal operation of the device Below you find a description how to mount the article E3D304 for...

Страница 11: ...device 4 Tighten set screws evenly Tightening reduces the distance between the heat conductor and the device The heat conductor must lie flat on the device without air gap 5 Tighten cylinder head bol...

Страница 12: ...s must be aligned vertically see figure on the right 3 Place both heat sinks on the bore holes of the heat conductors 4 Tighten countersunk head screws with maximum 2 0 3 0 Nm 5 Hold the heat conducto...

Страница 13: ...Nm 10 Check that the heat conductors are aligned in a straight line and lie flat on the device without gap The surface temperature can only be reduced if the heat conductors lie flat on the device wit...

Отзывы: