background image


IVS-300 Embedded System 


Page 76 


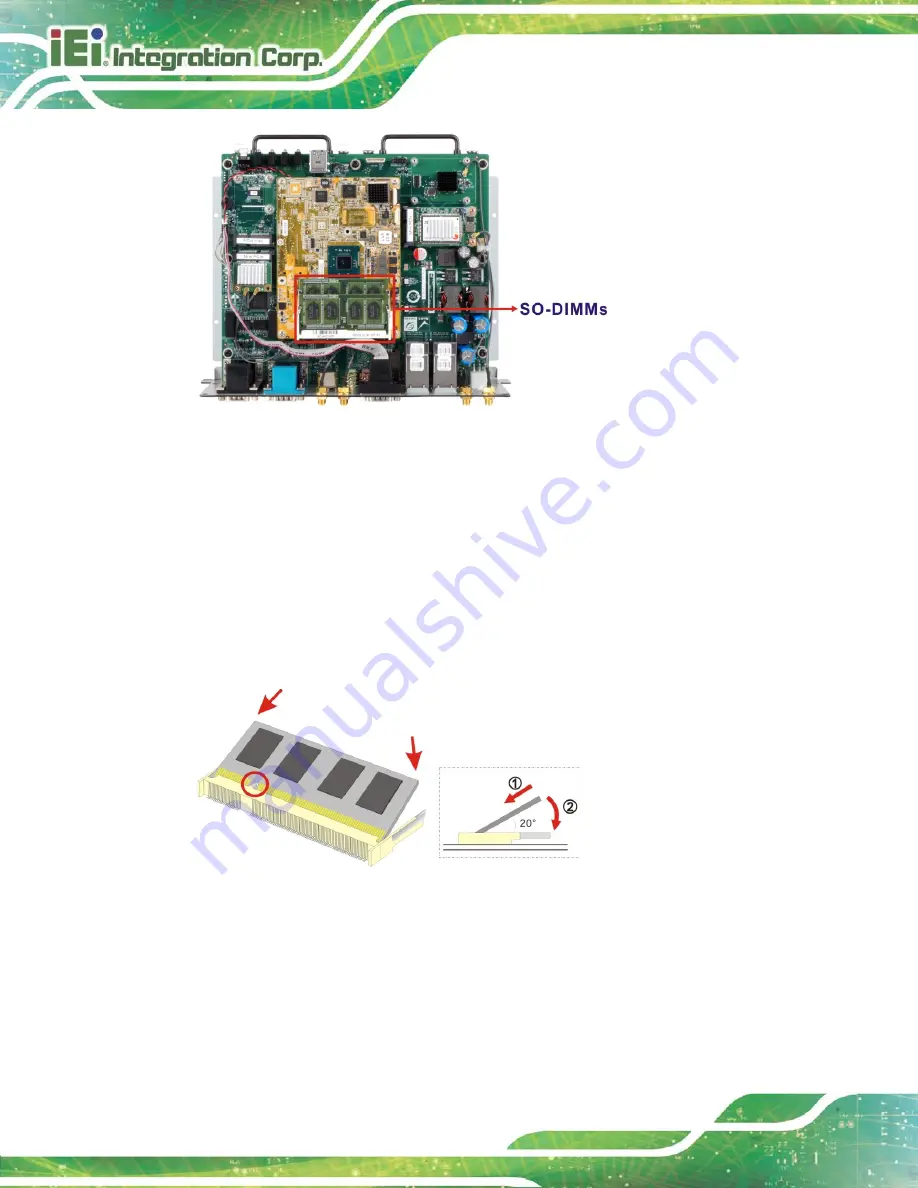
Figure 5-1: SO-DIMM Locations 

Step 3: 

Remove the SO-DIMM by releasing the arms on the SO-DIMM socket. 

Step 4: 

Align the new SO-DIMM with the socket. The SO-DIMM must be oriented in 

such a way that the notch in the middle of the SO-DIMM must be aligned with 

the plastic bridge in the socket (

Figure 5-2

). 

Step 5: 

Insert the SO-DIMM. Push the SO-DIMM chip into the socket at an angle   

(

Figure 5-2

). 


Figure 5-2: SO-DIMM Installation 

Step 6: 

Open the SO-DIMM socket arms. Gently pull the arms of the SO-DIMM socket 

out and push the rear of the SO-DIMM down (See 

Figure 5-2

)

Step 7: 

Secure the SO-DIMM. Release the arms on the SO-DIMM socket. They clip into 

place and secure the SO-DIMM in the socket.

Step 0:


Содержание IVS-300-BT-J1/4G

Страница 1: ...ser Manual eIVS 300 Embedded System MODEL MODEL IVS 300 Fanless Embedded System with Intel Skylake ULT Baytrail Processor 4 GB DDR3L DDR4 Quad GbE LAN with PoE On board GPS HDMI VGA Dual SSD Bay RoHS Compliant Rev 1 02 February 1 2018 ...

Страница 2: ...2018 1 02 Eliminated mSATA support December 6 2017 1 01 Added some IVS 300 ULT3 specifications Added the optional OBD II cable and its connector pinouts Modified Section 3 13 Mobile AP Added Section 3 14 RAID Configuration ULT3 Model Only October 5 2016 1 00 Initial release ...

Страница 3: ...t operate it in an area that exceeds the maximum operating temperature described in the user manual Vorsicht Um eine Überhitzung des Systems zu vermeiden betreiben Sie es ausschließlich im zulässigen Betriebstemperaturbereich Dieser ist in der Bedienungsanleitung vermerkt Attention Pour éviter la surchauffe du système ne l utilisez pas dans une zone dont la température dépasse les limites décrits ...

Страница 4: ...riferimento al manuale utente per le specifiche sull alimentazione Atención Utilice solamente el adaptador de corriente alterna CA con Marcas Conformidad otorgadas Cualquier otro adaptador no otorgado aumenta el riesgo de explosión o incendio Por favor consulte el manual del usuario para las especificaciones del adaptador de alimentación 警告 只能使用經過認證 適用於本系統的電源變壓器與電源線 使用不適用的電 源變壓器將可能導致火災或爆炸 電源變壓器規格請...

Страница 5: ...s arising out of the use or inability to use the product or documentation even if advised of the possibility of such damages This document contains proprietary information protected by copyright All rights are reserved No part of this manual may be reproduced by any mechanical electronic or other means in any form without prior written permission of the manufacturer TRADEMARKS All registered trade...

Страница 6: ...ION Cautionary messages should be heeded to help reduce the chance of losing data or damaging the product NOTE These messages inform the reader of essential but non critical information These messages should be read carefully as any directions or instructions contained therein can help avoid making mistakes HOT SURFACE This symbol indicates a hot surface that should not be touched without taking c...

Страница 7: ... LIST 10 2 3 OPTIONAL ITEMS 11 3 INSTALLATION 13 3 1 ANTI STATIC PRECAUTIONS 14 3 2 INSTALLATION PRECAUTIONS 14 3 2 1 High Surface Temperature 15 3 3 INSTALLATION PROCEDURE 15 3 4 DISASSEMBLE THE SYSTEM 16 3 5 PCIE MINI CARD INSTALLATION 18 3 5 1 PCIe Mini Slot MINI PCIE3 Pinouts 20 3 6 WLAN WWAN MODULE INSTALLATION 21 3 6 1 WWAN Module Slot MINI PCIE1 Pinouts 24 3 6 2 WLAN Module Slot MINI PCIE2 ...

Страница 8: ...BILE AP 37 3 13 1 Installation 37 3 13 2 Usage 38 3 14 RAID CONFIGURATION ULT3 MODEL ONLY 39 4 BIOS 43 4 1 INTRODUCTION 44 4 1 1 Starting Setup 44 4 1 2 Using Setup 44 4 1 3 Getting Help 45 4 1 4 BIOS Menu Bar 45 4 2 MAIN 46 4 3 ADVANCED 47 4 3 1 ACPI Settings 48 4 3 2 Super IO Configuration 49 4 3 2 1 Serial Port n Configuration 49 4 3 3 Hardware Monitor 54 4 3 3 1 Smart Fan Mode Configuration 55...

Страница 9: ...stem Doesn t Boot Up 74 5 2 3 More Troubleshooting 74 5 3 COMPONENT REPLACEMENT PROCEDURE 75 5 3 1 SO DIMM Replacement 75 A REGULATORY COMPLIANCE 77 B SAFETY PRECAUTIONS 82 B 1 SAFETY PRECAUTIONS 83 B 1 1 General Safety Precautions 83 B 1 2 Anti static Precautions 84 B 1 3 Product Disposal 85 B 2 MAINTENANCE AND CLEANING PRECAUTIONS 86 B 2 1 Maintenance and Cleaning 86 B 2 2 Cleaning Tools 86 C BI...

Страница 10: ...Card into the Slot at an Angle 20 Figure 3 9 Securing the Full size PCIe Mini Card 20 Figure 3 10 Knockouts for External Antennas 22 Figure 3 11 WLAN and WWAN Card Slot Locations 22 Figure 3 12 Connecting RF Cable 23 Figure 3 13 Securing SMA Connector and External Antenna Installation 23 Figure 3 14 SIM Card Slot Locations 26 Figure 3 15 SSD Bracket Retention Screws 27 Figure 3 16 Removing SSD Bra...

Страница 11: ... 3 26 Power Input Connector 35 Figure 3 27 ACC Power Cable 35 Figure 3 28 Power Button 36 Figure 3 29 Mobile AP Connection 38 Figure 3 30 RAID Configuration BIOS Setting 40 Figure 5 1 SO DIMM Locations 76 Figure 5 2 SO DIMM Installation 76 ...

Страница 12: ... PCIE3 Pinouts 21 Table 3 2 WWAN Module Slot MINI PCIE1 Pinouts 24 Table 3 3 WLAN Module Slot MINI PCIE2 Pinouts 25 Table 3 4 RS 232 Connector Pinouts 30 Table 3 5 DIO and RS 422 485 Connector Pinouts 31 Table 3 6 OBD II J1939 Connector Pinouts 32 Table 3 7 GPS Speed Pulse Direction Connector Pinouts 34 Table 3 8 Power Input Connector Pinouts 35 Table 4 1 BIOS Navigation Keys 45 Table 4 2 Power St...

Страница 13: ...nu 49 BIOS Menu 6 Hardware Monitor 54 BIOS Menu 7 Smart Fan Mode Configuration 55 BIOS Menu 8 Power Management 57 BIOS Menu 9 CPU Configuration 59 BIOS Menu 10 IDE Configuration 61 BIOS Menu 11 USB Configuration 62 BIOS Menu 12 Chipset 63 BIOS Menu 13 North Bridge 64 BIOS Menu 14 Intel IGD Configuration 65 BIOS Menu 15 South Bridge 66 BIOS Menu 16 Security 67 BIOS Menu 17 Boot 68 BIOS Menu 18 Save...

Страница 14: ......

Страница 15: ...IVS 300 Embedded System Page 1 Chapter 1 1 Introduction ...

Страница 16: ...ors with PoE ensure smooth network connectivity The display interface options include VGA and HDMI with two audio jacks Two USB 3 0 ports two RS 232 ports one RS 422 485 port and one OBD II port provide rich I O options for various applications The IVS 300 embedded systems are all capable of supporting two 2 5 SATA 6Gb s solid state drives 1 2 Benefits The IVS 300 embedded system has the following...

Страница 17: ...ort one OBD II port Two SATA 6Gb s SSD supported Two external SIM card slots support WWAN connection Optional 802 11b g n 1T1R wireless connection 1 4 Model Variations There are two models in the IVS 300 embedded system series The model variations are listed in Table 1 1 below Processor Memory IVS 300 ULT3 i5 4G Intel Core i5 6300U dual core 2 4 GHz 15W TDP 4 GB DDR4 preinstalled max 32 GB IVS 300...

Страница 18: ...shown in Figure 1 2 below Figure 1 2 Front Panel 1 5 1 LED Indicators The LED indicators on the front panel show the status of power HDD Wi Fi PoE and GPRS HSUPA connection Figure 1 3 LED Indicators Power LED Amber The system is off with power connected Blue The system is turned on ...

Страница 19: ...lled or the SIM slot is not being used Green The WWAN module is installed and the SIM slot is being used for WWAN connection Wi Fi LED Off The Wi Fi module is not installed Green The Wi Fi module is installed HDD LED Off HDD is not active Blinking HDD is active PoE LED Off PoE is not connected Green PoE is connected Table 1 2 LED Indicators 1 6 Rear Panel An overview of the rear panel is shown in ...

Страница 20: ...l The bottom surface of the IVS 300 contains six retention screw holes for installing two side mounting brackets Figure 1 5 Bottom Panel 1 8 Dimensions The dimensions of the IVS 300 are listed below and shown in Figure 1 6 Figure 1 6 Dimensions mm ...

Страница 21: ...stem max 8 GB Preinstalled one 4 0 GB DDR3L SDRAM SO DIMM Ethernet 4 x PCIe GbE by Intel I210 Ethernet controller with PoE IEEE802 3af support GPS On board GPS Wireless LAN 1 x Half size PCIe Mini card slot reserved for optional 802 11b g n 1T1R wireless module USB PCIe interface WWAN 1 x Full size PCIe Mini card slot reserved for WWAN module 2 x SIM card slot on rear panel Bluetooth Bluetooth 2 0...

Страница 22: ...and one 4 GB DDR4 memory Operating Shock Half sine wave shock 5G 11ms 3 shocks per axis Operating Vibration MIL STD 810F 514 5C 2 with SSD Operating Temperature 20ºC 60ºC with air flow with SSD Storage Temperature 30ºC 70ºC Humidity 10 95 non condensing Color Black and dark blue Mounting Mounting with two mounting brackets Weight Net Gross 3 0 kg 4 5 kg Dimensions W x D x H 255 mm x 185 mm x 80 mm...

Страница 23: ...IVS 300 Embedded System Page 9 Chapter 2 2 Unpacking ...

Страница 24: ...4 Lift the system out of the boxes Step 5 Remove both polystyrene ends one from each side Step 6 Make sure all the components listed in the packing list are present 2 2 Packing List NOTE If any of the components listed in the checklist below are missing do not proceed with the installation Contact the IEI reseller or vendor the IVS 300 was purchased from or contact an IEI sales representative dire...

Страница 25: ...s M3 5 for SSD installation 6 Screws M3 6 for mounting brackets 2 Mounting brackets 1 Driver and manual CD Table 2 1 Package List 2 3 Optional Items The following are optional component s which may be separately purchased Power adapter with transfer cable P N IVIPOWER 6PIN R10 ...

Страница 26: ...FI KIT02 R10 WWAN kit P N IVS 3G KIT02 R10 OBD II cable P N 32025 003400 100 RS OS Image with Windows Embedded Standard 7 64 bit for IVS 300 BT DVD ROM RoHS P N IVS 300 BT WES7E64 R10 OS Image with Windows Embedded Standard 7 64 bit for IVS 300 ULT3 DVD ROM RoHS P N IVS 300 ULT3 WES7E64 R10 Table 2 2 Optional Items ...

Страница 27: ...IVS 300 Embedded System Page 13 Chapter 3 3 Installation ...

Страница 28: ...grounding Before handling the board touch any grounded conducting material During the time the board is handled frequently touch any conducting materials that are connected to the ground Use an anti static pad When configuring the IVS 300 place it on an anti static pad This reduces the possibility of ESD damaging the IVS 300 3 2 Installation Precautions During installation be aware of the precauti...

Страница 29: ...Some surfaces of the equipment may become hot during operation The surface temperature may be up to several tens of degrees hotter than the ambient temperature Under these circumstances the equipment needs to be protected against accidental contact The equipment is intended for installation in a RESTRICTED ACCESS LOCATION Access can only be gained by SERVICE PERSONS or by USERS who have been instr...

Страница 30: ...orque for cover screws is 5 kg cm 0 36 lb ft 0 49 Nm 2 Never disassemble the system while power is still being fed into the system Before disassembling the system make sure the system has been turned off and all power connectors unplugged Before the internal component can be installed the system must be disassembled to access the main board To disassemble the system please follow the steps below S...

Страница 31: ...tention Screws Step 3 Remove the four internal retention screws Figure 3 2 Figure 3 2 Internal Chassis Retention Screws Step 4 Remove the front panel retention screws to detach the front panel from the chassis Figure 3 3 Figure 3 3 Front Panel Retention Screws ...

Страница 32: ...urn the internal platform over to access the front side of the main board Figure 3 5 Internal Platform Removal 3 5 PCIe Mini Card Installation The PCIe Mini slot allows installation of either a full size or half size PCIe Mini card To install a full size PCIe Mini card please follow the steps below Step 1 Access the front side of the main board See Section 3 4 Step 2 Locate the PCIe Mini slot MINI...

Страница 33: ...lot Location Step 3 Remove the two retention screws as shown in Figure 3 7 Figure 3 7 Removing the Retention Screws Step 4 Line up the notch on the card with the notch on the slot Slide the PCIe Mini card into the socket at an angle of about 20º Figure 3 8 ...

Страница 34: ...the full size PCIe Mini card with the retention screws previously removed Figure 3 9 Figure 3 9 Securing the Full size PCIe Mini Card 3 5 1 PCIe Mini Slot MINI PCIE3 Pinouts The pinouts for the PCIe Mini slot MINI PCIE3 are listed in the table below PIN NO DESCRIPTION PIN NO DESCRIPTION 1 NC 2 VCC3 3 NC 4 GND 5 NC 6 VCC1 5 ...

Страница 35: ... 35 GND 36 USB_DATA_N 37 NC 38 USB_DATA_P 39 VCC3 40 GND 41 VCC3 42 NC 43 DUAL3G LED 44 NC 45 NC 46 NC 47 NC 48 VCC1 5 49 NC 50 GND 51 NC 52 VCC3 Table 3 1 PCIe Mini Slot MINI PCIE3 Pinouts 3 6 WLAN WWAN Module Installation To install the optional WLAN or WWAN module please follow the steps below Step 1 Access the front side of the main board See Section 3 4 Step 2 Remove the knockout for antenna ...

Страница 36: ...tention screw s for PCIe Mini card installation Figure 3 11 Figure 3 11 WLAN and WWAN Card Slot Locations Step 5 Line up the notch on the WLAN WWAN module with the notch on the slot Slide the WLAN WWAN module into the slot at an angle of about 20º Step 6 Secure the WLAN WWAN module with the retention screw previously removed Step 7 Connect the RF cable s to the antenna connector s on the WLAN WWAN...

Страница 37: ...connector at the other end of the RF cable Step 9 Insert the SMA connector to the antenna connector hole on the rear panel Step 10 Secure the SMA connector by inserting the washer and tightening it with nut Step 11 Install the external antenna Figure 3 13 Securing SMA Connector and External Antenna Installation ...

Страница 38: ...GND 5 NC 6 VCC1 5 7 NC 8 SIM_VCC 9 GND 10 SIM_CIO 11 NC 12 SIM_CLK 13 NC 14 SIM_RST 15 GND 16 NC 17 NC 18 GND 19 NC 20 HSUPA_ON 21 GND 22 NC 23 NC 24 VCC3 25 NC 26 GND 27 GND 28 VCC1 5 29 GND 30 NC 31 NC 32 NC 33 NC 34 GND 35 GND 36 USB_DATA_N 37 NC 38 USB_DATA_P 39 VCC3 40 GND 41 VCC3 42 NC 43 3GLED_EN 44 NC 45 NC 46 NC 47 NC 48 VCC1 5 49 NC 50 GND 51 NC 52 VCC3 Table 3 2 WWAN Module Slot MINI PC...

Страница 39: ...5 7 NC 8 NC 9 GND 10 NC 11 CLK_PCIE_CLK_N 12 NC 13 CLK_PCIE_CLK_P 14 NC 15 GND 16 NC 17 NC 18 GND 19 NC 20 NC 21 GND 22 PCIRST 23 PCIE_RXN 24 VCC3 25 PCIE_RXP 26 GND 27 GND 28 VCC1 5 29 GND 30 SMB_CLK 31 PCIE_TXN 32 SMB_DATA 33 PCIE_TXP 34 GND 35 GND 36 USB_DATA_N 37 NC 38 USB_DATA_P 39 NC 40 GND 41 NC 42 NC 43 NC 44 WIFI_LED 45 NC 46 NC 47 NC 48 VCC1 5 49 NC 50 GND 51 NC 52 VCC3 Table 3 3 WLAN Mo...

Страница 40: ...SIM 2 slot with the gold contacts facing up To remove the SIM card push the SIM card to release it Step 4 Install IEI Mobile AP to designate a SIM card to use The Mobile AP instruction is described in detail in Section 3 13 Step 5 The SIM LED indicators on the front panel show the user which SIM card is being used See Section 1 5 1 3 8 Solid State Drive Installation Two 2 5 SATA drives can be inst...

Страница 41: ...crews Step 2 Pull the bracket out to remove the bracket from the IVS 300 Figure 3 16 Figure 3 16 Removing SSD Bracket Step 3 Place an SSD onto the bracket and secure the SSD with the bracket by inserting four retention screws M3 4 into the bottom of the SSD Figure 3 17 ...

Страница 42: ... on the front panel Make sure the SATA connector on the SSD is securely connected to the SATA connector inside the chassis Figure 3 18 SSD Installation Step 5 Tighten the two captive screws to secure the SSD bracket Step 6 Repeat the five steps described above to install the second SSD into the other SSD bracket Step 0 ...

Страница 43: ...e retention screw holes on the sides of the bottom surface Step 3 Secure the brackets to the system by inserting three retention screws M3 8 into each bracket Figure 3 19 Figure 3 19 Mounting Bracket Retention Screws Step 4 Drill holes in the intended installation surface Step 5 Align the mounting holes in the sides of the mounting brackets with the predrilled holes in the mounting surface Step 6 ...

Страница 44: ... 300 3 10 1 COM Port Connection The IVS 300 has two DB 9 connectors for RS 232 serial port connection The pinouts for the RS 232 connectors COM1and COM2 are listed in the figure and table below Figure 3 20 RS 232 Connector COM1 COM2 PIN NO DESCRIPTION 1 DCD 2 RX 3 TX 4 DTR 5 GND 6 DSR 7 RTS 8 CTS 9 RI Table 3 4 RS 232 Connector Pinouts ...

Страница 45: ...The pinouts for the DIO and RS 422 485 connector are listed in the figure and table below Figure 3 21 DIO and RS 422 485 Connector PIN NO DESCRIPTION PIN NO DESCRIPTION 1 DIN0 9 DOUT3 2 DIN1 10 GND 3 DIN2 11 TXD422 TXD485 4 DIN3 12 TXD422 TXD485 5 VCC5 13 RXD422 6 DOUT0 14 RXD422 7 DOUT1 15 N A 8 DOUT2 Table 3 5 DIO and RS 422 485 Connector Pinouts ...

Страница 46: ...inouts for the OBD II J1939 connector are listed in the figure and table below Figure 3 22 OBD II J1939 Connector PIN NO DESCRIPTION 1 GND 2 GND 3 OBD CAN_H 4 ISO 9141 2 K 5 OBD CAN_L 6 J1850 7 J1850 8 ISO 9141 2 L 9 NC Table 3 6 OBD II J1939 Connector Pinouts NOTE Microsoft Windows 10 OS does not support OBD II and J1939 functions ...

Страница 47: ...User can purchase the optional OBD II cable Figure 3 23 to connect the IVS 300 with the vehicle OBD II Cable Figure 3 23 OBD II Cable The pinout locations of OBD II cable connector are shown below Figure 3 24 OBD II Connector Pinouts ...

Страница 48: ...peed Pulse Direction Connector Pinouts 3 11 Power On Procedure 3 11 1 Installation Checklist WARNING Make sure a power supply with the correct input voltage is being fed into the system Incorrect voltages applied to the system may cause damage to the internal electronic components and may also cause injury to the user To power on the embedded system please make sure of the following The bottom cov...

Страница 49: ...in power connector pinouts are listed in the figure and table below Figure 3 26 Power Input Connector PIN NO DESCRIPTION 1 GND 2 GND 3 GND 4 ACC 5 VIN 6 VIN Table 3 8 Power Input Connector Pinouts To use ACC power connect the IVS 300 to the vehicle through the ACC power cable See Figure 3 27 Figure 3 27 ACC Power Cable ...

Страница 50: ...river Installation NOTE The content of the CD may vary throughout the life cycle of the product and is subject to change without prior notice Visit the IEI website or contact technical support for the latest updates All the drivers for the IVS 300 are on the utility CD that came with the system The utility CD contains drivers for Windows 7 and Windows 8 operating systems Please select the correspo...

Страница 51: ...ed to the system and install all of the necessary drivers for the IVS 300 3 13 Mobile AP IEI provides an application tool Mobile AP for the users of the IVS 300 with the WWAN module installed to manage mobile network and make a phone call 3 13 1 Installation To install this application tool please locate the WLAN folder in the utility CD This folder contains two files for different operating syste...

Страница 52: ...vers and applications the IVS 300 must be restarted in order to complete the installation 3 13 2 Usage To launch the application double click the MobileAP icon on the Windows desktop The user interface appears as shown in Figure 3 29 The functions are described below Figure 3 29 Mobile AP Connection Sim card switch Select a SIM card to designate a SIM card to use or click the Refresh SIM status bu...

Страница 53: ... value is internet o Connect result displays the connection result 3 14 RAID Configuration ULT3 Model Only The IVS 300 ULT3 i5 can provide data protection for serial ATA SATA disks via the Intel Rapid Storage Technology To access the Intel Rapid Storage Technology please follow the steps below WARNING Irrecoverable data loss occurs if a working drive is removed when trying to remove a failed drive...

Страница 54: ...configuration If they are not the same size disk drive capacity is sacrificed and overall performance affected Step 2 Enable SATA drives in BIOS Start the computer and access the BIOS setup program Go to Advanced SATA Configuration SATA Mode Enable RAID support for all SATA devices Figure 3 30 RAID Configuration BIOS Setting Step 3 Save and Exit BIOS After the SATA support option is enabled save a...

Страница 55: ...figure the RAID array A Select the option to Create RAID Volume from the Main Menu and press Enter Intel R Rapid Storage Technology Option ROM 15 2 0 2748 Copyright C Intel Corporation All rights reserved MAIN MENU 1 Create RAID Volume 4 Recovery Volume Options 2 Delete RAID Volume 5 Acceleration Options 3 Reset Disks to Non RAID 6 Exit DISK VOLUME INFORMATION RAID Volumes None defined B Press the...

Страница 56: ...then choose Y when the warning prompt appears to create volume Intel R Rapid Storage Technology Option ROM 15 2 0 2748 Copyright C Intel Corporation All rights reserved CREATE VOLUME MENU Name RAID Level Disks Strip Size Capacity Sync Volume1 RAID0 Stripe Select Disks 16KB 238 5 GB N A Create Volume ...

Страница 57: ...IVS 300 Embedded System Page 43 Chapter 4 4 BIOS ...

Страница 58: ...s 1 Press the DELETE key as soon as the system is turned on or 2 Press the DELETE key when the Press Delete to enter SETUP message appears on the screen 0 If the message disappears before the DELETE key is pressed restart the computer and try again 4 1 2 Using Setup Use the arrow keys to highlight items press ENTER to select use the PageUp and PageDown keys to change entries press F1 for help and ...

Страница 59: ...3 Getting Help When F1 is pressed a small help window describing the appropriate keys to use and the possible selections for the highlighted item appears To exit the Help Window press ESC or the F1 key again 4 1 4 BIOS Menu Bar The menu bar on top of the BIOS screen has the following main items Main Changes the basic system configuration Advanced Changes the advanced system settings Chipset Change...

Страница 60: ...il SoC C0 Stepping Memory Information Total Memory 4096 MB LPDDR3 TXE Information Sec RC Version 00 05 00 00 TXE FW Version 01 00 02 1060 System Date Mon 08 17 2015 System Time 11 10 27 Access Level Administrator Set the Date Use Tab to switch between Data elements Select Screen Select Item Enter Select Change Opt F1 General Help F2 Previous Values F3 Optimized Defaults F4 Save Exit ESC Exit Versi...

Страница 61: ...atible with the hardware Aptio Setup Utility Copyright C 2016 American Megatrends Inc Main Advanced Chipset Security Boot Save Exit ACPI Settings Super IO Configuration Hardware Monitor Power Management CPU Configuration IDE Configuration USB Configuration System ACPI Parameters Select Screen Select Item Enter Select Change Opt F1 General Help F2 Previous Values F3 Optimized Defaults F4 Save Exit ...

Страница 62: ...e highest ACPI sleep state the system will enter when the SUSPEND button is pressed Select Screen Select Item Enter Select Change Opt F1 General Help F2 Previous Values F3 Optimized Defaults F4 Save Exit ESC Exit Version 2 17 1245 Copyright C 2016 American Megatrends Inc BIOS Menu 3 ACPI Settings ACPI Sleep State Suspend Disabled Use the ACPI Sleep State option to specify the sleep state the syste...

Страница 63: ...es F3 Optimized Defaults F4 Save Exit ESC Exit Version 2 17 1245 Copyright C 2016 American Megatrends Inc BIOS Menu 4 Super IO Configuration 4 3 2 1 Serial Port n Configuration Use the Serial Port n Configuration menu BIOS Menu 5 to configure the serial port n Aptio Setup Utility Copyright C 2016 American Megatrends Inc Advanced Serial Port n Configuration Serial Port Enabled Device Settings IO 3F...

Страница 64: ...to DEFAULT The serial port IO port address and interrupt address are automatically detected IO 3F8h IRQ 4 Serial Port I O port address is 3F8h and the interrupt address is IRQ4 IO 3F8h IRQ 3 4 5 6 7 9 10 11 12 Serial Port I O port address is 3F8h and the interrupt address is IRQ3 4 5 6 7 9 10 11 12 IO 2F8h IRQ 3 4 5 6 7 9 10 11 12 Serial Port I O port address is 2F8h and the interrupt address is I...

Страница 65: ...port Change Settings Auto Use the Change Settings option to change the serial port IO port address and interrupt address Auto DEFAULT The serial port IO port address and interrupt address are automatically detected IO 2F8h IRQ 3 Serial Port I O port address is 2F8h and the interrupt address is IRQ3 IO 3F8h IRQ 3 4 5 6 7 9 10 11 12 Serial Port I O port address is 3F8h and the interrupt address is I...

Страница 66: ... the Serial Port option to enable or disable the serial port Disabled Disable the serial port Enabled DEFAULT Enable the serial port Change Settings Auto Use the Change Settings option to change the serial port IO port address and interrupt address Auto DEFAULT The serial port IO port address and interrupt address are automatically detected IO 2E0h IRQ 11 Serial Port I O port address is 2E0h and t...

Страница 67: ...8h and the interrupt address is IRQ3 4 5 6 7 9 10 11 12 IO 2E8h IRQ 3 4 5 6 7 9 10 11 12 Serial Port I O port address is 2E8h and the interrupt address is IRQ3 4 5 6 7 9 10 11 12 IO 3E0h IRQ 3 4 5 6 7 9 10 11 12 Serial Port I O port address is 3E0h and the interrupt address is IRQ3 4 5 6 7 9 10 11 12 IO 2E0h IRQ 3 4 5 6 7 9 10 11 12 Serial Port I O port address is 2E0h and the interrupt address is...

Страница 68: ...B3V 3 312 V VSB5V 4 944 V Enable or Disable Smart Fan Select Screen Select Item Enter Select Change Opt F1 General Help F2 Previous Values F3 Optimized Defaults F4 Save Exit ESC Exit Version 2 17 1245 Copyright C 2016 American Megatrends Inc BIOS Menu 6 Hardware Monitor Smart Fan Function Enabled Use the Smart Fan Function option to enable or disable the smart fan function Disabled Disables the sm...

Страница 69: ... Fan Mode Configuration CPU_FAN1 Smart Fan Control Auto Duty Cycle Mode CPU Temperature 1 60 CPU Temperature 2 50 CPU Temperature 3 40 CPU Temperature 4 30 SYS_FAN1 Smart Fan Control Auto Duty Cycle Mode System Temperature 1 60 System Temperature 1 50 System Temperature 1 40 System Temperature 1 30 Smart Fan Mode Select Select Screen Select Item EnterSelect Change Opt F1 General Help F2 Previous V...

Страница 70: ...djusts its speed using these settings CPU Temperature 1 CPU Temperature 2 CPU Temperature 3 CPU Temperature 4 SYS_FAN1 Smart Fan Control Auto Duty Cycle Mode Use the SYS_FAN1 Smart Fan Control BIOS option to configure the system smart fan Manual Duty Mode The fan spins at the speed set in the Manual Duty Mode option Auto Duty Cycle Mode DEFAULT The fan adjusts its speed using these settings System...

Страница 71: ...l Help F2 Previous Values F3 Optimized Defaults F4 Save Exit ESC Exit Version 2 17 1245 Copyright C 2016 American Megatrends Inc BIOS Menu 8 Power Management Low Voltage Warning 9V Use the Low Voltage Warning option to set the low voltage warning from 8V to 37V If the system voltage is lower than the value set here the power LED on the system front panel will blink at regular intervals refer to Se...

Страница 72: ...ower State The following table shows the relation of the power state and vehicle ignition system The auto start up and shut down time delay can be set by the BIOS options listed above LOCK ACC ON START ACC Signal Off On On Off Car Cigarette Lighter Off On On Off 5 V Standby Power Off On after 1 second On On Auto Start up Set by Auto Power On Delay BIOS option Auto Shut down Set by Auto Power Off D...

Страница 73: ...ol Technology Select Screen Select Item Enter Select Change Opt F1 General Help F2 Previous Values F3 Optimized Defaults F4 Save Exit ESC Exit Version 2 17 1245 Copyright C 2016 American Megatrends Inc BIOS Menu 9 CPU Configuration The CPU Configuration menu BIOS Menu 9 lists the following CPU details CPU Signature Lists the CPU signature value Microcode Patch Lists the microcode patch being used ...

Страница 74: ... enable or disable virtualization on the system When combined with third party software Intel Virtualization technology allows several OSs to run on the same system at the same time Disabled DEFAULT Disables Intel Virtualization Technology Enabled Enables Intel Virtualization Technology EIST Enabled Use the EIST option to enable or disable the Enhanced Intel SpeedStep Technology EIST Disabled Disa...

Страница 75: ...Item Enter Select Change Opt F1 General Help F2 Previous Values F3 Optimized Defaults F4 Save Exit ESC Exit Version 2 17 1245 Copyright C 2016 American Megatrends Inc BIOS Menu 10 IDE Configuration Serial ATA SATA Enabled Use the Serial ATA SATA option to configure the SATA controller Enabled DEFAULT Enables the on board SATA controller Disabled Disables the on board SATA controller SATA Mode IDE ...

Страница 76: ...lect Change Opt F1 General Help F2 Previous Values F3 Optimized Defaults F4 Save Exit ESC Exit Version 2 17 1245 Copyright C 2016 American Megatrends Inc BIOS Menu 11 USB Configuration USB Devices The USB Devices field lists the USB devices that are enabled on the system Legacy USB Support Enabled Use the Legacy USB Support BIOS option to enable USB mouse and USB keyboard support Normally if this ...

Страница 77: ...ARNING Setting the wrong values for the Chipset BIOS selections in the Chipset BIOS menu may cause the system to malfunction Aptio Setup Utility Copyright C 2016 American Megatrends Inc Main Advanced Chipset Security Boot Save Exit North Bridge South Bridge Host Bridge Parameters Select Screen Select Item Enter Select Change Opt F1 General Help F2 Previous Values F3 Optimized Defaults F4 Save Exit...

Страница 78: ...merican Megatrends Inc Chipset Intel IGD Configuration Memory Information Total Memory 4096 MB LPDDR3 DIMM1 2048 MB LPDDR3 DIMM2 2048 MB LPDDR3 Config Intel IGD Settings Select Screen Select Item EnterSelect Change Opt F1 General Help F2 Previous Values F3 Optimized Defaults F4 Save Exit ESC Exit Version 2 17 1245 Copyright C 2016 American Megatrends Inc BIOS Menu 13 North Bridge ...

Страница 79: ...ct Screen Select Item EnterSelect Change Opt F1 General Help F2 Previous Values F3 Optimized Defaults F4 Save Exit ESC Exit Version 2 17 1245 Copyright C 2016 American Megatrends Inc BIOS Menu 14 Intel IGD Configuration DVMT Pre Allocated 256M Use the DVMT Pre Allocated option to specify the amount of system memory that can be used by the internal graphics device 64M 64 MB of memory used by intern...

Страница 80: ...rends Inc Chipset Audio Configuration Audio Controller Enabled XHCI Mode Smart Auto Control Detection of the Azalia device Disabled Azalia will be unconditionally disabled Enabled Azalia will be unconditionally Enabled Select Screen Select Item EnterSelect Change Opt F1 General Help F2 Previous Values F3 Optimized Defaults F4 Save Exit ESC Exit Version 2 17 1245 Copyright C 2016 American Megatrend...

Страница 81: ...set Security Boot Save Exit Password Description If ONLY the Administrator s password is set then this only limits access to Setup and is only asked for when entering Setup If ONLY the User s password is set then this is a power on password and must be entered to boot or enter Setup In Setup the User will have Administrator rights The password length must be in the following range Minimum length 3...

Страница 82: ... Select Screen Select Item Enter Select Change Opt F1 General Help F2 Previous Values F3 Optimized Defaults F4 Save Exit ESC Exit Version 2 17 1245 Copyright C 2016 American Megatrends Inc BIOS Menu 17 Boot Bootup NumLock State On Use the Bootup NumLock State BIOS option to specify if the number lock setting must be modified during boot up On DEFAULT Allows the Number Lock on the keyboard to be en...

Страница 83: ...yboard lights up when the Number Lock is engaged Quiet Boot Enabled Use the Quiet Boot BIOS option to select the screen display when the system boots Disabled Normal POST messages displayed Enabled DEFAULT OEM Logo displayed instead of POST messages UEFI Boot Disabled Use the UEFI Boot option to enable or disable to boot from the UEFI devices Enabled Boot from UEFI devices is enabled Disabled DEFA...

Страница 84: ...revious Values F3 Optimized Defaults F4 Save Exit ESC Exit Version 2 17 1245 Copyright C 2016 American Megatrends Inc BIOS Menu 18 Save Exit Save Changes and Reset Use the Save Changes and Reset option to save the changes made to the BIOS options and reset the system Discard Changes and Reset Use the Discard Changes and Reset option to exit the system without saving the changes made to the BIOS co...

Страница 85: ...IVS 300 Embedded System Page 71 Restore User Defaults Use the Restore User Defaults option to restore the user defaults to all the setup options ...

Страница 86: ...IVS 300 Embedded System Page 72 Chapter 5 5 Troubleshooting and Maintenance ...

Страница 87: ...tions may lead to personal injury and system damage To preserve the working integrity of the IVS 300 embedded system the system must be properly maintained If embedded system components need replacement the proper maintenance procedures must be followed to ensure the system can continue to operate normally 5 2 System Troubleshooting This section provides some simple troubleshooting suggestions 5 2...

Страница 88: ...ot up please do the following Step 1 Check the power is turned on See Section 5 2 1 above Step 2 Make sure the SO DIMM modules are properly installed Step 0 5 2 3 More Troubleshooting Nothing appears on the monitor after booting up the system Make sure the monitor is properly connected to the system and the monitor is connected to a power supply and turned on WARNING If all troubleshooting measure...

Страница 89: ...presentative please send an email to sales ieiworld com The embedded system components listed below can all be replaced if they fail SO DIMM module PCIe Mini card see Section 3 5 WLAN or WWAN module see Section 3 5 1 5 3 1 SO DIMM Replacement WARNING Using incorrectly specified SO DIMM may cause permanently damage the IVS 300 Please make sure the purchased SO DIMM complies with the memory specific...

Страница 90: ...SO DIMM must be aligned with the plastic bridge in the socket Figure 5 2 Step 5 Insert the SO DIMM Push the SO DIMM chip into the socket at an angle Figure 5 2 Figure 5 2 SO DIMM Installation Step 6 Open the SO DIMM socket arms Gently pull the arms of the SO DIMM socket out and push the rear of the SO DIMM down See Figure 5 2 Step 7 Secure the SO DIMM Release the arms on the SO DIMM socket They cl...

Страница 91: ...IVS 300 Embedded System Page 77 Appendix A A Regulatory Compliance ...

Страница 92: ...of Directive 2014 53 EU Български Bulgarian IEI Integration Corp декларира че този оборудване е в съответствие със съществените изисквания и другите приложими правила на Директива 2014 53 EU Česky Czech IEI Integration Corp tímto prohlašuje že tento zařízení je ve shodě se základními požadavky a dalšími příslušnými ustanoveními směrnice 2014 53 EU Dansk Danish IEI Integration Corp erklærer herved ...

Страница 93: ... citiem ar to saistītajiem noteikumiem Direktīvas 2014 53 EU Lietuvių Lithuanian IEI Integration Corp deklaruoja kad šis įranga atitinka esminius reikalavimus ir kitas 2014 53 EU Direktyvos nuostatas Nederlands Dutch IEI Integration Corp dat het toestel toestel in overeenstemming is met de essentiële eisen en de andere relevante bepalingen van richtlijn 2014 53 EU Malti Maltese IEI Integration Cor...

Страница 94: ...li direktive 2014 53 EU Slovensky Slovak IEI Integration Corp týmto vyhlasuje že zariadenia spĺňa základné požiadavky a všetky príslušné ustanovenia Smernice 2014 53 EU Suomi Finnish IE Integration Corp vakuuttaa täten että laitteet on direktiivin 2014 53 EU oleellisten vaatimusten ja sitä koskevien direktiivin muiden ehtojen mukainen Svenska Swedish IEI Integration Corp förklarar att denna utrust...

Страница 95: ...erference at his own expense Federal Communication Commission Interference Statement This equipment has been assembled with components that comply with the limits for a Class B digital device pursuant to Part 15 of the FCC Rules These limits are designed to provide reasonable protection against harmful interference in a residential installation This equipment generates uses and can radiate radio f...

Страница 96: ...IVS 300 Embedded System Page 82 B Safety Precautions Appendix B ...

Страница 97: ...t the risk of electric shock make sure power cord is unplugged from wall socket To fully disengage the power to the unit please disconnect the power cord from the power outlet Refer servicing to qualified service personnel The power outlet shall be readily available and accessible Do not apply voltage levels that exceed the specified voltage range Doing so may cause fire and or an electrical shock...

Страница 98: ...eptible to ESD It is therefore critical that whenever the IVS 300 is opened and any of the electrical components are handled the following anti static precautions are strictly adhered to Wear an anti static wristband Wearing a simple anti static wristband can help to prevent ESD from damaging any electrical component Self grounding Before handling any electrical component touch any grounded conduc...

Страница 99: ... is classified as electronic device in terms of the European Directive 2012 19 EU WEEE and must not be disposed of as domestic garbage EU wide legislation as implemented in each Member State requires that waste electrical and electronic products carrying the mark left must be disposed of separately from normal household waste This includes monitors and electrical accessories such as signal cables ...

Страница 100: ...an the embedded system gently wipe it with a piece of soft dry cloth or a slightly moistened cloth The interior of the device does not require cleaning Keep fluids away from the device interior Be cautious of all small removable components when vacuuming the device Never drop any objects or liquids through the openings of the device Be cautious of any possible allergic reactions to solvents or che...

Страница 101: ...e the plastic parts Vacuum cleaner Using a vacuum specifically designed for computers is one of the best methods of cleaning the device Dust and dirt can restrict the airflow in the device and cause its circuitry to corrode Cotton swabs Cotton swaps moistened with rubbing alcohol or water are excellent tools for wiping hard to reach areas Foam swabs Whenever possible it is best to use lint free sw...

Страница 102: ...IVS 300 Embedded System Page 88 Appendix C C BIOS Menu Options ...

Страница 103: ... 54 PC Health Status 54 CPU_FAN1 Smart Fan Control Auto Duty Cycle Mode 56 SYS_FAN1 Smart Fan Control Auto Duty Cycle Mode 56 Low Voltage Warning 9V 57 Auto Power On Delay 10 sec 57 Auto Power Off Delay 20 sec 58 Intel Virtualization Technology Disabled 60 EIST Enabled 60 Serial ATA SATA Enabled 61 SATA Mode IDE Mode 61 USB Devices 62 Legacy USB Support Enabled 62 DVMT Pre Allocated 256M 65 DVMT T...

Страница 104: ...IVS 300 Embedded System Page 90 Save Changes and Reset 70 Discard Changes and Reset 70 Restore Defaults 70 Save as User Defaults 70 Restore User Defaults 71 ...

Страница 105: ...IVS 300 Embedded System Page 91 Appendix D D Watchdog Timer ...

Страница 106: ...BIOS function call INT 15H is used to control the Watchdog Timer INT 15H AH 6FH Sub function AL 2 Sets the Watchdog Timer s period BL Time out value Its unit second is dependent on the item Watchdog Timer unit select in CMOS setup Table D 1 AH 6FH Sub function Call sub function 2 to set the time out period of Watchdog Timer first If the time out value is not zero the Watchdog Timer starts counting...

Страница 107: ... system resets Example program INITIAL TIMER PERIOD COUNTER W_LOOP MOV AX 6F02H setting the time out value MOV BL 30 time out value is 48 seconds INT 15H ADD THE APPLICATION PROGRAM HERE CMP EXIT_AP 1 is the application over JNE W_LOOP No restart the application MOV AX 6F02H disable Watchdog Timer MOV BL 0 INT 15H EXIT ...

Страница 108: ...IVS 300 Embedded System Page 94 Appendix E E Hazardous Materials Disclosure ...

Страница 109: ...amps These components will be separately marked Please refer to the following table Part Name Toxic or Hazardous Substances and Elements Lead Pb Mercury Hg Cadmium Cd Hexavalent Chromium CR VI Polybrominated Biphenyls PBB Polybrominated Diphenyl Ethers PBDE Housing O O O O O O Display O O O O O O Printed Circuit Board O O O O O O Metal Fasteners O O O O O O Cable Assembly O O O O O O Fan Assembly ...

Страница 110: ...电池或灯管 这些元 件将会单独标示出来 部件名称 有毒有害物质或元素 铅 Pb 汞 Hg 镉 Cd 六价铬 CR VI 多溴联苯 PBB 多溴二苯 醚 PBDE 壳体 O O O O O O 显示 O O O O O O 印刷电路板 O O O O O O 金属螺帽 O O O O O O 电缆组装 O O O O O O 风扇组装 O O O O O O 电力供应组装 O O O O O O 电池 O O O O O O O 表示该有毒有害物质在该部件所有物质材料中的含量均在 SJ T 11363 2006 现由 GB T 26572 2011 取代 标准规定的限量要求以下 X 表示该有毒有害物质至少在该部件的某一均质材料中的含量超出 SJ T 11363 2006 现由 GB T 26572 2011 取代 标准规定的限量要求 ...

Отзывы: