background image


IBX-660 Industrial Edge Storage Server 
 

Page 45 

Româna [Romanian]   

IEI Integration Corp declară că acest echipament este in conformitate cu cerinţele 
esenţiale şi cu celelalte prevederi relevante ale Directivei 1999/5/CE.


Slovensko [Slovenian]   

IEI Integration Corp izjavlja, da je ta opreme v skladu z bistvenimi zahtevami in ostalimi 

relevantnimi določili direktive 1999/5/ES.


Slovensky [Slovak]   

IEI Integration Corp týmto vyhlasuje, že zariadenia spĺňa základné požiadavky a všetky 

príslušné ustanovenia Smernice 1999/5/ES. 

Suomi [Finnish]   

IEI Integration Corp vakuuttaa täten 

ttä laitteet

on direktiivin 1999/5/EY oleellisten 

vaatimusten ja sitä koskevien direktiivin muiden ehtojen mukainen. 

Svenska [Swedish]   

IEI Integration Corp förklarar att denna utrustningstyp står I överensstämmelse med de 

väsentliga egenskapskrav och övriga relevanta bestämmelser som framgår av direktiv 

1999/5/EG. 


Содержание IBX-660 series

Страница 1: ...660 Industrial Edge Storage Server Page i User Manual IBX 660 Industrial server MODEL MODEL IBX 660 Series 4 bay Industrial Data Storage PC for Smart Factory and Harsh Environment Rev 1 00 April 25 2...

Страница 2: ...IBX 660 Industrial Edge Storage Server Page ii Revision Date Version Changes April 25 2018 1 00 Initial release...

Страница 3: ...l damages arising out of the use or inability to use the product or documentation even if advised of the possibility of such damages This document contains proprietary information protected by copyrig...

Страница 4: ...ersonal injury Warnings should be taken seriously CAUTION Cautionary messages should be heeded to help reduce the chance of losing data or damaging the product NOTE These messages inform the reader of...

Страница 5: ...2 PACKING LIST 10 2 3 OPTIONAL ITEMS 11 3 INSTALLATION 12 3 1 ANTI STATIC PRECAUTIONS 13 3 2 INSTALLATION PRECAUTIONS 13 3 3 INSTALLATION PROCEDURE 14 3 4 SO DIMM INSTALLATION OPTIONAL 15 3 5 HARD DRI...

Страница 6: ...SB Configuration 33 4 4 CHIPSET 34 4 5 SECURITY 36 4 6 BOOT 37 4 7 SAVE EXIT 38 5 MAINTENANCE 40 5 1 COMPONENT REPLACEMENT PROCEDURE 41 A REGULATORY COMPLIANCE 42 B SAFETY PRECAUTIONS 47 B 1 SAFETY PR...

Страница 7: ...3 1 Bottom Panel Removal 15 Figure 3 2 SO DIMM Installation 16 Figure 3 3 Front Panel Removal 17 Figure 3 4 HDD Tray Removal 18 Figure 3 5 HDD Tray Installation 18 Figure 3 6 HDD Installation 19 Figu...

Страница 8: ...IBX 660 Industrial Edge Storage Server Page viii List of Tables Table 1 1 IBX 660 Model Variations 2 Table 1 2 Hardware Specifications 7 Table 2 1 Package List 11 Table 4 1 BIOS Navigation Keys 28...

Страница 9: ...IBX 660 Industrial Edge Storage Server Page 1 Chapter 1 1 Introduction...

Страница 10: ...pable of operating under wide temperatures from 40 C to 50 C 40 F 122 F in fanless operation It is compliant with the military grade MIL STD 810G 514 6E 1 simulation test for anti vibration The IBX 66...

Страница 11: ...DIMM memory Dual GbE LAN for high speed network applications Support four 2 5 SSD or HDD Extended temperature range 1 4 Front Panel The IBX 660 front panel contains six LED indicators 1 x Status LED g...

Страница 12: ...2 V DC power input jack 1 x 9 V 36 V DC power input terminal block 4 pin 1 x Audio mic in jack 1 x Audio out jack 1 x HDMI connector 2 x RJ 45 GbE connector 2 x USB 2 0 port connector 2 x USB 3 0 port...

Страница 13: ...from the chassis while power is still being fed into the system Before removing the bottom access panel make sure the system has been turned off and all power connectors unplugged The bottom surface o...

Страница 14: ...4 GB memory For dual DIMM configurations you must use a pair of identical DDR3L modules eMMC 32 GB GPU 7th generation Intel HD Graphics Ethernet 2 x RJ 45 gigabit Ethernet port HDD 4 x 2 5 SATA SSD HD...

Страница 15: ...8 GB 1600 MHz DDR3L memory and four 2 5 HDD Operating Temperature 40 C 50 C 40 F 122 F Please note that industrial SSDs are required to meet this condition Humidity 5 95 RH non condensing Color Black...

Страница 16: ...IBX 660 Industrial Edge Storage Server Page 8 1 8 Dimensions The dimensions of the IBX 660 are listed below and shown in Figure 1 5 Figure 1 5 Dimensions mm inch...

Страница 17: ...IBX 660 Industrial Edge Storage Server Page 9 Chapter 2 2 Unpacking...

Страница 18: ...ep 4 Lift the system out of the boxes Step 5 Remove both polystyrene ends one from each side Step 6 Make sure all the components listed in the packing list are present 2 2 Packing List NOTE If any of...

Страница 19: ...24 Flat head screws for HDD installation Table 2 1 Package List 2 3 Optional Items The following are optional components which may be separately purchased Item and Part Number Image OS Image with Wind...

Страница 20: ...IBX 660 Industrial Edge Storage Server Page 12 Chapter 3 3 Installation...

Страница 21: ...s are strictly adhered to Wear an anti static wristband Wearing a simple anti static wristband can help to prevent ESD from damaging the board Self grounding Before handling the board touch any ground...

Страница 22: ...n when installing the IBX 660 The IBX 660 s cooling vents must not be obstructed by any objects Blocking the vents can cause overheating of the IBX 660 Leave at least 5 cm of clearance around the IBX...

Страница 23: ...ure the purchased SO DIMM complies with the memory specifications of the IBX 660 To install a SO DIMM memory module into a SO DIMM socket please follow the steps below Step 1 Loosen the four captive s...

Страница 24: ...lace Ensure the memory module sits properly with the clips in place Figure 3 2 SO DIMM Installation NOTE Always ensure that a memory module is installed in the primary slot that is on the top marked w...

Страница 25: ...OTE Before installing hard drives ensure the solid disk drives SSDs that you use are compatible with the IBX 660 Four 2 5 SATA hard drives and or solid disk drive SSD can be installed in the IBX 660 T...

Страница 26: ...age Server Page 18 Step 2 Remove the hard drive tray Figure 3 4 Figure 3 4 HDD Tray Removal Step 3 Attach the drive to the tray and secure the four screws in the back of the drive tray Figure 3 5 Figu...

Страница 27: ...he IBX 660 all the way to the end Figure 3 6 Figure 3 6 HDD Installation Step 5 Repeat Step 2 to Step 4 to install the remaining drives Please follow the HDD Sequence shown in Step 2 to do so Step 6 C...

Страница 28: ...n in the following sections The mounting kit described below can be separately purchased Please contact IEI sales representative directly for detail information The mounting instructions are described...

Страница 29: ...on screws two in each bracket to secure the system to the wall Step 0 3 7 Power On Procedure 3 7 1 Installation Checklist WARNING Make sure a power supply with the correct input voltage is being fed i...

Страница 30: ...l block The terminal block pinouts are shown in Figure 3 9 Figure 3 9 Terminal Block Pinouts 3 7 3 Power on Procedure To power on the IBX 660 please follow the steps below Step 1 Connect the power sou...

Страница 31: ...the IBX 660 press the power button for 1 5 seconds To force turn off press the power button for 5 seconds 3 8 Available Drivers All the drivers for the IBX 660 are available on IEI Resource Download...

Страница 32: ...ype IBX 660IBX 660IBX 660 and press Enter Step 2 All product related software utilities and documentation will be listed You can choose Driver to filter the result Step 3 Click the driver file name on...

Страница 33: ...software from the downloaded ISO image file in Windows 8 8 1 or 10 double click the ISO file to mount it as a virtual drive to view its content On Windows 7 system an additional tool such as Virtual C...

Страница 34: ...IBX 660 Industrial Edge Storage Server Page 26 Chapter 4 4 BIOS...

Страница 35: ...wo ways 1 Press the DELETE key as soon as the system is turned on or 2 Press the DELETE key when the Press Delete to enter SETUP message appears on the screen 0 If the message disappears before the DE...

Страница 36: ...ys 4 1 3 Getting Help When F1 is pressed a small help window describing the appropriate keys to use and the possible selections for the highlighted item appears To exit the Help Window press ESC or th...

Страница 37: ...emory Information Total Memory 8192 MB Memory Frequency 1333 MHz System Date Mon 08 17 2015 System Time 11 10 27 Access Level Administrator Set the Date Use Tab to switch between Data elements Select...

Страница 38: ...Utility Copyright C 2013 American Megatrends Inc Main Advanced Chipset Security Boot Save Exit Hardware Monitor CPU Configuration USB Configuration Monitor hardware status Select Screen Select Item E...

Страница 39: ...rican Megatrends Inc Advanced PC Health Status CPU Temperature 25 C VIN1 0 984 V VIN2 2 128 V VIN3 0 992 V VIN4 3 386 V VCC3V 3 328 V VSB3V 3 344 V VSB5V 5 040 V VBAT 2 992 V Select Screen Select Item...

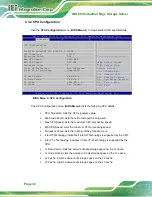
Страница 40: ...Exit ESC Exit Version 2 16 1242 Copyright C 2013 American Megatrends Inc BIOS Menu 4 CPU Configuration The CPU Configuration menu BIOS Menu 4 lists the following CPU details CPU Signature Lists the CP...

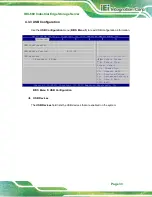
Страница 41: ...atrends Inc Advanced USB Configuration USB Module Version 8 11 02 USB Devices 1 Keyboard 2 Hubs Select Screen Select Item Enter Select Change Opt F1 General Help F2 Previous Values F3 Optimized Defaul...

Страница 42: ...ss Last State Select DVMT 5 0 Pre Allocated Fixed Graphics Memory size used by the Internal Graphics Device Select Screen Select Item Enter Select Change Opt F1 General Help F2 Previous Values F3 Opti...

Страница 43: ...S option to enable or disable power saving function Disabled DEFAULT Eup Function support disabled Enabled Eup Function support enabled Restore on AC Power Loss Last State Use the Restore on AC Power...

Страница 44: ...er on password and must be entered to boot or enter Setup In Setup the User will have Administrator rights The password length must be in the following range Minimum length 3 Maximum length 20 Adminis...

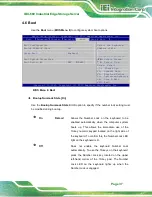
Страница 45: ...right C 2013 American Megatrends Inc BIOS Menu 8 Boot Bootup NumLock State On Use the Bootup NumLock State BIOS option to specify if the number lock setting must be modified during boot up On DEFAULT...

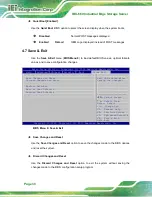
Страница 46: ...urity Boot Sa Save Exit Save Changes and Reset Discard Changes and Reset Restore Defaults Save as User Defaults Restore User Defaults Exit the system after saving the changes Select Screen Select Item...

Страница 47: ...fault values for each of the parameters on the Setup menus F3 key can be used for this operation Save as User Defaults Use the Save as User Defaults option to save the changes done so far as user defa...

Страница 48: ...IBX 660 Industrial Edge Storage Server Page 40 Chapter 5 5 Maintenance...

Страница 49: ...stem damage For more details on anti static precautions please refer to Section 3 1 5 1 Component Replacement Procedure WARNING Users are not advised to attempt to repair or replace any internal or ex...

Страница 50: ...IBX 660 Industrial Edge Storage Server Page 42 Appendix A A Regulatory Compliance...

Страница 51: ...e essential requirements and other relevant provisions of Directive 1999 5 EC Bulgarian IEI Integration Corp 1999 5 esky Czech IEI Integration Corp t mto prohla uje e tento za zen je ve shod se z klad...

Страница 52: ...999 5 EK Lietuvi Lithuanian IEI Integration Corp deklaruoja kad is ranga atitinka esminius reikalavimus ir kitas 1999 5 EB Direktyvos nuostatas Nederlands Dutch IEI Integration Corp dat het toestel to...

Страница 53: ...nimi dolo ili direktive 1999 5 ES Slovensky Slovak IEI Integration Corp t mto vyhlasuje e zariadenia sp a z kladn po iadavky a v etky pr slu n ustanovenia Smernice 1999 5 ES Suomi Finnish IEI Integrat...

Страница 54: ...the interference at his own expense Federal Communication Commission Interference Statement This equipment has been assembled with components that comply with the limits for a Class B digital device p...

Страница 55: ...IBX 660 Industrial Edge Storage Server Page 47 Appendix B B Safety Precautions...

Страница 56: ...ined below whenever the IBX 660 is opened Make sure the power is turned off and the power cord is disconnected whenever the IBX 660 is being installed moved or modified Do not apply voltage levels tha...

Страница 57: ...lowing anti static precautions are strictly adhered to Wear an anti static wristband Wearing a simple anti static wristband can help to prevent ESD from damaging any electrical component Self groundin...

Страница 58: ...the mark left must be disposed of separately from normal household waste This includes monitors and electrical accessories such as signal cables or power cords When you need to dispose of your display...

Страница 59: ...is a list of items to use when cleaning the IBX 660 Cloth Although paper towels or tissues can be used a soft clean piece of cloth is recommended when cleaning the IBX 660 Water or rubbing alcohol A...

Страница 60: ...IBX 660 Industrial Edge Storage Server Page 52 Appendix C C Hazardous Materials Disclosure...

Страница 61: ...and lamps These components will be separately marked Please refer to the following table Part Name Toxic or Hazardous Substances and Elements Lead Pb Mercury Hg Cadmium Cd Hexavalent Chromium CR VI P...

Страница 62: ...e Storage Server Page 54 RoHS RoHS Pb Hg Cd CR VI PBB PBDE O O O O O O O O O O O O O O O O O O O O O O O O O O O O O O O O O O O O O O O O O O O O O O O O O SJ T 11363 2006 GB T 26572 2011 X SJ T 1136...

Отзывы: