


15
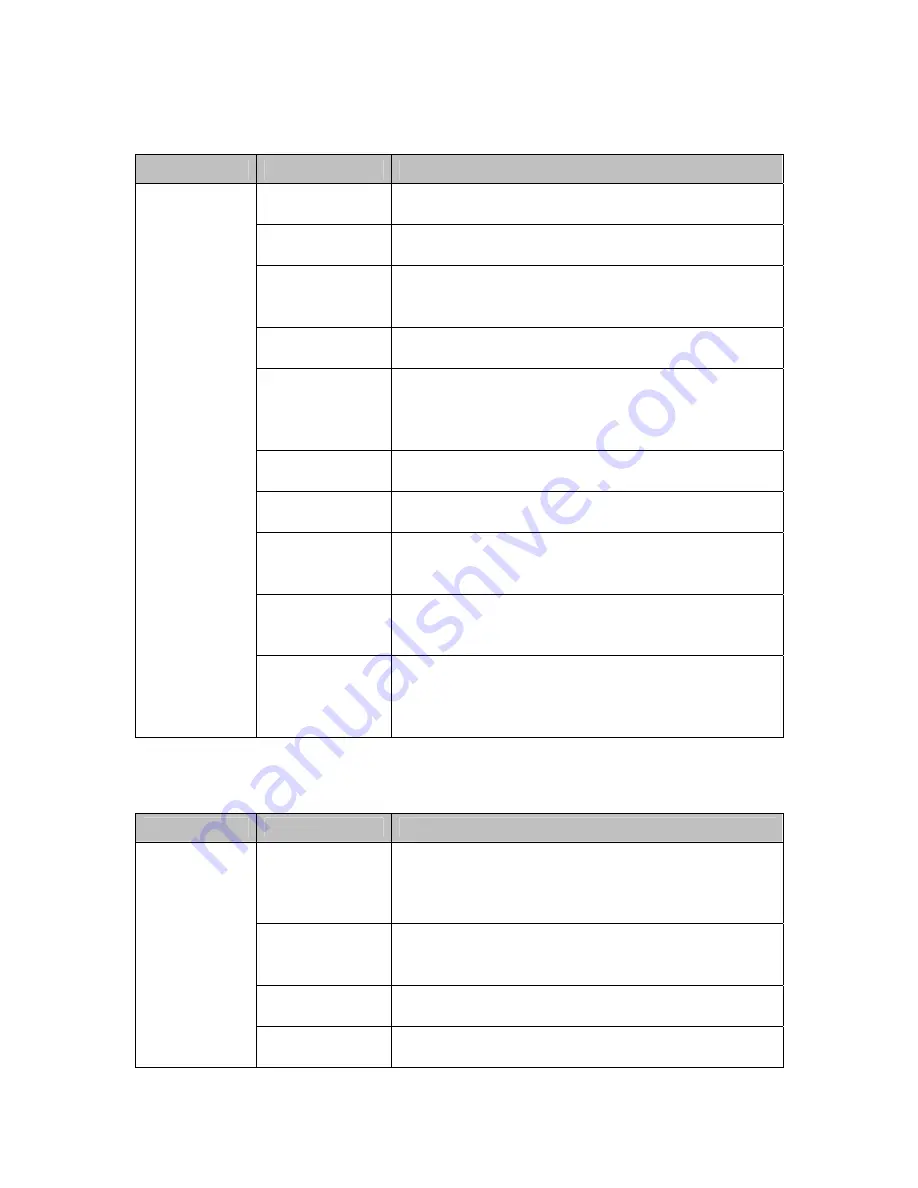
Camera Settings Setup
Sub-Menu
Option
Function
Digital Zoom
Allows users to turn the digital zoom function on or
off. By default, digital zoom is
off
.
Zoom Speed
Allows users to change the zoom speed. The default
speed is
high
.
Iris Average
The iris average can be set to any value between
0-
255
. The default is
96
. Raising the average increases
brightness.
Iris Peak
The iris peak can be set to any value between
0-127
.
The default is
16
.
Iris Mode
The iris mode can be set to
M/A
(default),
MANU
(manual), or
AUTO
(automatic). The M/A setting
gives operators control of the iris when the dome is
still. At other times, the camera controls the iris.
Backlight
Allows users to turn backlight compensation
on
or
off
. The default is
off
.
WB Mode
Allows users to change the white-balance mode. By
default, white balancing is done automatically.
WB-R
Allows users to adjust the R-gain for manual white-
balance. Ranges from
0-255
. The higher the R-gain,
the more reddish the image will appear.
WB-B
Allows users to adjust the R-gain for manual white-
balance. Ranges from
0-255
. The higher the R-gain,
the more bluish the image will appear.
Camera Setup
Focus Mode
The focus mode can be set to
M/A
(default),
MANU
(manual), or
AUTO
(automatic). The M/A
setting gives operators control over focus when the
dome is still. At other times, the camera has control.
Exposure Mode Setup
Sub-Menu
Option
Function
AE-DSS
Allows users to enable or disable the dome’s Digital
Slow Shutter (DSS) capability. DSS slows the frame
rate and enhances sensitivity in low-light conditions.
The default mode is
AUTO
.
Shutter
Allows users to manually adjust the camera’s shutter
speed. The default mode is
AUTO
. Available shutter
speeds vary for NTSC and PAL models.
Exposure
Allows users to manually change the dome’s F-stop.
The default mode is
AUTO
.
Set AE Mode
B/W Mode
The B/W mode is used to specify the conditions for
switching from color to black and white. The default,