background image


 FINGER006 SERIES QUICK INSTALLATION GUIDE 


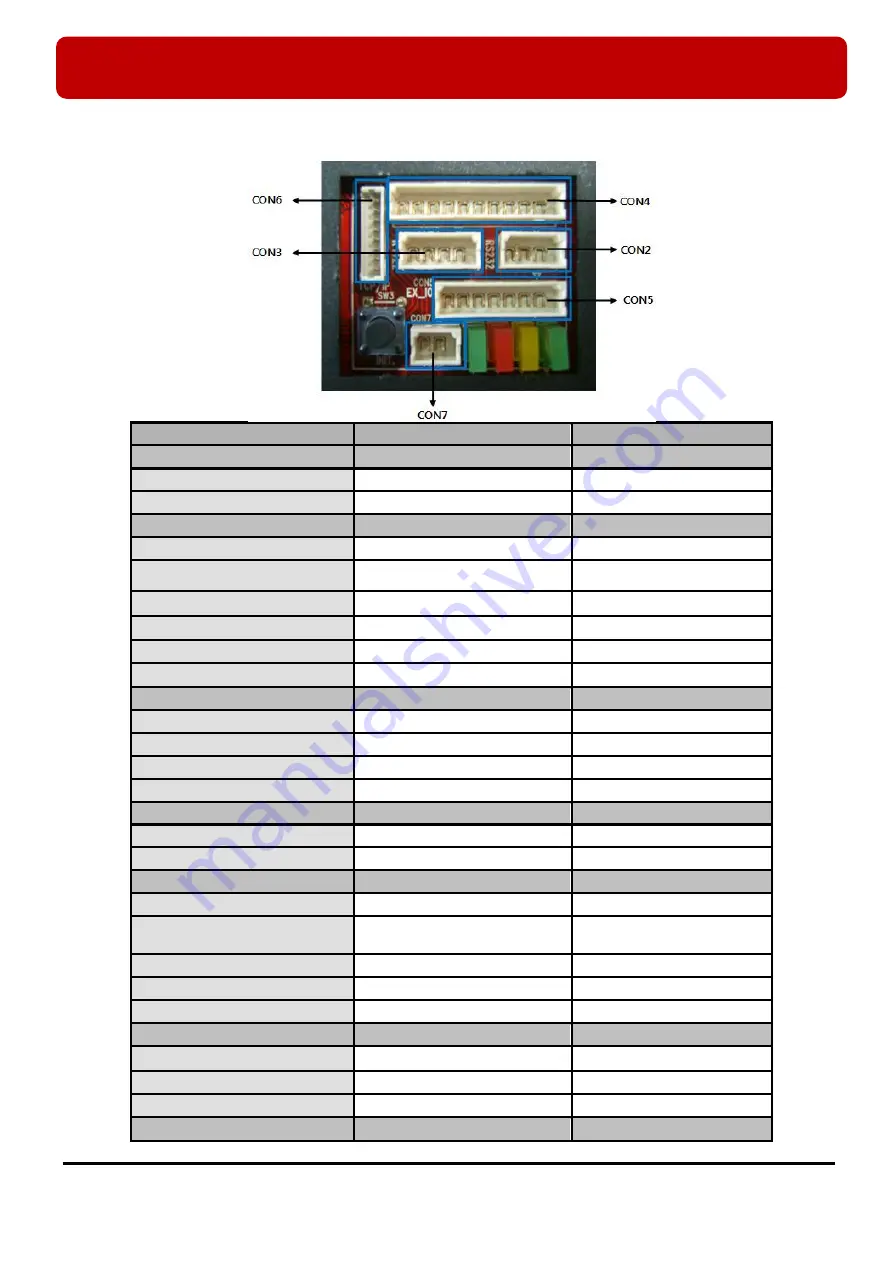
3.3 Connection and Color Code Table 


I/O PORT NAME 

SIGNAL NAME 

COLOR CODED 

POWER 

(CON7) 


Main Power(+12V) 

DC +12V 

Red 

Power Ground 

GND 

Black 

OUTPUT 

(CON4) 


Not in Use 

Gray with Red Stripe 


Not in Use 

Blue with White Stripe 


Not in Use 

White with Red Stripe 


Not in Use 

White 


Not in Use 

Purple with White Stripe 


Not in Use 

Purple 

INPUT 

(CON4) 


Not in Use 

Orange 


Not in Use 

Yellow with Red Stripe 

OK Input 

OK Input 

Green 

Error Input 

Error Input 

Green with White Stripe 

EXTERNAL READER PORT 

(CON5) 


Wiegand Data0 

Wiegand DATA0 Input 

Pink 

Wiegand Data1 

Wiegand DATA1 Input 

Cyan 

OUTPUT


(CON5) 


Wiegand Data0 Output 

Wiegand Data0 Output 

Orange with White 

Wiegand Data1 Output 

Wiegand Data1 Output 

Brown with White Stripe 

OK Signal Out


OK Out   

Green with Red Stripe 

Error Signal Out 

Error Out   

Blue with Red Stripe 

Tamper Switch Out 

Tamper Switch Out (Not Use) 

Yellow with White Stripe 

RS232 INTERFACE 

(CON2) 


RS232-TX 

TXD 

Black with White Stripe 

RS232-RX 

RXD 

Red with White Stripe 

Ground


GND 

Black 

RS422 INTERFACE 

(CON3) 


Содержание FINGER006SR

Страница 1: ...Quick Installation Guide Fingerprint Identification Proximity PIN Reader ...

Страница 2: ...ock Never spill liquid of any kind on the product 7 Never disassemble this product by yourself take the unit to a qualified service center whenever service or repair is required Opening or removing the covers may expose you to dangerous voltages or other risks Also incorrect reassembly can cause electric shock when the unit is subsequently used 8 Unplug this product from the Direct Current DC powe...

Страница 3: ...h power supply The green LED turns on if access has granted The orange LED turns on if access has failed Finger Print Scanner When users put their finger on the scanner white light will turn on 16 Numeric Keypad Card data registration deletion and various function settings are possible through keypad input without host computer control Function Keypad There are four function keys F1 F2 F3 and F4 L...

Страница 4: ...than 2 seconds Refer to 8 2 System Initialization for more details Communication Display LED 3 4 yellow green LED will twinkle during RS232 RS422 and TCP IP communication If the LAN is connected normally during TCP IP communication green LED will turn on But in the collision status 2 LED red will turn on Figure The Communication Display LED in the Rear View Temper Switch Initialization Switch 1 2 ...

Страница 5: ...Red Stripe OK Input OK Input Green Error Input Error Input Green with White Stripe EXTERNAL READER PORT CON5 Wiegand Data0 Wiegand DATA0 Input Pink Wiegand Data1 Wiegand DATA1 Input Cyan OUTPUT CON5 Wiegand Data0 Output Wiegand Data0 Output Orange with White Wiegand Data1 Output Wiegand Data1 Output Brown with White Stripe OK Signal Out OK Out Green with Red Stripe Error Signal Out Error Out Blue ...

Страница 6: ... TX TX Gray RS422 RX RX Blue RS422 RX RX Brown TCP IP Communication CON6 TCP IP Communication Optional 8PIN connector module 3 4 TCP IP Module Option The Finger006 is able to use TCP IP Communication An optional TCP IP module is needed for TCP IP communication to the PC ...

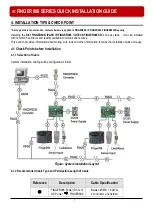
Страница 7: ...ools and readily available communications wires This section provides information about wiring wire runs and other information to make the installation quick and easy 4 1 Check Points before Installation 4 1 1 Selection of Cable System installation cabling will be configured as follow Figure System Installation Layout 4 1 2 Recommended Cable Type and Permissible Length of Cable Reference Descripti...

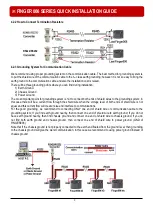
Страница 8: ...portion of signal is reflected back into the transmission line The decision whether or not to use termination resistors should be based on the cable length and data rate used by the communication system For example if you use 9 600 baud rate and 1 200m length of cable the propagation velocity of cable is 0 66 x speed of light This value is specified by the cable manufacturer if we assume the refle...

Страница 9: ... of shield wires to the grounding system in this case there will be a current flow through the shield wire when the voltage level of both ends of shield wire is not equal and this current flow will create noise and interfere to communications For the good grounding we recommend to connecting ONLY one end of shield wire of communication cable to the grounding system If you find earth ground nearby ...

Страница 10: ...step Using 2 screws install wall mount to the wall Insert 5 O Rings to the Wall Mount as indicated then run the cable from the main unit through the center hole and snap in place the main unit to Wall Mount Make sure that the main unit is secure locked in place with Wall Mount Caution Before mounting the Star FINGER006 iPASS IP FINGER006 IDTECK FINGER006SR unit to the Wall Mount bracket an operati...

Страница 11: ...g Board ID Besides the method described above there is one more method for system initialization which is by entering setting menu In this case all setting values will be cleared except Board ID If you want to know details please refer to 12 1 2 Communication Address Setting in page 27 5 3 Wiring 5 3 1 Power Connect the wire of DC 12V power to the 12V port Red Connect the GND wire of DC 12V power ...

Страница 12: ...ector Serial communication connector female is required to connect the FINGER006 to a host computer via RS232 communication Please follow the instructions Connect RS232 TX port of FINGER006 to the pin 2 of the 9 pin connector Connect RS232 RX port of FINGER006 to the pin 3 of the 9 pin connector Connect RS232 GND of FINGER006 to the pin 5 of the 9 pin connector Plug in the 9 pin connector to COM n...

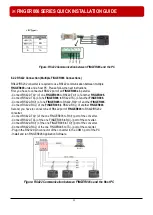
Страница 13: ...nother FINGER006 Connect RS422 RX of one FINGER006 to RS422 RX of another FINGER006 Connect RS422 RX of one FINGER006 to RS422 RX of another FINGER006 Second you have to connect one of RS422 port of FINGER006 to RS422 RS232 converter Connect RS422 TX of the one FINGER006 to RX port of the converter Connect RS422 TX of the one FINGER006 to RX port of the converter Connect RS422 RX of the one FINGER...

Страница 14: ...FINGER006 unit Then the LCD will first display Initialize OK 1 Yes 0 No Press 1 key if you want to initialize the system or 0 to cancel the initialization procedure After all the initialization process is completed the system will be operating in the normal mode and the LCD will display FINGER006 F1 MM DD hh mm ss INTERFACE FINGER006 ILAN422 LINE COLOR RS232 TX CON2 RX RS232 DSUB9 BLACK WHITE RX C...

Страница 15: ... the current date and time To adjust the time date setting press ENT then enter 15 Digits in a YYYYMMDDhhmmssW format and then enter ENT again to confirm NOTE For the days of the week W 1 Sun 2 Mon 3 Tue 4 Wed 5 Thu 6 Fri 7 Sat e g To input August 24 2009 13 30 15 Monday enter 200908241330152 7 4 Maximum Number of Cardholder IDs By default the FINGER006 is set to store up to 10 000 cardholders and...

Страница 16: ...d from OK output wire for 500ms Default Registered Card Reading When a registered card or PIN is read the door will open for 3 seconds Defaults with the GREEN LED on Alarms Unregistered Password Fingerprint When an unregistered card is read wrong password is input wrong fingerprint is input the access is denied and the alarm will be activated for 3 seconds Defaults with Orange LED on LED turns on ...

Страница 17: ... FINGER006 SERIES QUICK INSTALLATION GUIDE 17 9 Template ...

Отзывы: