iT4B User Manual
9
Download
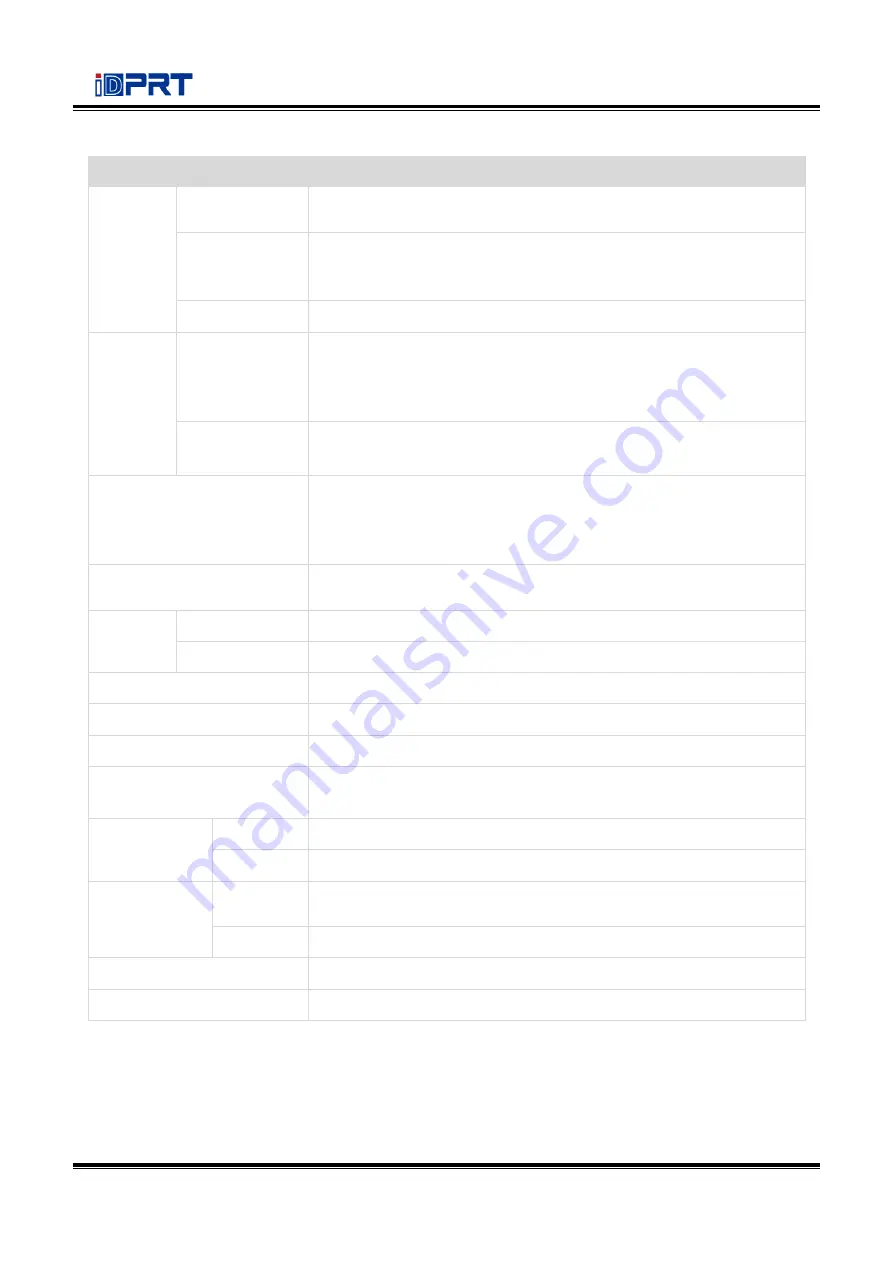
Fonts
Bitmap fonts
90°, 180°, 270° rotatable and 10 times expandable in horizontal
and vertical directions
Asian fonts
16x16, 24x24. Traditional Chinese, Simplified Chinese, Japanese,
Korean, 90
∘
,180
∘
,270
∘
, rotatable and 8 times expandable in
horizontal and vertical directions
TTF fonts
90°, 180°, 270° rotatable
Barcodes
1D
Code 39, Code 93, EAN 8/13 (add on 2 & 5), UPC A/E (add on 2 &
5), I 2 of 5, Codabar, Code 128 (subset A,B, C), EAN 128, MSI,
Plessey, Telepen, GS1 DataBar, Standard 2 of 5, Industrial 2 of 5,
Code 11, Code 49
2D
PDF417, Data matrix code, QR code, Micro PDF417, Aztec code
Code Pages
850, 852, 437, 860, 863, 865, 857, 861, 862, 855, 866, 737, 851,
869, WINDOWS 1250, 1251, 1252, 1253, 1254, 1255, 1257,
UTF
-
8, UTF
-
16BE, UTF
-
16LE,
DBCS 932 (JIS), 936(GBK), 949 (Koran), 950(BIG5)
Graphics
Resident graphic file types are BMP and PCX, other graphic
formats are converted by the software download
Interfaces
Standard
USB, Ethernet
Optional
Wi
-
Fi, Bluetooth
Control Panel
Power switch button, FEED button, 2 indicating LED
LCD Display
Not Support
RTC Function
Not Support
Power Supply
External AC/DC switching power adapter,
AC 100V
-
240V/DC 24V/2.5A/60W, Peak 9A
Environment
Operation
5 to 50
℃
@ humidity 25% to 85% non
-
condensing
Storage
-
40 to 60
℃
@ humidity 10% to 90% non
-
condensing
Physical
Characteristic
Dimension
(L*H*W)
308*250*180 mm
Weight
About 2.9 kg
Options & Accessory
Peeler Module, Cutter Module, External Label Roll Holder
Agency Approval
CE EMC (EN 55022 Class B), FCC EMC (Class A), CCC, RoHS
Item
Parameter
Содержание iT4B
Страница 10: ...iT4B User Manual 7 1 3 Dimension...
Страница 21: ...iT4B User Manual 18 Figure 2 Left...
Страница 23: ...iT4B User Manual 20 Figure 5 Left...
Страница 33: ...iT4B User Manual 30 2 Click Settings 1 Set up the interface needed range USB COM LPT ETH...
Страница 34: ...iT4B User Manual 31 2 Click Get Printer Information and printer information will show in the above...
Страница 35: ...iT4B User Manual 32 3 Click Get Status and printer status will show in the above...
Страница 38: ...iT4B User Manual 35 6 Click Ethernet then click Get to gain the relevant values...
Страница 39: ...iT4B User Manual 36 7 Click WIFI then set up the name password and so on...
Страница 43: ...iT4B User Manual 40 4 You can set a magnification of the graphic as needed...
Страница 47: ...iT4B User Manual 44 6 Click System Click language and choose the language of printer utility...
Страница 50: ...iT4B User Manual 47 5 Choose the installation directory then click Next 6 Click Finish...
Страница 52: ...iT4B User Manual 49 9 Enter a name for this printer then click Next 10 Click Finish...
Страница 55: ...iT4B User Manual 52 2 According to different needs set up the page...
Страница 56: ...iT4B User Manual 53 Click Stock Name and choose the paper type...
Страница 57: ...iT4B User Manual 54 Click New Stock and set up a new stock Click Edit Stock and edit the stock...
Страница 58: ...iT4B User Manual 55 Click Delete Stock and delete the stock Choose Orientation or Effects showed in the Preview...
Страница 59: ...iT4B User Manual 56 Click Preset Name and back to the default settings Click Manage and change the settings...
Страница 60: ...iT4B User Manual 57 3 Click Graphics and edit the pictures...
Страница 61: ...iT4B User Manual 58 4 Click Stock...
Страница 62: ...iT4B User Manual 59 5 Click Option...
Страница 64: ...iT4B User Manual 61 Click Speed Settings Set up the printing speed...
Страница 66: ...iT4B User Manual 63 2 Click General Print Test Page and printer will print labels with current settings...
Страница 67: ...iT4B User Manual 64 3 Click Ports and choose the port needed...
Страница 70: ...iT4B User Manual 67 4 Click Next 5 Read and accept the license agreement then click Next...
Страница 71: ...iT4B User Manual 68 6 Select Features and installation location then click Next 7 Click Install...
Страница 72: ...iT4B User Manual 69 8 Click Finish...
Страница 74: ...iT4B User Manual 71 3 Choose Blank Template then click Next...
Страница 77: ...iT4B User Manual 74 6 Edit the side edges then click Next...
Страница 78: ...iT4B User Manual 75 7 Choose the item shape then click Next...
Страница 79: ...iT4B User Manual 76 8 Edit the template size then click Next...
Страница 80: ...iT4B User Manual 77 9 Based on your need edit the template background Then click Next...
Страница 81: ...iT4B User Manual 78 10 Finish the settings showed in the Review and Preview Then click Finish...
Страница 85: ...iT4B User Manual 82 7 Compose the text 8 Finish all the settings Click Print and a new label will be printed...


