iE2P_iE2X User Manual
25
3.5.2 Display Operation
Note:
⚫
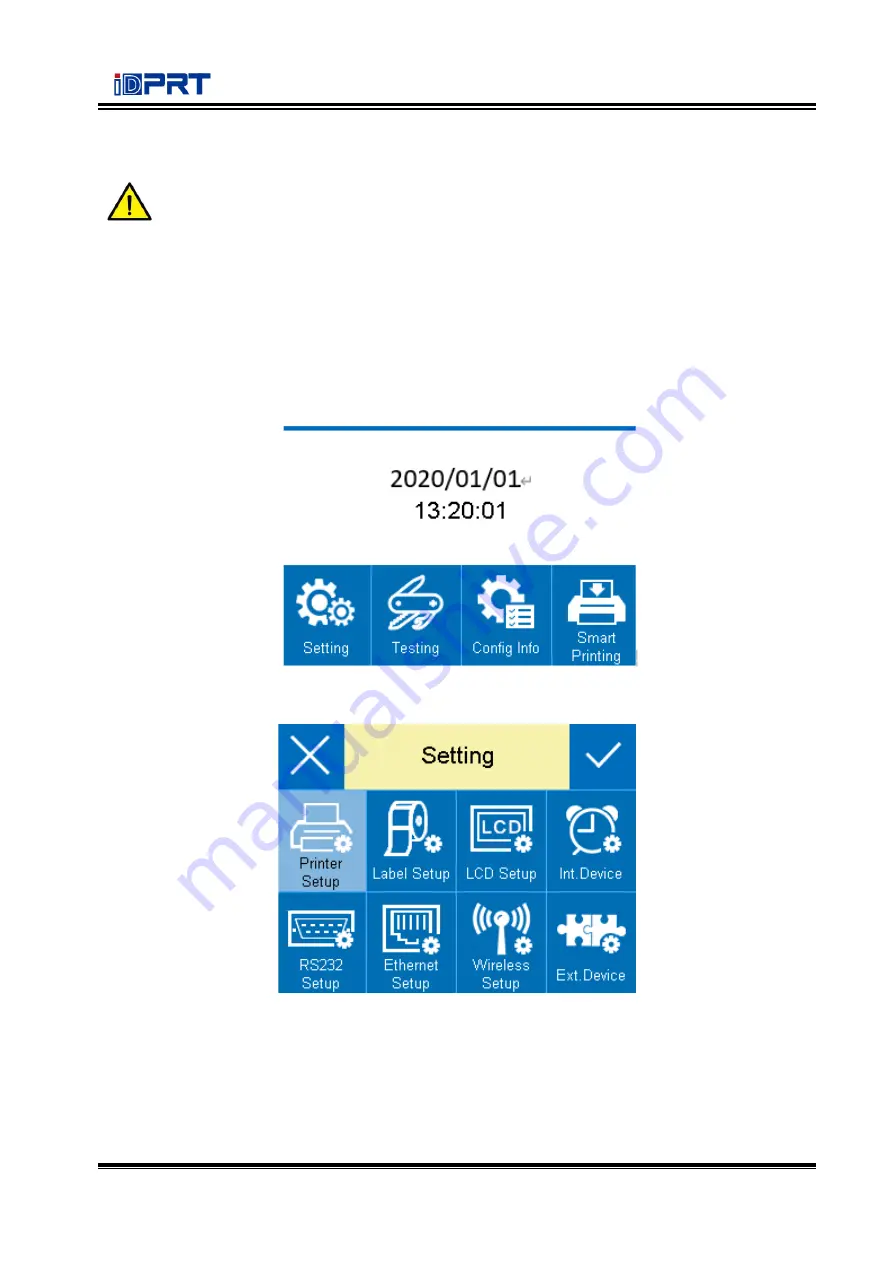
The display operation of printer iE2P is controlled by directional pad.
⚫
The highlighted item represents that user has chosen the item needed.
In the following instructions, the example will be taken to show user how to operate the
printer.
Changing the speed of the printer:
1) Press the power button to open the printer’s power.
2) Enter the home menu.
3) Enter the setting menu, then choose the “Printer Setup” item.
Содержание iE2P
Страница 4: ...iE2P_iE2X User Manual Changes Record Rev Date Description 1 0 2019 12 24 ...
Страница 10: ...iE2P_iE2X User Manual 5 1 2 Appearance and Components Front View Rear View ...
Страница 11: ...iE2P_iE2X User Manual 6 Inside View Note The views above are for your reference Ports vary by your choice ...
Страница 12: ...iE2P_iE2X User Manual 7 1 3 Dimension Take printer iE2P as example Unit mm ...
Страница 22: ...iE2P_iE2X User Manual 17 Figure 2 ...
Страница 24: ...iE2P_iE2X User Manual 19 Figure 5 ...
Страница 42: ...iE2P_iE2X User Manual 37 2 Click Get Printer Information and printer information will show in the above ...
Страница 43: ...iE2P_iE2X User Manual 38 3 Click Get Status and printer status will show in the above ...
Страница 45: ...iE2P_iE2X User Manual 40 5 Click RS 232 then set up the baud rate data bits parity and flow control ...
Страница 47: ...iE2P_iE2X User Manual 42 7 Click Ethernet then click Get to gain the relevant values ...
Страница 48: ...iE2P_iE2X User Manual 43 8 Click WIFI then set up the name password and so on ...
Страница 52: ...iE2P_iE2X User Manual 47 4 You can set a magnification of the graphic as needed ...
Страница 57: ...iE2P_iE2X User Manual 52 7 Click System Click language and choose the language of printer utility ...
Страница 60: ...iE2P_iE2X User Manual 55 5 Choose the installation directory then click Next 6 Click Finish ...
Страница 62: ...iE2P_iE2X User Manual 57 8 Choose the printer then click Next 9 Enter a name for this printer then click Next ...
Страница 63: ...iE2P_iE2X User Manual 58 10 Click Finish ...
Страница 66: ...iE2P_iE2X User Manual 61 2 According to different needs set up the page ...
Страница 67: ...iE2P_iE2X User Manual 62 Click Stock Name and choose the paper type ...
Страница 68: ...iE2P_iE2X User Manual 63 Click New Stock and set up a new stock Click Edit Stock and edit the stock ...
Страница 69: ...iE2P_iE2X User Manual 64 Choose Orientation or Effects showed in the Preview ...
Страница 70: ...iE2P_iE2X User Manual 65 ...
Страница 71: ...iE2P_iE2X User Manual 66 Click Preset Name and back to the default settings ...
Страница 72: ...iE2P_iE2X User Manual 67 Click Manage and change the settings ...
Страница 73: ...iE2P_iE2X User Manual 68 3 Click Graphics and edit the pictures ...
Страница 74: ...iE2P_iE2X User Manual 69 4 Click Stock to set the media settings feed mode and feed options ...
Страница 75: ...iE2P_iE2X User Manual 70 Set up the print method ...
Страница 76: ...iE2P_iE2X User Manual 71 Set up the media type ...
Страница 77: ...iE2P_iE2X User Manual 72 Click Feed Mode Mode and choose the method of media handing ...
Страница 78: ...iE2P_iE2X User Manual 73 5 Click Options to set the darkness and speed ...
Страница 80: ...iE2P_iE2X User Manual 75 2 Click General Print Test Page and printer will print labels with current settings ...
Страница 81: ...iE2P_iE2X User Manual 76 3 Click Ports and choose the port needed ...
Страница 82: ...iE2P_iE2X User Manual 77 4 Click Advanced to set the available time for printer ...
Страница 83: ...iE2P_iE2X User Manual 78 5 Click Tool Action to set all settings into the restore factory setting ...
Страница 86: ...iE2P_iE2X User Manual 81 4 Click Next 5 Read and accept the license agreement then click Next ...
Страница 87: ...iE2P_iE2X User Manual 82 6 Select Features and installation location then click Next 7 Click Install ...
Страница 90: ...iE2P_iE2X User Manual 85 3 Choose Blank Template then click Next ...
Страница 93: ...iE2P_iE2X User Manual 88 6 Edit the side edges then click Next ...
Страница 94: ...iE2P_iE2X User Manual 89 7 Choose the item shape then click Next ...
Страница 95: ...iE2P_iE2X User Manual 90 8 Edit the template size then click Next ...
Страница 96: ...iE2P_iE2X User Manual 91 9 Based on your need edit the template background Then click Next ...
Страница 97: ...iE2P_iE2X User Manual 92 10 Finish the settings showed in the Review and Preview Then click Finish ...
Страница 98: ...iE2P_iE2X User Manual 93 8 4 2 label Edit 1 Click the icon of code 2 Choose the code then click Select ...
Страница 99: ...iE2P_iE2X User Manual 94 3 Click the blank showing the code ...
Страница 100: ...iE2P_iE2X User Manual 95 4 Double click the code and edit it User can set up the size font border and so on ...
Страница 102: ...iE2P_iE2X User Manual 97 7 Compose the text 8 Finish all the settings Click Print and a new label will be printed ...
Страница 112: ...iE2P_iE2X User Manual 107 ...
Страница 113: ...iE2P_iE2X User Manual 108 ...


