5: S
PECIAL
F
UNCTIONS
5-72
S
MART
AXIS P
RO
/ L
ITE
U
SER
'
S
M
ANUAL
FT9Y-B1378
Network Settings
This section describes the network settings of the SmartAXIS.
These settings are used to configure the network to use the SmartAXIS Ethernet port. All SmartAXIS models are equipped with an
Ethernet port except for the 12-I/O type. Configure the SmartAXIS network settings in the same manner as the network settings
for a computer.
The network settings can be configured with either of the methods below.
Automatically acquire an IP address (DHCP)
A DHCP server must be present on the network where the SmartAXIS is located. The SmartAXIS automatically acquires its network settings
from the DHCP server. The network settings are acquired from the DHCP server when the user program is finished downloading and when
the SmartAXIS is turned on.
Use the following IP address
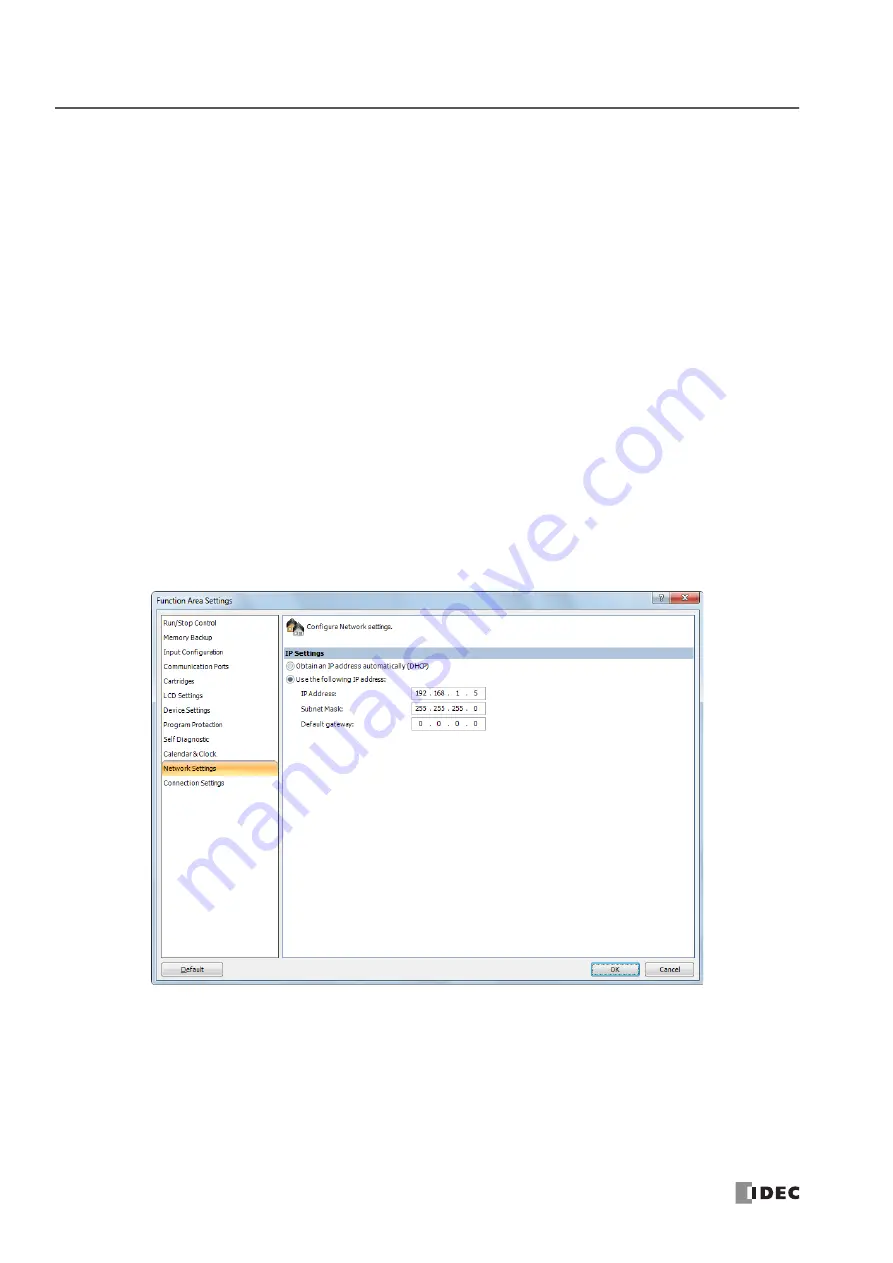
Enter the SmartAXIS network settings as a fixed IP address, subnet mask, and default gateway. The network settings are applied when the
user program is finished downloading. Consult the network administrator regarding the IP address to configure.
Note 1:
The SmartAXIS default settings are: IP address 192.168.1.5, subnet mask 255.255.255.0, default gateway 0.0.0.0.
Note 2:
When automatically acquiring an IP address using DHCP, the same IP address may not be assigned each time depending on the DHCP
server settings and the system configuration on the network where the SmartAXIS is operating. (Example: When using DHCP with two SmartAXIS
and automatically acquiring the IP addresses, the IP addresses for two SmartAXIS may be replaced.) When the SmartAXIS is incorporated in a
system configuration where it is a communication target, we recommend setting a fixed IP address, subnet mask, and default gateway.
Programming WindLDR
1.
Select
Configuration
from the WindLDR menu bar, and then click
Network Settings
.
The Function Area settings dialog box appears.
2.
Select
Obtain an IP address automatically (DHCP)
or
Use the following IP address
.
When
Use the following IP address
is selected, enter the IP address, subnet mask, and default gateway.
3.
Click
OK
.
This concludes configuring the settings.
Содержание SmartAXIS FT9Z-1A01
Страница 1: ...FT9Y B1378 7...
Страница 10: ...TABLE OF CONTENTS Preface 9 SMARTAXIS PRO LITE USER S MANUAL FT9Y B1378...
Страница 212: ...7 DEVICE ADDRESSES 7 16 SMARTAXIS PRO LITE USER S MANUAL FT9Y B1378...
Страница 230: ...8 INSTRUCTIONS FUNCTION BLOCKS REFERENCE 8 18 SMARTAXIS PRO LITE USER S MANUAL FT9Y B1378...
Страница 344: ...13 SCRIPTS 13 36 SMARTAXIS PRO LITE USER S MANUAL FT9Y B1378...
Страница 385: ...SMARTAXIS PRO LITE USER S MANUAL FT9Y B1378 Appendix 15 APPENDIX European Font ISO 8859 1 Cyrillic Font ANSI 1251...
Страница 386: ...APPENDIX Appendix 16 SMARTAXIS PRO LITE USER S MANUAL FT9Y B1378 Japanese Font JIS X0201...
Страница 393: ......


