■
Receiving
Make sure charged battery pack (BP-243) is installed (p. 7).
q
Push and hold
[PWR]
for 1 sec. to turn power ON.
w
Push
[
Y
Y
]
or
[
Z
Z
]
to set the desired audio level.
• The frequency display shows the volume level while setting. See
the section at right for details.
e
Set the receiving frequency. (p. 11)
r
Set the squelch level. (p. 14)
• While pushing and holding
[SQL] (
ATT
•
SET
)
, rotate
[DIAL]
.
• The
fi
rst click of
[DIAL]
indicates the current squelch level.
• “LEVEL 1” is loose squelch (for weak signals) and “LEVEL 9” is
tight squelch (for strong signals).
• “AUTO” indicates automatic level adjustment by a noise pulse
counting system.
• Push and hold
[SQL] (
ATT
•
SET
)
to open the squelch manually.
t
When a signal is received:
• TX/RX indicator lights green.
• Squelch opens and audio is emitted.
• The S/RF meter shows the relative signal strength level.
■
Setting audio volume
The audio level can be adjusted to one of 40 levels.
➥
Push
[
Y
Y
]
or
[
Z
Z
]
to adjust the audio level.
• If squelch is closed, push and hold
[SQL] (
ATT
•
SET
)
to verify the
audio level.
• Pushing and holding either key changes the audio level continu-
ously.
• The display shows the volume level while setting.
SCAN
S.MW
SET
INDICATION
AUDIO LEVEL
Minimum setting
(no audio)
Muximum setting
Initial setting
SCAN
SET
S.MW
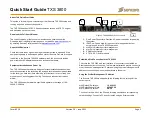
q
[PWR]
e
Set frequency
r
Set squelch level
w
Set audio level
e
Select band
r
Push for setting
the squelch
(Push to monitor)
13
BASIC OPERATION
4