REMOTE-CONTROL MICROPHONE
HM-195
series
INSTRUCTIONS
e
¤3
Receiving DSC calls
D
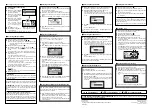
Receiving a Distress Call/Distress Acknowledgement
q
Push [ALARM OFF] to stop the alarm and the blinking backlight.
w
Push a softkey to select your action.
[IGN]
Push to ignore the call and return to the normal
operating mode.
[INFO]
Push to display the Received Call information. (See
¤4
)
[PAUSE]
(For only USA version)
Push to pause the countdown.
• Displayed if the “CH Auto Switch:” item in the DSC
SETTINGS menu is set to “10 sec”(See
¤6
).
• Push [RESUME] to resume the countdown.
[ACPT]
Push to accept the call, then push [CH 16] to switch
the operating channel to Channel 16. After that,
monitor it, as a coast station may require assistance.
D
Receiving a Distress Relay Call/
Distress Relay Acknowledgement
q
Push [ALARM OFF] to stop the alarm and the blinking backlight.
w
Push a softkey to select your action.
[IGN]
Push to ignore the call and return to the normal
operating mode.
[INFO]
Push to display the Received Call information. (See
¤4
)
[PAUSE]
(For only USA version.) Push to pause the countdown.
• Displayed if the “CH Auto Switch:” item in the DSC
SETTINGS menu is set to “10 sec”(See
¤6
).
• Push [RESUME] to resume the countdown.
[ACPT]
Push to accept the call, then push [CH 16] to switch
the operating channel to Channel 16. After that,
monitor it, as a coast station may require assistance.
D
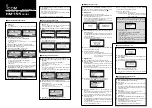
Receiving an Individual Call
q
Push [ALARM OFF] to stop the alarm and the blinking backlight.
• If [ALARM OFF] is not pushed within 2 minutes, the next screen
may appear, depending on the call Category.
w
Push a softkey to select your action.
[IGN]
Push to ignore the call and return to the normal
operating mode.
[INFO]
Push to display the Received Call information. (See
¤4
)
[PAUSE]
(For only USA version.) Push to pause the countdown.
• Displayed if the “CH Auto Switch:” item in the DSC
SETTINGS menu is set to “10 sec”(See
¤6
).
• Push [RESUME] to resume the countdown.
[ACK]
Push to display the “INDIVIDUAL ACK” screen to reply to
the call, and select the channel specified by the calling sta-
tion for voice communication, depending on your situation.
See
¤2
for details of the Individual Acknowledgement
procedure.
When “INDIVIDUAL ACK” is set to “Auto ACK (Unable),” the
transceiver automatically replies to the call. In that case, both
the TX and RX calls are stored in the Transmitted and Re-
ceived Call Logs.
D
Receiving a Group Call/Geographical Area Call/
All Ships Call
q
Push [ALARM OFF] to stop the alarm and the blinking backlight.
• If [ALARM OFF] is not pushed within 2 minutes, the next screen
may appear, depending on the call Category.
w
Push a softkey to select your action.
[IGN]
Push to ignore the call and return to the normal
operating mode.
[INFO]
Push to display the Received Call information. (See
¤4
)
[PAUSE]
(For only USA version.) Push to pause the countdown.
• Displayed if the “CH Auto Switch:” item in the DSC
SETTINGS menu is set to “10 sec”(See
¤6
).
• Push [RESUME] to resume the countdown.
[ACPT]
Push to monitor the channel specified by the calling
station for its announcement.
Note for Geographical Area Call
When no GPS receiver is connected, or if there is a problem
with the connected receiver, all Geographical Area Calls are
received, regardless of your position.
D
Receiving a Position Request Call
q
Push [ALARM OFF] to stop the alarm and the blinking backlight.
• If [ALARM OFF] is not pushed within 2 minutes, the next screen
may appear, depending on the call Category.
w
Push a softkey to select your action.
[IGN]
Push to ignore the call and return to the normal
operating mode.
[INFO]
Push to display the Received Call information. (See
¤4
)
[UNABLE]
(For only USA version.) Push to transmit the “Un-
able to Comply” acknowledgement.
[ABLE]
(For only USA version.) Push to transmit the
“Able to Comply” acknowledgement.
[ACK]
Push to display the “POSITION REPLY” screen
and send a reply to the call. (See
¤2
)
When “POSITION ACK” is set to “Auto TX,” the transceiv-
er automatically replies to the call. In that case, both the
TX and RX calls are stored in the Transmitted and Re-
ceived Call Logs.
D
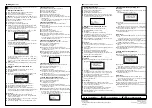
Receiving a Position Report Call
q
Push [ALARM OFF] to stop the alarm and the blinking backlight.
• If [ALARM OFF] is not pushed within 2 minutes, the next
screen may appear, depending on the call Category.
w
Push a softkey to select your action.
[EXIT]
Push to ignore the call and return to the normal op-
erating mode.
[INFO]
Push to display the Received Call information.
(See
¤4
)
D
Receiving a Polling Request Call
q
Push [ALARM OFF] to stop the alarm and the blinking back-
light.
• If [ALARM OFF] is not pushed within 2 minutes, the next
screen may appear, depending on the call Category.
w
Push a softkey to select your action.
[IGN]
Push to ignore the call and return to the normal operat-
ing mode.
[INFO]
Push to display the Received Call information. (See
¤4
)
[ACK]
Push to display the “POLLING REPLY” screen to reply
to the call. (See
¤2
)
When “POSITION ACK” is set to “Auto TX,” the trans-
ceiver automatically replies to the call. In that case, both
the TX and RX calls are stored in the Transmitted and
Received Call Logs.
D
Receiving a Test Call
q
Push [ALARM OFF] to stop the alarm and the blinking backlight.
• If [ALARM OFF] is not pushed within 2 minutes, the next
screen may appear, depending on the call Category.
w
Push a softkey to select your action.
[IGN]
Push to ignore the call and return to the normal operat-
ing mode.
[INFO]
Push to display the Received Call information. (See
¤4
)
[ACK]
Push to display the “TEST ACK” screen to reply to the call. }
(See
¤2
)
When “TEST ACK” is set to “Auto TX,” the transceiver
automatically replies to the call. In that case, both the TX
and RX calls are stored in the Transmitted and Received
Call Logs.
D
Receiving a Test Acknowledgement Call
q
Push [ALARM OFF] to stop the alarm and the blinking backlight.
• If [ALARM OFF] is not pushed within 2 minutes, the next
screen may appear, depending on the call Category.
w
Push [EXIT] to return to the normal operating mode.
¤3
Receiving DSC calls (Continued)
¤4
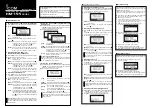
Received Call Log
The transceiver automatically stores up to 50 distress mes-
sages and 50 other messages, and they can be used as a
supplement to your logbook.
• While in the normal operating mode, “
” blinks in the upper
right corner of the LCD when there is an unread message.
q
Push [LOG] to enter “RCVD CALL LOG” in the DSC CALLS
menu, or you can enter it through the Menu screen.
w
Select “Distress” or “Others.”
• The Distress messages are stored in “Distress.”
• The messages other than the Distress are stored in “Others.”
• “
” appears when there are unread messages.
• “
” appears when there are no unread messages.
• No icon appears when there are no messages.
e
Select the message.
• The message in the unopened file has not been read.
r
Rotate Dial to scroll the message contents.
t
To delete the displayed message, push [DEL].
• A confirmation screen appears, then push [OK] to delete.
y
Push [EXIT] to return to the normal operating mode.
¤5
Transmitted Call Log
The transceiver automatically stores up to 50 transmitted calls,
and the logs can be used as a supplement to your logbook.
q
Enter “TX CALL LOG” in the DSC CALLS menu.
w
Select the message.
Rotate Dial to scroll the message contents.
r
To delete the displayed message, push [DEL].
• The confirmation screen appears, then push [OK] to delete.
t
Push [EXIT] to return to the normal operating mode.
When “Distress” is selected in step
w
.
In this INSTRUCTIONS, the IC-M423/IC-M424 series is used
for an example.
•
Some functions and DSC calls may not be usable depending
on the transceiver model or version.
•
Some screen, function name, and softkey name may be differ-
ent, depending on the transceiver.
See the transceiver’s manual for detail operation.


