background image

5

6D

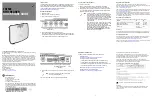
Take one of the pneumatic wheels. Push the wheel 

through the axle. Make sure the valve is located on the 

outside.

Take the long cotter pin and place it through the hole on 

the axle on the inside of the wheel.

6E

Attach the other pneumatic wheel. Take the small cotter 

pin (Item 5C) and the wheel washer (5B). Place the 

wheel washer over the axle and slide the cotter pin (item 

5C) into the holes to fix the second wheel.

6F

Use the pliers to split the cotter pins on both sides.

6G

8

Thread the M6x35 bolt through the handle bar hole (Item 

2) and lower frame (Item 7). Use the M6 wingnut to tighten. 

Repeat on opposite side.

ASSEMBLING THE HANDLE BAR AND CONTROL ROD:

Flip the spreader onto its wheels and ensure they turn 

freely. Align the holes at the bottom of the handle bar 

(Item 2) with the holes at the top of the lower frame 

(Item 7). You may need to pull the ends apart slightly to 

place in position.

7

Assembling your


AccuPro ONE

7

5I

5H

Содержание AccuPro ONE

Страница 1: ...AccuPro ONE Manual www icl growingsolutions com...

Страница 2: ...ts package 5A Axle bearing X2 5B Wheel Washer 5C Small Cotter pin 5D Large Cotter pin 5E Agitator 5F M6x60 Bolts X4 5G M6 lock nuts X4 5H M6 X35 Bolts 5I M6 Wing Nut X2 6 Axle 7 Lower Frame X2 8 Contr...

Страница 3: ...ket 12 1 22 Push the free end of the lower linkage 13 through the center hole of the shutter plate 2 Secure the lower linkage 13 in place using the R pin small 11C as shown 3 Take the two lower frames...

Страница 4: ...The arrow should point away from the stand 3 6B Feed the axle 6 through the hole without the axle bearing Item 5A push it through the hole in the centre of the gearbox and through the hole Item 5A on...

Страница 5: ...pin item 5C into the holes to fix the second wheel 6F Use the pliers to split the cotter pins on both sides 6G 8 Thread the M6x35 bolt through the handle bar hole Item 2 and lower frame Item 7 Use the...

Страница 6: ...per are fully open and the control lever is set at 25 IMPORTANT 9 Protruding from the back of the hopper body Item 9 is a V shaped metal bracket Item 12 pivot bracket Clip the L shaped end of the cont...

Страница 7: ...a single or double pass apllication method as shown in images A single pass or image B double pass taking into account the spread width of the material being applied single pass double pass Step 3 Cl...

Страница 8: ...3 ICL Koeweistraat 4 4181 CD Waardenburg The Netherlands Tel 31 0 418 655 700 Email info iclsf com For further information contact your ICL Technical Area Sales Manager or visit www icl growingsolutio...

Отзывы: