background image


 System Area  


STD20         Gross - 2.856m²    Aperture - 1.881m²     Absorber - 1.632m² 

STD30         Gross - 4.286m²    Aperture - 2.822m²     Absorber - 2.448m² 


  System Weight

STD20           Stand - 3.5Kgs      Gross - 63Kgs             Net - 61.3Kgs

STD30           Stand - 5Kgs         Gross - 94Kgs             Net - 91.99Kgs


Manifold’s Capacity

STD20                                                 1.1L

STD30                                                 1.7L 

SYSTEM SPECIFICATIONS

Evacuated Tube Specifications
Total Weight 2.0 kg

Tube:

Overall Length 1815mm 

Outer Diametre 58mm 

Inner Tube Inside Diametre 44mm 

Inner Tube Outside diametre 47mm 

Copper Heatpipe:

Diametre 8mm 

Overall length 1792mm 

Transfer section Diametre 14mm 

Transfer section length 60mm 

FRAME & STAND ASSEMBLY STD20 - 30

Stand is for flat roof or elevating to different pitch to the roof

30 Tube 2100mm width maximum

20 Tube 1400mm wdith maximum

1. Front Track 2. Bottom Track 3. Side Supports 4. Back Stands Upper Bar

5. Back Stands Lower Bar 6. X Back Supports 7. Feet

Adjustable Angle Range: 26°(L=1650, 34°(L=1545, 37°(L=1469, 42°(L=1381, 46°(L=1278)

•  Adjustable angle range between 26° - 46° Degrees.

•  Sections 4 and 5 should be set to suitable height, adjust these first and bolt together.

•  Sections 3 and 6 should be accurately adjusted and cut to suit the panels height.

•  Bolt holes may need to be re drilled to be able to assemble at desired height.
1.  Outrigger: 35mm wide x 30mm height x 3mm powdercoated Aluminium ‘U’ channel.

2.  Bottom Rail: 60mm wide x 45mm height x 3mm powdercoated Aluminium extrusion.

3.  Outrigger Brace: 22mm wide x 12mm height x 3mm powdercoated Aluminium ‘U’ channel. 

4.  Top section adjustable leg: 35mm wide x 30mm height x 3mm powdercoated Aluminium ‘U’ 

channel.

5.  Bottom section adjustable leg: 40mm wide x 33mm height x 3mm powdercoated  Aluminium 

‘U’ channel.

6.  Back brace: 23mm wide x 13mm deep x 3mm powdercoated Aluminium ‘U’ channel.

7.  Feet: 44mm x 32mm x 3mm powdercoated Aluminium.

Frame bolts: all 7mm diametre shaft A4 Stainless Steel, Sizes 15mm, 30mm, 55mm.

Fixing point hole mesurements

from top of rail to center of hole

A:330mm B:370mm 

C:1000mm D:1040mm 

E:1660mm F:1710mm

Содержание STD20

Страница 1: ...lar energy equipment If you have any questions please contact us Commissioning with Customer Please ask customer to be available at the end of the day estimated completion time for commissioning and to go through user operation INSTALLATION INSTRUCTION MANUAL June 2020 ...

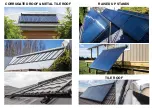
Страница 2: ...RAISED UP STANDS TILE ROOF CORRUGATED ROOF METAL TILE ROOF ...

Страница 3: ...L 1545 37 L 1469 42 L 1381 46 L 1278 Adjustable angle range between 26 46 Degrees Sections 4 and 5 should be set to suitable height adjust these first and bolt together Sections 3 and 6 should be accurately adjusted and cut to suit the panels height Bolt holes may need to be re drilled to be able to assemble at desired height 1 Outrigger 35mm wide x 30mm height x 3mm powdercoated Aluminium U chann...

Страница 4: ...turer s roof fixing requirements 6 Drill a clearance hole for the roof mounting screw only slightly larger than the roof screw and small enough that the roofing washer can provide a nice seal against roofing material when tightened ie place roofing washer between roofing material and HDPE block see roof fixing details 7 When marking roof fixing points on U channel select the most suitable purlins ...

Страница 5: ...ible Here is an installation displaying a thermal break for hot and cold 4 way valve is inserted into hole drilled through inner baffle in cylinder 4 way valve usually takes the cold feed however in this example the cold feed is on the bottom left of image as this cylinder has two bottom ports ...

Страница 6: ...EVENLY SPREAD HEAT PAST AROUND TUBE TIP ROOF FIXING METHODS TOPHAT PURLIN ...

Страница 7: ...00mm then back up into the cylinder This prevents heat loss by heat drifting up the line This is particularly important for solar wetback installations and low pressure installations The circulation pump must be installed to draw the cooler water from the lower section of the cylinder and circulate this water through the collector before returning back to the cylinder at a point higher than the dr...

Страница 8: ...through the cap then insert the probe all the way into the horizontal thermocouple sleeve inside the cylinder Apply neutral cure sili cone just inside the outer casing of the cylinder under the cap then insert the cap Use tape to hold cable in place for minimum 24 hours to allow silicone to cure Once probes are secure clip cables using cable ties back to terminal box and trim excess cable to make ...

Страница 9: ...priority ie TH1 If only evening users of hot water set late afternoon heating back up as priority TH3 SETTING UP THE CONTROLLER Set Points are as per Owner Manual If there has been a power surge it is a good idea to check the controller to en sure settings have not reverted back to factory setting Ie if frost symbol has disappeared or T4 is not showing on screen when scrolling through parameters p...

Страница 10: ...ommended to have separate switching for elements independent of the controller otherwise an element can be accidently left on reducing the performance of the controller Please ensure the end user understands how the system is connected CAUTION Ripple or intermittent power can restrict use of intelligent time heating backup time heating and manual heating functions of controller For full user contr...

Страница 11: ...flooding through house not common This could happen where heat has got through to Polypropylene pipe and melted it Ensure that only copper is used where this can occur NB heat can travel up the cold supply pipe when the whole cylinder is HOT May require thermal trap on the cold supply bare copper pipe in a loop Check that the heat dump at the TPR valve can drain away without backing up and floodin...

Страница 12: ... when fill of water F Solar to be installed as to not compromise the structural integrity of the building G Please use appropriate fixings per roof type as contained in this manual for roof types outside of these then refer to Engineering manual otherwise specific engi neer design required and be certain that you do not use dissimilar metals that can cause corrosion H Controller manual and install...

Страница 13: ...Leading Solar Specialists Ice Solar Ltd 0064 3 3554323 gordon icesolar co nz View Our Online Store Scan to download manuals consent Scan to access www icesolar co nz Thank you for choosing Ice Solar ...

Отзывы: