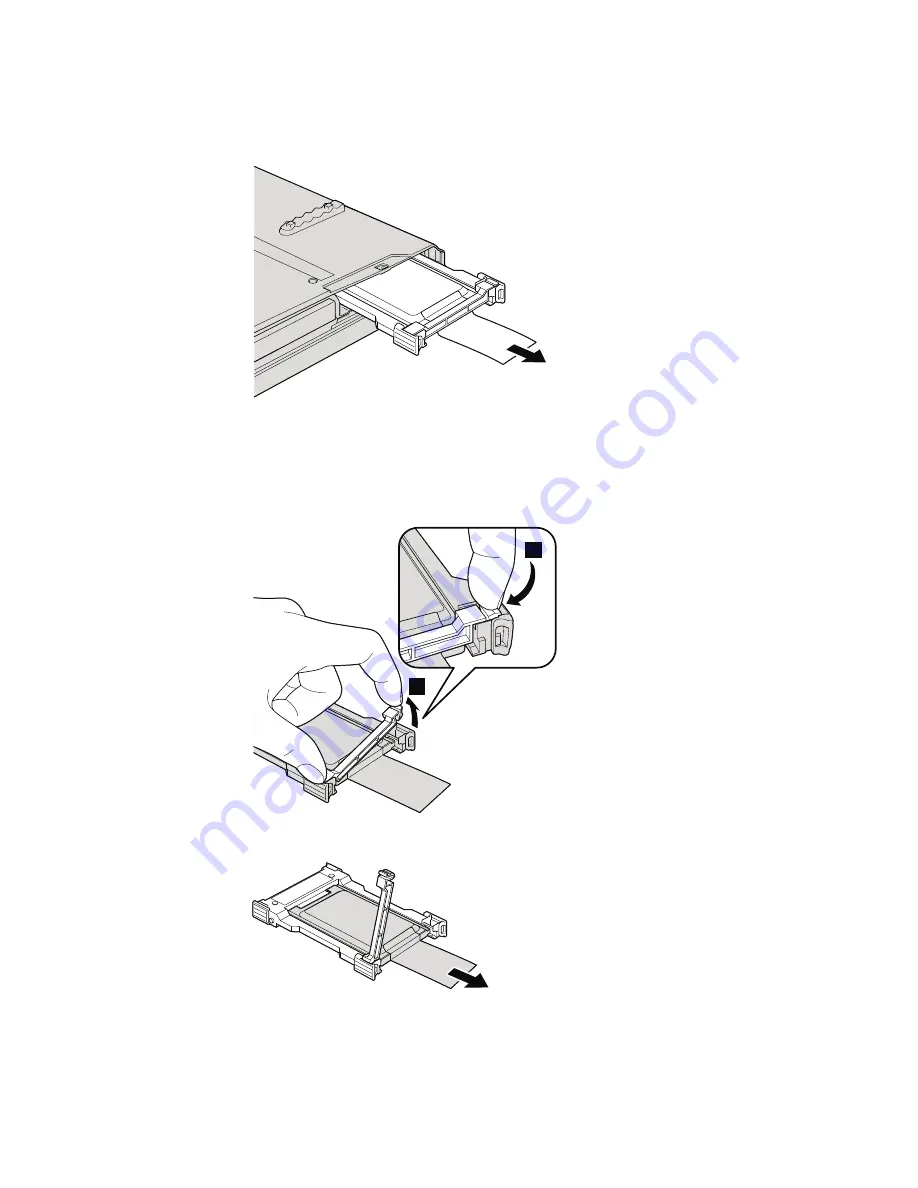
background image

6.

Remove the SSD by pulling out the tab.

7.

Release the latch with your finger in the direction shown by the arrow

1

, and lift up the bar

2

.

Note:

Do not remove the rubbers attached to the side of the adapter. To

do so requires pulling hard, possibly damaging or breaking them.

2

1

8.

Remove the SSD from the adapter.

46

ThinkPad

®

T500 and W500 Service and Troubleshooting Guide

Содержание ThinkPad T500 - LENOVO - Genuine Windows 7 Home Premium...

Страница 1: ...ThinkPad T500 and W500 Service and Troubleshooting Guide...

Страница 2: ......

Страница 3: ...ThinkPad T500 and W500 Service and Troubleshooting Guide...

Страница 4: ...support click Troubleshooting and then click User s guides and manuals Second Edition June 2008 Copyright Lenovo 2008 All rights reserved LENOVO products data computer software and services have been...

Страница 5: ...roblems 24 Sleep standby or hibernation problems 25 Computer screen problems 27 Battery problems 30 AC adapter problems 30 Hard disk drive HDD or solid state drive SSD problems 31 Fingerprint reader p...

Страница 6: ...Compliance 76 Japanese VCCI Class B statement 77 EU WEEE Statements 77 Notice for users in the U S A 77 ENERGY STAR model information 78 Notice for Regulatory information 80 Trademarks 81 Index 83 iv...

Страница 7: ...use discomfort or even a skin burn v Avoid keeping your hands your lap or any other part of your body in contact with a hot section of the computer for any extended time v Periodically take breaks fro...

Страница 8: ...uter equipped with a hard disk drive do one of the following and make sure that the power on indicator is off Turn it off Press Fn F4 to put it in sleep standby mode Press Fn F12 to put it in hibernat...

Страница 9: ...ine manual called Access Help preinstalled on your ThinkPad computer is a comprehensive online manual that provides answers to most of your questions about your computer helps you to configure preload...

Страница 10: ...inkVantage button can help you in many situations when your computer is working normally and even when it is not Press the ThinkVantage button to open the ThinkVantage Productivity Center or Lenovo Ca...

Страница 11: ...s in boldface Comments Fingerprint reader v Enabled If you select Disabled the integrated fingerprint reader is disabled and you cannot use it v Disabled By default the integrated fingerprint reader i...

Страница 12: ...4 ThinkPad T500 and W500 Service and Troubleshooting Guide...

Страница 13: ...lose to such an appliance and is exposed for an extended time to air containing negative ions it may become electrostatically charged Such a charge may be discharged through your hands when you touch...

Страница 14: ...ld it by the bottom Do not pick up or hold your computer by the display Connect the internal modem correctly v Your computer modem might use only an analog telephone network or public switched telepho...

Страница 15: ...such as xD Picture Card SD Card Memory Stick and MultiMediaCard Communication Daughter Card Note When transferring data to or from a Flash Media Card such as an SD card do not put your computer in sl...

Страница 16: ...ith the clean sponge 8 Wipe the surface again with a dry soft lint free cloth 9 Wait for the surface to dry completely and remove any cloth fibers from the computer surface Cleaning your computer keyb...

Страница 17: ...ure of isopropyl alcohol and water that does not contain impurities 4 Wring out as much of the liquid as you can 5 Wipe the display again do not let any liquid drip into the computer 6 Be sure to dry...

Страница 18: ...10 ThinkPad T500 and W500 Service and Troubleshooting Guide...

Страница 19: ...ications for my ThinkPad computer See http www lenovo com think support I need to upgrade a device or I need to replace one of the following the HDD the SSD the PCI Express Mini Card the Modem Daughte...

Страница 20: ...details see Basics in Access Help 2 Turn off the computer and then turn it on again 3 When the ThinkPad logo comes up immediately press F1 to enter the BIOS Setup Utility If you have set a supervisor...

Страница 21: ...mation v Running any tests may take up to several minutes or longer Make sure you have time to run the entire test do not interrupt the test while it is running When preparing to contact the Customer...

Страница 22: ...ed test failed v Error code 0202 Controller Diag failed 6 If the diagnostic program returns no error message but you still have some concerns v See the instructions in the Introducing Rescue and Recov...

Страница 23: ...ts Checksum of the startup sequence setting in the EEPROM is not correct Press F1 to enter the BIOS Setup Utility Press F9 and then Enter to load the default setting Press F10 and then Enter to restar...

Страница 24: ...hen turn on the computer Make sure that the built in keyboard operates correctly If it does have the external keyboard serviced v Make sure that the external keyboard is connected to the correct conne...

Страница 25: ...ee the same error code have the computer serviced 1802 Unauthorized network card is plugged in Power off and remove the miniPCI network card The Mini PCI network card is not supported on this computer...

Страница 26: ...d press Enter If you still see the same error message have the computer serviced The hard disk password prompt An HDD or SSD password is set Type the password and press Enter to use the computer If yo...

Страница 27: ...that the operating system has no failure and is installed correctly Excluded from boot order Open the BIOS Setup Utility and add the device to boot order Beep errors One short beep pause three short b...

Страница 28: ...ss error 0188 Invalid RFID serialization information area 0189 Invalid RFID configuration information area 0192 System Security Embedded Security hardware tamper detected 0260 System timer error 0270...

Страница 29: ...rrect password and press Enter 3 If these items are set properly and the screen remains blank have the computer serviced Problem When I turn on the machine only a white cursor appears on a blank scree...

Страница 30: ...r hibernation Problem The computer does not respond Solution 1 Turn off the computer by pressing and holding the power switch for 4 seconds or more 2 If the computer still does not respond remove and...

Страница 31: ...C Doctor for Windows If you cannot startup Windows use PC Doctor from the service partition on your hard disk drive Password problems Problem You forgot your password Solution v If you forget your pow...

Страница 32: ...g properly If keys on the keyboard still do not work have the computer serviced Problem A number appears when you type a letter Solution The numeric lock function is on To disable it press and hold Sh...

Страница 33: ...e following v Connect the AC adapter to the computer and plug it into an electrical outlet v Replace the battery with a fully charged one Problem When you take action to return from sleep standby mode...

Страница 34: ...the AC adapter and the battery Problem The computer enters sleep standby mode unexpectedly Solution 1 Make sure that the settings in Power Manager are set properly a Start Power Manager by clicking St...

Страница 35: ...istors TFTs A small number of missing discolored or bright dots on the screen might exist all the time Problem The screen is blank Solution 1 Do the following v Press Fn F7 to bring up the image Note...

Страница 36: ...formation window Note The device driver name depends on the video chip that has been installed on your computer 6 Click the Properties button If you are prompted for an administrator password or confi...

Страница 37: ...perly If not click the Troubleshoot button 7 Click the Monitor tab 8 Make sure that the information is correct 9 Click the Properties button Check the Device status box and make sure that the device i...

Страница 38: ...Discharge and recharge the battery AC adapter problems Problem The AC adapter is connected to the computer and the working electrical outlet but the power adapter power plug icon is not displayed on...

Страница 39: ...security function If you have set a hard disk password with Using Passphrase enabled in the BIOS Setup Utility and want to use the HDD or SSD in an older computer 1 Remove the hard disk password on y...

Страница 40: ...ress F1 to enter the BIOS Setup Utility 4 Remove all other passwords 5 Set Using Passphrase as enabled or disabled whichever was its setting when you set the hard disk password 6 Save the change and e...

Страница 41: ...erprint To improve the situation try the following v If your hands are too dry apply lotion to them v Clean or wipe your hands to remove any excess dirt or moisture from the fingers v Enroll and use a...

Страница 42: ...immediately press F1 to enter the BIOS Setup Utility 3 Select Startup and press Enter 4 Select Boot and press Enter 5 Make sure that v The device is included in the Boot priority order list v The dev...

Страница 43: ...state drive SSD With Lenovo technologies advancing to provide you with the best engineered systems some models are equipped with a solid state drive SSD for data storage This cutting edge technology e...

Страница 44: ...rive partition usually drive C will be deleted in the recovery process However before any data is overwritten you will be given the opportunity to save one or more files to other media v If your optic...

Страница 45: ...e and Recovery program you also have one or more backups stored that reflect the contents of the HDD or SSD as it existed at various points in time These backups might be stored on your HDD or SSD or...

Страница 46: ...38 ThinkPad T500 and W500 Service and Troubleshooting Guide...

Страница 47: ...attery To replace the battery do the following 1 Turn off the computer or enter hibernation mode Then disconnect the AC adapter and all cables from the computer 2 Close the computer display and turn t...

Страница 48: ...lly charged battery 5 Slide the battery latch to the locked position 6 Turn the computer over again Connect the AC adapter and the cables to the computer 40 ThinkPad T500 and W500 Service and Troubles...

Страница 49: ...g v The Rescue and Recovery workspace and the Product Recovery program are not included on an optional drive Attention Handling an HDD or an SSD v Do not drop the drive or subject it to physical shock...

Страница 50: ...isconnect the AC adapter and all cables from the computer 2 Close the computer display and turn the computer over 3 Remove the battery 4 Remove the screw that secures the slot cover 5 Remove the slot...

Страница 51: ...6 Remove the HDD by pulling out the tab 7 Detach the side rubber rails form the HDD 8 Attach the side rubber rails to a new HDD Chapter 5 Upgrading and replacing devices 43...

Страница 52: ...it firmly into place 10 Reinstall the slot cover 11 Reinstall the screw 12 Reinstall the battery 13 Turn the computer over again Connect the AC adapter and the cables to the computer 44 ThinkPad T500...

Страница 53: ...r then disconnect the AC adapter and all cables from the computer 2 Close the computer display and turn the computer over 3 Remove the battery 4 Remove the screw that secures the slot cover 5 Remove t...

Страница 54: ...direction shown by the arrow 1 and lift up the bar 2 Note Do not remove the rubbers attached to the side of the adapter To do so requires pulling hard possibly damaging or breaking them 2 1 8 Remove t...

Страница 55: ...ew SSD into the adapter 1 Put the bar back in place and set the latch 2 2 1 10 Insert the SSD into the slot then press it firmly into place 11 Reinstall the slot cover Chapter 5 Upgrading and replacin...

Страница 56: ...memory slot of your computer SO DIMMs with different capacities are available Note Use only the memory types supported by your computer If you incorrectly install the optional memory or install an uns...

Страница 57: ...t secure the palm rest b Turn the computer over and open the display Open up the palm rest in the direction shown by arrow 1 by picking up the sides and then release the palm rest from the computer 2...

Страница 58: ...DIMMs are already installed in the memory slots remove an SO DIMM to make room for the new one by pressing out on the latches on both edges of the socket at the same time Be sure to save it for futur...

Страница 59: ...about 20 degrees 1 then press it firmly 2 Note If you install a memory module in only one of the two memory slots install it in the lower slot 1 2 2 1 9 Pivot the SO DIMM downward until it snaps into...

Страница 60: ...your model has a touch pad or a fingerprint reader attach the connector of the palm rest cable b Press the left and right top edges of the palm rest to fit it into place 52 ThinkPad T500 and W500 Ser...

Страница 61: ...Turn the computer over and reconnect the AC adapter and the cables to the computer To make sure that the SO DIMM is installed correctly do as follows 1 Turn on the computer 2 When the ThinkPad logo c...

Страница 62: ...54 ThinkPad T500 and W500 Service and Troubleshooting Guide...

Страница 63: ...n please contact the Customer Support Center at the phone number s listed in Worldwide telephone list on page 57 Some fees might apply Getting help on the Web The Lenovo Web site on the World Wide Web...

Страница 64: ...Warranty then follow the instructions on the screen For the terms and conditions of the Lenovo Limited Warranty that applies to your Lenovo hardware product see Chapter 3 Warranty information in the...

Страница 65: ...ervicing country Service centers in certain countries might not be able to service all models of a particular machine type In some countries fees and restrictions might apply at the time of service To...

Страница 66: ...imedia Home PC 800 938 228 Hong Kong Cantonese English Mandarin China Macau S A R ThinkPad Technical enquiry hotline 0800 839 Macau ThinkPad Service Center 2871 5399 Macau Multimedia Home PC 0800 336...

Страница 67: ...and support English Israel Givat Shmuel Service Center 972 3 531 3900 Hebrew English Italy 39 800 820094 Warranty service and support Italian Japan ThinkPad Products Toll Free 0120 20 5550 Internation...

Страница 68: ...6999 Portugal 351 21 892 7046 Portuguese Romania 4 021 224 4015 Russia Moscow 7 495 258 6300 Toll free 8 800 200 6300 Russian Singapore 1800 3172 888 English Bahasa Melayu Slovakia 421 2 4954 5555 Slo...

Страница 69: ...y support English United States 1 800 426 7378 English Uruguay 000 411 005 6649 Spanish Venezuela 0 800 100 2011 Spanish Vietnam For northern area and Hanoi 84 4 843 6675 For southern area and Ho Chi...

Страница 70: ...62 ThinkPad T500 and W500 Service and Troubleshooting Guide...

Страница 71: ...ts and Labor 3 years 3 Battery pack 1 year 1 Japan Parts and Labor 1 year 3 Battery pack 1 year 1 Other Parts and Labor 3 years 4 Battery pack 1 year 1 2056 2241 4063 All Parts and Labor 3 years 2 Bat...

Страница 72: ...f warranty service designated for your product An optional service offering may be available for purchase from Lenovo to have Lenovo install Self service CRUs for you You may find a list of CRUs and t...

Страница 73: ...repaired or exchanged it will be made available for your collection Failure to collect the product may result in your Service Provider disposing of the product as it sees fit For Mail in Service the p...

Страница 74: ...66 ThinkPad T500 and W500 Service and Troubleshooting Guide...

Страница 75: ...cards notebook keyboards and palm rests with fingerprint reader and touchpad may also be CRUs v Optional service CRUs these CRUs are isolated parts within the computer that are concealed by an access...

Страница 76: ...puter and tells where to find the replacement instructions Service and Troubleshooting Guide Setup Instructions Access Help Online Hardware Maintenance Manual Online Video Self service CRUs AC adapter...

Страница 77: ...or display uses TFT technology v Size 15 4 inch 391 mm Resolution LCD 1920 by 1200 1680 by 1050 1280 by 800 External monitor Up to 2560 by 1600 v Brightness control v ThinkLight v Integrated camera on...

Страница 78: ...v Fingerprint reader on some models Specifications Size v Width 357 5 mm 14 1 inch v Depth 255 mm 10 0 inch v Height 29 7 to 33 5 mm 1 17 inch to 1 32 inch Environment v Maximum altitude without pres...

Страница 79: ...50 to 60 Hz v Input rating of the AC adapter 100 240 V AC 50 to 60 Hz Battery pack v Lithium ion Li Ion battery pack Nominal voltage 10 8 V Capacity 5 2 AH or 7 8 AH depending on the model Battery li...

Страница 80: ...72 ThinkPad T500 and W500 Service and Troubleshooting Guide...

Страница 81: ...f Licensing LENOVO PROVIDES THIS PUBLICATION AS IS WITHOUT WARRANTY OF ANY KIND EITHER EXPRESS OR IMPLIED INCLUDING BUT NOT LIMITED TO THE IMPLIED WARRANTIES OF NON INFRINGEMENT MERCHANTABILITY OR FIT...

Страница 82: ...oduct is subject to the United States Export Administration Regulations EAR and has an Export Classification Control Number ECCN of 4A994 b It can be re exported except to any of the embargoed countri...

Страница 83: ...any interference received including interference that may cause undesired operation Responsible party Lenovo United States Incorporated 1009 Think Place Building One Morrisville NC 27560 Telephone 1...

Страница 84: ...Produkt ohne Zustimmung der Lenovo ver ndert bzw wenn Erweiterungskomponenten von Fremdherstellern ohne Empfehlung der Lenovo gesteckt eingebaut werden Deutschland Einhaltung des Gesetzes ber die ele...

Страница 85: ...t to be thrown away but rather reclaimed upon end of life per this Directive Users of electrical and electronic equipment EEE with the WEEE marking per Annex IV of the WEEE Directive must not dispose...

Страница 86: ...46 2247 2261 4058 4061 4062 4063 4064 4065 By using ENERGY STAR qualified products and taking advantage of the power management features of your computer you can help reduce the consumption of electri...

Страница 87: ...If you do not need to have Wake on LAN set to Enable while your computer is in Sleep or Standby mode you can reduce the power consumption and prolong the time in Sleep or Standby mode by switching th...

Страница 88: ...ick OK Notice for Regulatory information The latest Regulatory Notice has been uploaded on the Web site To refer to it go to http www lenovo com think support click Troubleshooting and then click User...

Страница 89: ...of International Business Machines Corporation in the United States other countries or both Intel is a registered trademark of Intel Corporation or its subsidiaries in the United States and other coun...

Страница 90: ...82 ThinkPad T500 and W500 Service and Troubleshooting Guide...

Страница 91: ...negative ions 5 notices 73 electronic emissions 74 EU environmental 77 Export classification 74 FCC statement 74 for US users 77 Regulatory information 80 P packing material 5 password setting 7 troub...

Страница 92: ...reader 33 keyboard 24 memory 23 password 23 pointing device 24 sleep or hibernation 25 startup problems 33 storage device 31 U upgrading devices 39 W warranty information 63 Web help 55 worldwide sup...

Страница 93: ......

Страница 94: ...Part Number 44C9800 Printed in China 1P P N 44C9800...

Отзывы: