background image

15

Personnalisation de l’affichage

F

EN

D

ES

I

Personnalisation de l’affichage

Personnalisation de l’affichage

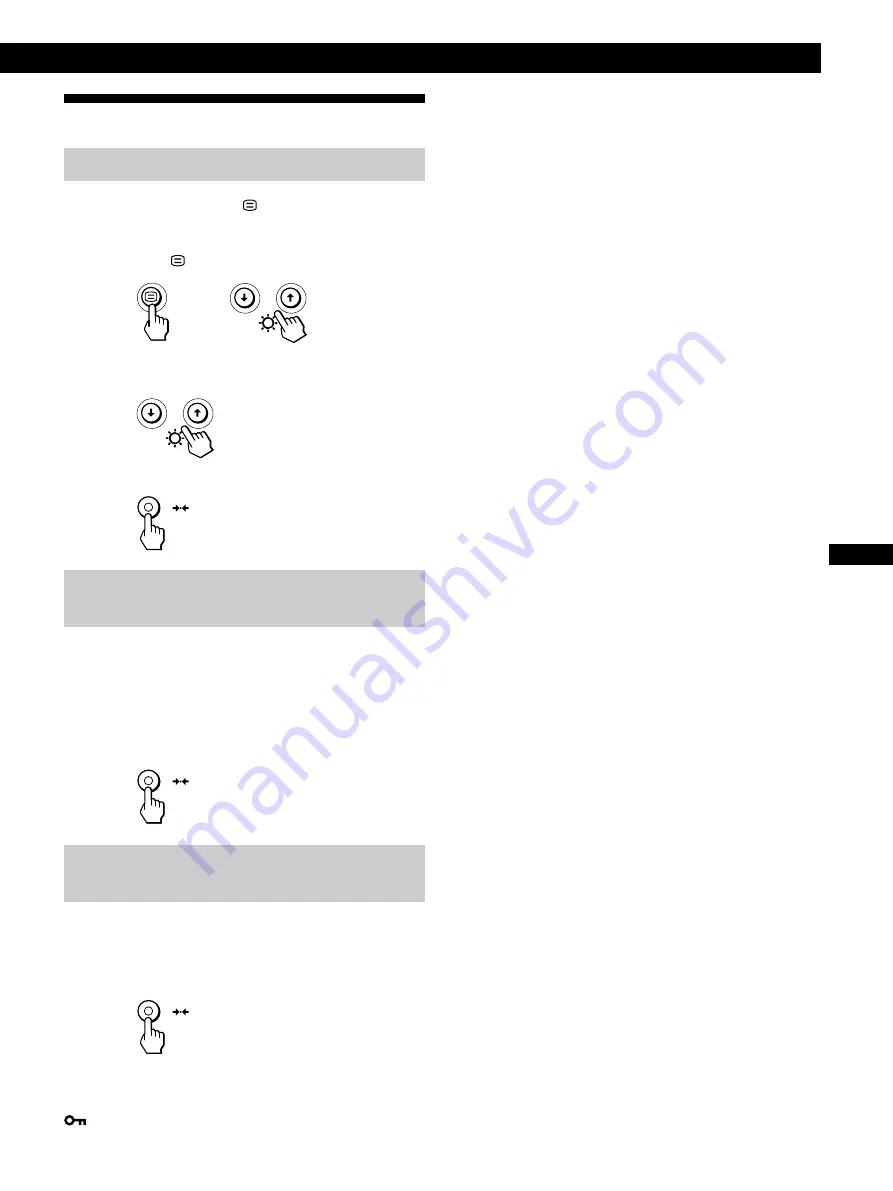
Réinitialisation des réglages

Réinitialisation d’un paramètre de réglage

1

Appuyez sur les touches 

 et 

.

/

>

 pour sélectionner

l’écran de menu contenant le paramètre que vous
voulez réinitialiser et appuyez ensuite de nouveau
sur la touche 

.

2

Appuyez sur les touches 

.

/

>

 pour sélectionner le

paramètre que vous voulez réinitialiser.

3

Appuyez sur la touche 

?

 (réinitialisation).

Réinitialisation de toutes les données de
réglage pour le signal d’entrée en cours

Alors qu’aucun écran de menu n’est affiché, appuyez sur
la touche 

?

 (réinitialisation).

Toutes les données de réglage pour le signal d’entrée en
cours sont ramenées aux valeurs de réglage par défaut.
Sachez que la réinitialisation du signal en cours n’affecte pas
la luminosité et le contraste, la langue d’affichage sur écran,
la position sur écran et le verrouillage des commandes.

Réinitialisation de toutes les données de
réglage pour tous les signaux d’entrée

Maintenez la touche 

?

 (réinitialisation) enfoncée

pendant au moins deux secondes.

Toutes les données de réglage, y compris la luminosité et le
contraste, sont ramenées aux valeurs de réglage par défaut.

Remarque

La touche 

?

 (réinitialisation) ne fonctionne pas lorsque

 (MENU VERROUILLE) est mis sur ON.

Содержание P96

Страница 1: ...Operating Instructions Mode d emploi Bedienungsanleitung Manual de instrucciones Istruzioni per l uso P96 Color Monitor F EN D ES I ...

Страница 2: ......

Страница 3: ...FAHRENHINWEISE Um die Gefahr eines elektrischen Schlags zu vermeiden folgendes beachten Unter keinen Umständen die Abdeckungen abnehmen Das Produkt nicht in Betrieb nehmen wenn der Sockel nicht montiert ist Das Gerät nicht während eines Gewitters an eine Steckdose anschließen oder von ihr trennen Das Netzkabel ist an eine ordnungsgemäß verdrahtete und geerdete Steckdose anzuschließen Jedes Gerät m...

Страница 4: ...ccare la spina dalla presa di alimentazione che deve essere facilmente accessibile Manipulación El monitor de color es pesado por lo que debe manipularlo con cuidado IBM recomienda moverlo con la ayuda de dos personas PERIGO Para evitar o perigo de choques eléctricos Não retire as coberturas Não utilize este produto antes de montar a base Não ligue nem desligue este produto durante uma tempestade ...

Страница 5: ... eller lyfts av två personer VAARA Sähköiskun vaaran välttämiseksi Älä avaa laitteen kansia missään tilanteessa Älä käytä laitetta ellei jalustaa ole kiinnitetty Älä kytke laitetta pistorasiaan tai irrota sitä pistorasiasta ukonilman aikana Virtajohto on kytkettävä asianmukaisesti johdotettuun ja maadoitettuun pistorasiaan Kaikki muutkin laitteet joihin tämä tuote on liitetty on kytkettävä asianmu...

Страница 6: ...lantıları usulüne uygun olarak yapılmış bir prize takılmalıdır Bu cihazın bağlanacağı diğer tüm cihazlar da elektrik ve toprak bağlantıları usulüne uygun olarak yapılmış prize takılmış olmalıdır Monitörün elektrikle bağlantısını kesmek için fişini prizden çekmeniz gereklidir Priz kolayca erişilebilecek bir yerde olmalıdır Kaldırma Renkli monitörünüz ağırdır kaldırırken dikkatli olunuz IBM monitörü...

Страница 7: ...Getting Started Getting Started F EN ES C English ...

Страница 8: ...BM sproduct program orservicemaybeused Anyfunctionallyequivalentproduct program orservicethatdoesnot infringeanyofIBM sintellectualpropertyrightsorotherlegallyprotectablerightsmaybeusedinsteadoftheIBMproduct program orservice Evaluationandverificationofoperationinconjunctionwith otherproducts programs orservices except thoseexpresslydesignatedbyIBM aretheuser sresponsibility IBMmayhavepatentsorpen...

Страница 9: ...System 6 Using the SIZE CENTER On screen Display 7 Using the GEOMETRY On screen Display 8 Using the COLOR On screen Display 9 Using the CONVERGENCE On screen Display 10 Using the LANGUAGE On screen Display 11 Using the OPTION On screen Display 11 Using the HELP On screen Display 14 Resetting the Adjustments 15 Technical Features Power Saving Function 16 Damper Wires 16 Plug Play 16 Preset Modes 17...

Страница 10: ...electrical outlet Precautions Installation Prevent internal heat build up by allowing adequate air circulation Do not place the monitor on surfaces rugs blankets etc or near materials curtains draperies that may block the ventilation holes Do not install the monitor near heat sources such as radiators or air ducts or in a place subject to direct sunlight excessive dust mechanical vibration or shoc...

Страница 11: ...ons when adjusting other items 7 u power switch and indicator pages 16 20 Turns the monitor on or off The power indicator lights up in green when the monitor is turned on and either flashes in green and orange or lights up in orange when the monitor is in power saving mode 1 2 Rear 8 AC IN connector page 4 Provides AC power to the monitor 9 Video input 1 connector HD15 page 4 Inputs RGB video sign...

Страница 12: ...t the weight of the monitor Allow at least 2 inches 50mm ventilation space around the monitor Height The monitor should be positioned so that the top of the screen is slightly below your eye level when you sit at your workstation Orientation Choose a position that gives the least reflection from lights and windows usually at a right angle to any windows The monitor should be positioned directly in...

Страница 13: ...ers the power saving mode If this happens switch to the other connector Automatically Sizing and Centering the Picture You can easily adjust the picture to fill the screen by pressing the auto sizing and centering button Press the button The picture automatically fills the screen Notes This function is intended for use with a computer that provides a full screen picture It may not work properly if...

Страница 14: ... CONTRAST EX I T S I ZE CENTER GEOMETRY CONVERGENCE COLOR HELP LANGUAGE OPT I ON MENU OK 6 8 7 kHz 8 5Hz 1 0 2 4 x 7 6 8 Introducing the On screen Display System Most adjustments are made using the MENU OSD MENU OSD Press the button to display the MENU OSD This MENU OSD contains links to the other OSDs described below 1 EXIT Closes the MENU OSD 2 SIZE CENTER Displays the SIZE CENTER OSD for adjust...

Страница 15: ...g Vertical Centering Horizontal Sizing Vertical Sizing Zoom 4 Press the buttons to adjust the settings Select Horizontal Centering Vertical Centering Horizontal Sizing Vertical Sizing Zoom Press the button once to return to the MENU OSD and twice to return to normal viewing If no buttons are pressed the OSD closes automatically after about 30 seconds To reset press the reset button while the OSD i...

Страница 16: ...e side balance adjust the picture width adjust the picture shape balance For Rotation Pincushion Pin Balance Keystone Key Balance Press to rotate the picture clockwise to rotate the picture counterclockwise to expand the picture sides to contract the picture sides to expand the picture sides to the right to expand the picture sides to the left to increase the picture width at the top to decrease t...

Страница 17: ... OSD and twice to return to normal viewing If no buttons are pressed the OSD closes automatically after about 30 seconds To reset press the reset button while the OSD is on The selected color temperature is reset to the factory settings sRGB Mode The sRGB color setting is an industry standard color space protocol designed to correlate the displayed and printed colors of sRGB compliant computer pro...

Страница 18: ...C o n v e r g e n c e To a d j u s t t h e h o r i z o n t a l c o n v e r g e n c e a d j u s t t h e v e r t i c a l c o n v e r g e n c e For Horizontal Convergence Vertical Convergence 4 Press the buttons to adjust the settings Press the button once to return to the MENU OSD and twice to return to normal viewing If no buttons are pressed the OSD closes automatically after about 30 seconds To r...

Страница 19: ... Display The OPTION OSD allows you to manually degauss the screen adjust the moire cancellation level and adjust the OSD position It also allows you to lock the controls Degaussing the screen The monitor screen is automatically degaussed demagnetized when the power is turned on You can also manually degauss the monitor 1 Press the button T h e M E N U O S D a p p e a r s 2 Press the buttons to sel...

Страница 20: ... the moire If elliptical or wavy patterns appear on the screen adjust the moire cancellation level 1 Press the button The MENU OSD appears 2 Press the buttons to select OPTION and press the button again The OPTION OSD appears 3 Press the buttons to select MOIRE ADJUST 4 Press the buttons to adjust the amount of moire cancellation until the moire effect is at a minimum Moire is a type of natural in...

Страница 21: ...peat steps 1 through 3 above and press the button to select OFF DEGAUSS ON OPT I ON CONTROL LOCK OFF ON OPT I ON Restoring the color The colors of most display monitors tend to gradually lose brilliance over several years of service The IMAGE RESTORATION feature allows you to restore the color to the original factory quality levels 1 Press the button The MENU OSD appears 2 Press the buttons to sel...

Страница 22: ... the screen to the edges or if the picture appears too large for the screen adjust the resolution to the figures shown in the OSD using your computer If the input signal matches one of this monitor s factory preset modes the resolution and refresh rate of the current input signal are displayed FLICKER If the picture is flickering adjust the refresh rate to figures shown in the OSD If the input sig...

Страница 23: ...current input signal When there is no OSD displayed press the reset button All of the adjustment data for the current input signal is reset to the factory settings Note that resetting the current signal does not affect brightness and contrast OSD language OSD position or control lock Resetting all of the adjustment data for all input signals Press and hold the reset button for more than two second...

Страница 24: ...al sync signal present present absent absent Notes When your computer is in a power saving mode MONITOR IS IN POWER SAVE MODE appears on the screen if you press any button on the monitor page 17 After a few seconds the monitor enters the power saving mode again Once the horizontal and vertical sync signals are detected the monitor automatically resumes its normal operation mode The power managemen...

Страница 25: ... model name serial number and manufactured year The OSD automatically disappears after about 30 seconds MODEL I BM P9 6 SER NO 1 2 3 4 5 6 7 MANUFACTURED 1 9 9 9 5 2 I NFORMAT I ON Warning Messages If no pictures appears on the screen one of the following messages appears on the screen To solve the problem see Troubleshooting on page 18 1 The input signal condition OUT OF SCAN RANGE indicates that...

Страница 26: ...the proper bus slot The computer is in power saving mode Try pressing any key on the computer keyboard or moving the mouse Check that your computer power switch is in the on position Check that the graphic board is completely seated in the proper bus slot Check that the video frequency range is within that specified for the monitor Horizontal 30 107kHz Vertical 48 120 Hz Refer to your computer s i...

Страница 27: ...he monitor into a different AC outlet preferably on a different circuit Try the monitor on a different computer in a different room Set the refresh rate on the computer to obtain the best possible picture by referring to your computer s manual Eliminate the use of video cable extensions and or video switch boxes if this symptom occurs Excessive cable length or a weak connection can produce this sy...

Страница 28: ...is monitor is equipped with a self diagnosis function If there is a problem with your monitor or computer the screen will go blank and the u indicator will either light up green or flash orange If the u indicator is green 1 Disconnect the video input cable or turn off the connected computer 2 Press the u button twice to turn the monitor off and then on 3 Press and hold the button for 2 seconds bef...

Страница 29: ...F Français ...

Страница 30: ...eul un produit programme ou service IBM peut être utilisé Tout produit programme ou service équivalent qui n enfreint pas les droits de propriété intellectuelle d IBM ou tout autre droit relevant d une protection juridique peut être utilisé au lieu du produit programme ou service IBM L évaluation et le contrôle du fonctionnement du produit en association avec d autres produits programmes ou servic...

Страница 31: ... TAILLE CENTRE 7 Utilisation de l écran de menu GEOMETRIE 8 Utilisation de l écran de menu COULEUR 9 Utilisation de l écran de menu CONVERGENCE 10 Utilisation de l écran de menu LANGUAGE 11 Utilisation de l écran de menu OPTION 11 Utilisation de l écran de menu AIDE 14 Réinitialisation des réglages 15 Caractéristiques techniques Fonction d économie d énergie 16 Fils d amortissement 16 Un moniteur ...

Страница 32: ... à assurer une circulation d air adéquate pour éviter une surchauffe interne de l appareil Ne placez pas le moniteur sur des surfaces textiles tapis couvertures etc ni à proximité de rideaux ou de draperies susceptibles d obstruer les orifices de ventilation N installez pas le moniteur à proximité de sources de chaleur comme un radiateur ou une bouche d air chaud ni dans un endroit exposé au rayon...

Страница 33: ...ouches pour le réglage d autres paramètres 7 Commutateur et indicateur d alimentation u pages 16 20 Met le moniteur sous et hors tension L indicateur d alimentation s allume en vert lorsque le moniteur est sous tension et clignote en vert et en orange ou s allume en orange lorsque le moniteur se trouve en mode d économie d énergie 8 Connecteur AC IN page 4 Assure l alimentation du moniteur 9 Conne...

Страница 34: ...r parce que l utilisation prolongée d un poste de travail informatique peut s avérer fatigante Dos Asseyez vous sur un siège et placez le dos contre le dossier Mains Appliquez de légères pressions sur le clavier en gardant les mains et les doigts décontractés Laissez un espace devant le clavier pour reposer les poignets lorsque vous ne tapez pas Envisagez l utilisation d un repose poignets Acuité ...

Страница 35: ...ommutez l autre connecteur Réglage automatique de la taille et du centrage de l image Vous pouvez aisément ajuster l image pour qu elle remplisse l écran jusqu aux bords en appuyant sur la touche taille et centrage automatiques Appuyez sur la touche L image remplit automatiquement l écran Remarques Cette fonction est destinée à être utilisée avec un ordinateur capable d afficher une image plein éc...

Страница 36: ...Présentation du système d écrans de menu La plupart des réglages sont effectués à l aide de l écran MENU Ecran MENU Appuyez sur la touche pour afficher l écran MENU Cet écran MENU contient des liens avec les autres écrans de menu décrits ci dessous 1 SORTIR Referme l écran MENU 2 TAILLE CENTRE Affiche l écran de menu TAILLE CENTRE afin d ajuster la taille de l image le centrage ou le zoom 3 GEOMET...

Страница 37: ...Pour déplacer l image vers la droite déplacer l image vers la gauche déplacer l image vers le haut déplacer l image vers le bas augmenter la largeur de l image diminuer la largeur de l image augmenter la hauteur de l image diminuer la hauteur de l image agrandir l image réduire l image Pour ajuster le centrage horizontal de l image ajuster le centrage vertical de l image ajuster la dimension horiz...

Страница 38: ...l image 4 Appuyez sur les touches pour ajuster les réglages Appuyez une seule fois sur la touche pour revenir à l écran MENU et deux fois pour revenir au mode d affichage normal Si vous n appuyez sur aucune touche l écran de menu disparaît automatiquement au bout d environ 30 secondes Pour réinitialiser les valeurs de réglage appuyez sur la touche réinitialisation pendant que l écran de menu est a...

Страница 39: ...t du contraste le réglage sRGB passe à OFF Pour plus de détails sur le changement des réglages de la luminosité et du contraste voir page 6 Remarque Votre ordinateur et les autres appareils raccordés une imprimante par exemple doivent être compatibles avec sRGB Utilisation de l écran de menu COULEUR Vous pouvez changer la température des couleurs du moniteur Ainsi vous pouvez changer les couleurs ...

Страница 40: ...amètre à régler Appuyez une seule fois sur la touche pour revenir à l écran MENU et deux fois pour revenir au mode d affichage normal Si vous n appuyez sur aucune touche l écran de menu disparaît automatiquement au bout d environ 30 secondes Pour réinitialiser les valeurs de réglage appuyez sur la touche réinitialisation pendant que l écran de menu est affiché Le paramètre sélectionné est ramené à...

Страница 41: ...fois pour revenir au mode d affichage normal Si vous n appuyez sur aucune touche l écran de menu disparaît automatiquement au bout d environ 30 secondes Utilisation de l écran de menu LANGUAGE Les écrans de menu sont disponibles en anglais en français en allemand en espagnol en italien en néerlandais en suédois en russe et en japonais 1 Appuyez sur la touche L écran MENU apparaît 2 Appuyez sur les...

Страница 42: ...cran de menu est affiché Ajustement du moiré Si des lignes elliptiques ou ondulées apparaissent à l écran ajustez le niveau d annulation de moiré 1 Appuyez sur la touche L écran MENU apparaît 2 Appuyez sur les touches pour sélectionner OPTION et appuyez de nouveau sur la touche L écran de menu OPTION apparaît 3 Appuyez sur les touches pour sélectionner REGLAGE MOIRE 4 Appuyez sur les touches pour ...

Страница 43: ... à 3 au dessus et appuyez sur la touche pour sélectionner OFF DEGAUSS ON OPT I ON MENU VERROU I L LE OFF ON OPT I ON Restauration des couleurs Les couleurs de la plupart des moniteurs tendent à perdre progressivement de leur éclat au fil des ans La fonction RESTAURER COULEUR vous permet de restaurer les couleurs aux niveaux de qualité par défaut d orgine Les explications ci dessous présentent comm...

Страница 44: ...irectement à l écran de menu OPTION puis sélectionnez DEGAUSS Appuyez une seule fois sur la touche pour revenir à l écran MENU et deux fois pour revenir au mode d affichage normal Si vous n appuyez sur aucune touche l écran de menu disparaît automatiquement au bout d environ 30 secondes Remarques Avant d utiliser cette fonction le moniteur doit se trouver en mode de fonctionnement normal indicateu...

Страница 45: ... cours Alors qu aucun écran de menu n est affiché appuyez sur la touche réinitialisation Toutes les données de réglage pour le signal d entrée en cours sont ramenées aux valeurs de réglage par défaut Sachez que la réinitialisation du signal en cours n affecte pas la luminosité et le contraste la langue d affichage sur écran la position sur écran et le verrouillage des commandes Réinitialisation de...

Страница 46: ... ci dessous Sommeil et sommeil profond sont des modes d économie d énergie définis par l Environmental Protection Agency R e m a r q u e s Lorsque votre ordinateur est en mode d économie d énergie MONITEUR EN MODE D ECONOMIE D ENERGIE apparaît à l écran si vous appuyez sur n importe quelle touche du moniteur page 17 Après quelques secondes le moniteur repasse en mode d économie d énergie Une fois ...

Страница 47: ...NITEUR EN MODE D ECONOMIE D ENERGIE indique que l ordinateur est en mode d économie d énergie Ce message ne s affiche que lorsque votre ordinateur se trouve dans un mode d économie d énergie et que vous appuyez sur l une des touches du moniteur 2 Le connecteur sélectionné Ce message indique le connecteur sélectionné ENTREE 1 ou ENTREE 2 Caractéristiques techniques Informations complémentaires Affi...

Страница 48: ...omie d énergie Appuyez sur une touche quelconque du clavier de l ordinateur ou déplacez la souris Vérifiez que le commutateur d alimentation de votre ordinateur est en position on Assurez vous que la carte graphique est bien logée dans la fente de bus adéquate Vérifiez si la plage de fréquence vidéo est conforme à la plage spécifiée pour le moniteur Horizontal 30 107 kHz Vertical 48 120 Hz Reporte...

Страница 49: ...ordinateur différent dans une autre pièce Réglez le taux de régénération de l ordinateur pour obtenir la meilleure image possible en vous référant au mode d emploi de l ordinateur Si ce symptôme se manifeste débranchez les câbles prolongateurs vidéo et ou les boîtiers de commutation vidéo Une longueur de câble excessive ou des connexions lâches peuvent être à l origine de l apparition de ce symptô...

Страница 50: ... et l indicateur u s allumera en vert ou clignotera en orange Si l indicateur u est vert 1 Déconnectez le câble d entrée vidéo ou mettez l ordinateur raccordé hors tension 2 Appuyez deux fois sur la touche u u u u u pour éteindre le moniteur puis pour le remettre sous tension 3 Appuyez sur la touche et maintenez la enfoncée pendant 2 secondes avant que le moniteur ne passe en mode d économie d éne...

Страница 51: ...Getting Started Getting Started D Deutsch ...

Страница 52: ...Programme oder Dienstleistungen können auch andere ihnen äquivalente Produkte Programme oder Dienstleistungen verwendet werden solange diese keine gewerblichen oder anderen Schutzrechte von IBM verletzen Die Verantwortung für den Betrieb der Produkte Programme oder Dienstleistungen in Verbindung mit Fremdprodukten und Fremdleistungen liegt beim Kunden soweit solche Verbindungen nicht ausdrücklich ...

Страница 53: ...rast 6 Das Bildschirmmenüsystem 6 Die Bildschirmanzeige GRÖSSE BILDLG 7 Die Bildschirmanzeige GEOMETRIE 8 Die Bildschirmanzeige FARBE 9 Die Bildschirmanzeige KONVERGENZ 10 Die Bildschirmanzeige LANGUAGE 11 Die Bildschirmanzeige OPTION 11 Die Bildschirmanzeige HILFE 14 Zurücksetzen der Einstellungen 15 Technische Merkmale Energiesparfunktion 16 Dämpfungsdrähte 16 Plug Play 16 Vordefinierte Modi 17 ...

Страница 54: ...damit sich im Monitor kein Wärmestau bildet Stellen Sie den Monitor nicht auf Oberflächen wie Teppichen oder Decken oder in der Nähe von Materialien wie Gardinen und Wandbehängen auf die die Lüftungsöffnungen blockieren könnten Stellen Sie den Monitor nicht in der Nähe von Wärmequellen wie Heizkörpern oder Luftschächten oder an Orten auf an denen er direktem Sonnenlicht außergewöhnlich viel Staub ...

Страница 55: ...n weiterer Optionen 5 Taste Menü Seite 6 15 17 Zum Aufrufen der Bildschirmanzeige MENU 6 Tasten Kontrast links und rechts Seite 6 15 20 Zum Einstellen des Kontrasts Fungieren als die Tasten zum Einstellen weiterer Optionen 7 Netzschalter und anzeige u Seite 16 20 Zum Ein und Ausschalten des Monitors Die Netzanzeige leuchtet grün wenn der Monitor eingeschaltet ist und blinkt grün und orange bzw leu...

Страница 56: ...daß sich die obere Kante des Bildschirms etwas unterhalb Ihrer Augenhöhe befindet wenn Sie am Arbeitsplatz sitzen Ausrichtung Richten Sie den Monitor so aus daß möglichst wenig Reflexionen durch Lampen oder Fenster auftreten In der Regel empfiehlt es sich einen Monitor im rechten Winkel zu den Fenstern aufzustellen Der Monitor sollte möglichst direkt vor Ihnen stehen so daß Sie nicht in gedrehter ...

Страница 57: ... Automatisches Einstellen der Größe und Zentrierung des Bildes SiekönnenGrößeundZentrierungdesBildesmitderTaste Größe Zentrierungautomatischeinstellen problemlos soeinstellen daßdasBilddenBildschirmausfüllt Drücken Sie die Taste DasBildwirdautomatischsoeingestellt daßesden Bildschirmausfüllt Hinweise Diese Funktion ist speziell für Computer konzipiert bei denen das Bild den ganzen Bildschirm ausfü...

Страница 58: ...n Eingangssignals Wenn das Signal einem der werkseitig voreingestellten Modi des Monitors entspricht wird auch die Auflösung angezeigt Vorbereitungen Verbinden Sie den Monitor mit dem Computer und schalten Sie beide Geräte ein Auswählen der Sprache für die Bildschirmanzeigen Wenn Sie die Sprache für die Bildschirmanzeigen ändern wollen schlagen Sie unter Die Bildschirmanzeige LANGUAGE auf Seite 11...

Страница 59: ... Tasten die Option ein Drücken Sie einmal die Taste um zur Bildschirmanzeige MENU zu wechseln Wenn Sie zur normalen Anzeige wechseln wollen drücken Sie die Taste zweimal Wenn Sie keine weitere Taste drücken wird das Bildschirmmenü nach etwa 30 Sekunden automatisch ausgeblendet Drücken Sie zum Zurücksetzen des Wertes die Taste Zurücksetzen bevor die Bildschirmanzeige ausgeblendet wird Die ausgewähl...

Страница 60: ... Zurücksetzen des Wertes die Taste Zurücksetzen bevor die Bildschirmanzeige ausgeblendet wird Die ausgewählte Option wird auf die werkseitige Einstellung zurückgesetzt Die Bildschirmanzeige GEOMETRIE Mit der Bildschirmanzeige GEOMETRIE können Sie Form und Ausrichtung des Bildes festlegen Der Wert für die Option Bildrotation den Sie hier einstellen wird für alle eingespeisten Eingangssignale gespei...

Страница 61: ...ie die Taste zweimal Wenn Sie keine weitere Taste drücken wird das Bildschirmmenü nach etwa 30 Sekunden automatisch ausgeblendet Drücken Sie zum Zurücksetzen des Wertes die Taste Zurücksetzen bevor die Bildschirmanzeige ausgeblendet wird Die ausgewählte Farbtemperatur wird auf die werkseitigen Einstellungen zurückgesetzt Der sRGB Modus Die sRGB Farbeinstellung ist ein Farbraumprotokoll nach Indust...

Страница 62: ...s und drücken Sie die Taste erneut Die Bildschirmanzeige KONVERGENZ erscheint Drücken Sie einmal die Taste um zur Bildschirmanzeige MENU zu wechseln Wenn Sie zur normalen Anzeige wechseln wollen drücken Sie die Taste zweimal Wenn Sie keine weitere Taste drücken wird das Bildschirmmenü nach etwa 30 Sekunden automatisch ausgeblendet Drücken Sie zum Zurücksetzen des Wertes die Taste Zurücksetzen bevo...

Страница 63: ...Sie zur normalen Anzeige wechseln wollen drücken Sie die Taste zweimal Wenn Sie keine weitere Taste drücken wird das Bildschirmmenü nach etwa 30 Sekunden automatisch ausgeblendet Die Bildschirmanzeige LANGUAGE Für die Bildschirmmenüs stehen die Sprachen Englisch Französisch Deutsch Spanisch Italienisch Niederländisch Schwedisch Russisch und Japanisch zur Verfügung 1 Drücken Sie die Taste Die Bilds...

Страница 64: ...et Drücken Sie zum Zurücksetzen die Taste Zurücksetzen solange das Bildschirmmenü angezeigt wird Ändern der Position der Bildschirmanzeigen Sie können die Bildschirmanzeigen verschieben wenn Sie z B den Bereich hinter einer Bildschirmanzeige einstellen wollen 1 Drücken Sie die Taste Die Bildschirmanzeige MENU erscheint 2 Wählen Sie mit den Tasten die Option OPTION aus und drücken Sie die Taste ern...

Страница 65: ... mit der Taste die Option AUS DEGAUSS E I N OPT I ON Wiederherstellen der Farben Bei den meisten Bildschirmen zeigt sich nach einer Anzahl von Jahren ein allmähliches Nachlassen der Farbbrillanz Mit der Funktion FARBWIEDERHERSTELLUNG können Sie die Bildschirmfarben auf die ursprünglichen werkseitig eingestellten Werte zurücksetzen In den Schritten unten wird erläutert wie Sie die Farben des Monito...

Страница 66: ...nü OPTION direkt aufzurufen und wählen Sie dann DEGAUSS Drücken Sie einmal die Taste um zur Bildschirmanzeige MENU zu wechseln Wenn Sie zur normalen Anzeige wechseln wollen drücken Sie die Taste zweimal Wenn Sie keine weitere Taste drücken wird das Bildschirmmenü nach etwa 30 Sekunden automatisch ausgeblendet Hinweise Bevor Sie diese Funktion verwenden können muß sich der Monitor mindestens 30 Min...

Страница 67: ...zen wenn keine Bildschirmanzeige zu sehen ist Alle Einstellungen für das aktuelle Eingangssignal werden auf die werkseitigen Einstellungen zurückgesetzt Durch Zurücksetzen des aktuellen Signals ändern sich die Einstellungen für Helligkeit Kontrast Sprache Position der Bildschirmanzeigen und die Tastensperrfunktion nicht Zurücksetzen aller Einstellungen für alle Eingangssignale Halten Sie die Taste...

Страница 68: ...rmodus Sobald jedoch horizontale und vertikale Synchronisationssignale eingehen schaltet der Monitor automatisch wieder in den normalen Betriebsmodus Die Energiesparfunktion wird aktiviert wenn der Computer erkennt daß Sie die Maus oder die Tastatur eine bestimmte Zeitspanne lang nicht benutzt haben Diese Zeitspanne können Sie selbst definieren IBM empfiehlt den Monitor am Feierabend oder auch tag...

Страница 69: ...er und Herstellungsjahr des Monitors Die Bildschirmanzeige wird nach etwa 30 Sekunden automatisch ausgeblendet MODEL I BM P9 6 SER NO 1 2 3 4 5 6 7 MANUFACTURED 1 9 9 I NFORMAT I ON 9 5 2 Warnmeldungen Wenn auf dem Bildschirm kein Bild erscheint wird eine der folgenden Meldungen auf dem Bildschirm angezeigt Wie Sie das Problem beheben schlagen Sie unter Störungsbehebung auf Seite 18 nach 1 Status ...

Страница 70: ...astatur oder bewegen Sie die Maus Der Netzschalter des Computers muß sich in der Position EIN befinden Die Grafikkarte muß korrekt im richtigen Bus Steckplatz sitzen Die Videofrequenz muß im für den Monitor angegebenen Bereich liegen Horizontal 30 107 kHz Vertikal 48 120 Hz Schlagen Sie in der Bedienungsanleitung zum Computer nach und stellen Sie den Videofrequenzbereich ein Wenn Sie einen Videosi...

Страница 71: ...r entfernen Sie sie ganz Typischerweise werden solche Störungen durch Geräte wie Ventilatoren Leuchtstoffröhren und Laser Drucker verursacht Steht sehr nahe bei diesem Gerät ein zweiter Monitor vergrößern Sie den Abstand zwischen beiden Geräten um die Interferenzen zu verringern Schließen Sie das Netzkabel des Monitors an eine andere Steckdose möglichst an einem anderen Stromkreis an Testen Sie de...

Страница 72: ...ben vorbehalten Selbstdiagnosefunktion Dieser Monitor verfügt über eine Selbstdiagnosefunktion Wenn an dem Monitor oder Computer ein Problem auftritt erscheint ein leerer Bildschirm und die Netzanzeige u leuchtet grün auf oder blinkt orange Wenn die Netzanzeige u grün leuchtet 1 Lösen Sie das Videoeingangskabel oder schalten Sie den angeschlossenen Computer aus 2 Schalten Sie den Monitor am Netzsc...

Страница 73: ...Getting Started Getting Started ES Español ...

Страница 74: ...odo cualquier producto programa o servicio funcionalmente equivalente y que no infrinja los derechos sobre la propiedad intelectual de IBM u otros derechos protegidos legalmente puede utilizarse en lugar del producto programa o servicio IBM La evaluación y verificación del funcionamiento de este monitor con otros productos programas o servicios con la excepción de aquellos expresamente designados ...

Страница 75: ...alla TAMAÑO CENTRO 7 Uso de la indicación en pantalla GEOMETRIA 8 Uso de la indicación en pantalla COLOR 9 Uso de la indicación en pantalla CONVERGENCIA 10 Uso de la indicación en pantalla LANGUAGE 11 Uso de la indicación en pantalla OPCION 11 Uso de la indicación en pantalla AYUDA 14 Restauración de los ajustes de fábrica 15 Funciones técnicas Función de ahorro de energía 16 Hilos de amortiguació...

Страница 76: ...ácil acceso Precauciones Instalación Coloque el monitor en un lugar debidamente ventilado para evitar el recalentamiento interno No lo sitúe sobre superficies alfombras mantas etc o cerca de materiales cortinas tapices que puedan bloquear los orificios de ventilación No instale el monitor cerca de fuentes de calor como radiadores o tubos de ventilación ni lo exponga a la luz directa del sol a polv...

Страница 77: ...tor e indicador de encendido u páginas 16 20 Enciende o apaga el monitor El indicador de alimentación se ilumina en verde cuando el monitor está encendido y parpadea en verde y en naranja o se ilumina en naranja cuando dicho monitor se encuentra en el modo de ahorro de energía 8 Conector AC IN página 4 Permite enchufar un cable de alimentación de CA al monitor 9 Conector 1 de entrada de vídeo HD15...

Страница 78: ...lmente en ángulo recto a cualquier ventana El monitor debe colocarse directamente enfrente del usuario de forma que la postura del cuerpo sea natural Incline el monitor con el fin de obtener un ángulo de visualización cómodo Hábitos de trabajo Descanso Descanse con regularidad Cambie de postura y levántese para estirar los músculos de vez en cuando ya que el uso prolongado de ordenadores puede pro...

Страница 79: ...ra en el modo de ahorro de energîa Si esto ocurre cambie al otro conector Tamaño y centrado automáticos de la imagen Es posible ajustar la imagen fácilmente para que llene la pantalla Para ello basta con pulsar el botón tamaño y centrado automáticos Pulse el botón La imagen llenará automáticamente la pantalla Notas Esta función está destinada a emplearse con un ordenador que proporcione imágenes d...

Страница 80: ...9 Introducción al sistema de indicación en pantalla La mayoría de los ajustes se realizan con la indicación en pantalla MENU Indicación MENU Pulse el botón para visualizar la indicación MENU Este MENU contiene vínculos con las otras indicaciones en pantalla descritas a continuación 1 SALIR Cierra la indicación MENU 2 TAMAÑO CENTRO Muestra la indicación TAMAÑO CENTRO para ajustar eltamaño centradoy...

Страница 81: ... cierra automáticamente después de unos 30 segundos Para reajustar pulse el botón restauración mientras la indicación aún esté activada Se restauran los valores predefinidos de fábrica de la opción seleccionada Nota El ajuste de Zoom se detiene en cuanto el tamaño horizontal o vertical alcanza su valor máximo o mínimo El valor de ajuste horizontal no aparece en el menú Para desplazar la imagen hac...

Страница 82: ...lse el botón una vez para volver a la indicación MENU y dos veces para recuperar la visualización normal Si no pulsa ningún botón la indicación se cierra automáticamente después de unos 30 segundos Para reajustar pulse el botón restauración mientras la indicación aún esté activada La opción seleccionada recupera el valor predefinido de fábrica 4 Pulse los botones para realizar los ajustes Para Rot...

Страница 83: ... para establecer una equivalencia entre los colores mostrados y los impresos mediante los productos informáticos compatibles con sRGB Para ajustar los colores en el perfil sRGB basta con seleccionar la opción sRGB SI en el menú COLOR Sin embargo para que los colores sRGB se muestren de forma correcta γ 2 2 6500K es preciso definir el perfil sRGB en el ordenador Si selecciona sRGB SI el brillo y el...

Страница 84: ...rgencia horizontal Convergencia vertical Para ajustar la convergencia horizontal ajustar la convergencia vertical 2 6 CONVERGENC I A 4 Pulse los botones para realizar los ajustes Para Convergencia horizontal Convergencia vertical Pulse el botón una vez para volver a la indicación MENU y dos veces para recuperar la visualización normal Si no pulsa ningún botón la indicación se cierra automáticament...

Страница 85: ...ón en pantalla OPCION La indicación OPCION permite desmagnetizar la pantalla manualmente definir el nivel de cancelación de muaré y ajustar la posición de la indicación También permite bloquear los controles Desmagnetización de la pantalla La pantalla del monitor se desmagnetiza automáticamente cuando se enciende la unidad También es posible desmagnetizarla de forma manual 1 Pulse el botón Aparece...

Страница 86: ...entre activada Ajuste del muaré Si en la pantalla aparecen patrones elípticos u ondulados ajuste el nivel de cancelación de muaré 1 Pulse el botón Aparece la indicación MENU 2 Pulse los botones para seleccionar OPCION y vuelva a pulsar el botón Aparece la indicación OPCION 3 Pulse los botones para seleccionar AJUSTE MUARE 4 Para ajustar el nivel de cancelación de muaré pulse los botones hasta que ...

Страница 87: ...3 anteriores y pulse el botón para seleccionar NO DESMAGNET S I OPC I ON BLOQUEO DE A JUSTES NO S I OPC I ON Recuperación del color En la mayoría de los monitores el color suele perder luminosidad de forma gradual después de varios años de servicio La función REAJUSTE DE COLOR permite recuperar los niveles originales de calidad definidos en fábrica para el color A continuación se describe cómo res...

Страница 88: ...a pasar directamente a la indicación OPCION y a continuación seleccione DESMAGNET Pulse el botón una vez para volver a la indicación MENU y dos veces para recuperar la visualización normal Si no pulsa ningún botón la indicación se cierra automáticamente después de unos 30 segundos Notas Antes de emplear esta función el monitor debe encontrarse en el modo de funcionamiento normal indicador de alime...

Страница 89: ...indicación en pantalla pulse el botón restauración Se restauran los ajustes predefinidos de fábrica de todos los datos de ajuste para la señal de entrada actual Tenga en cuenta que la restauración de la señal actual no afecta al brillo contraste idioma y posición de la indicación en pantalla ni al bloqueo de los controles Restauración de todos los datos de ajuste para todas las señales de entrada ...

Страница 90: ...itor vuelve al modo de ahorro de energía Una vez detectadas las señales de sincronización horizontal y vertical el monitor recupera automáticamente el modo de funcionamiento normal La función de gestión de energía se activa cuando el ordenador reconoce que no se ha utilizado el ratón o el teclado durante un espacio de tiempo definible por el usuario IBM recomienda que apague el monitor al final de...

Страница 91: ...del modelo el número de serie y el año de fabricación La indicación desaparece automáticamente después de unos 30 segundos MODEL I BM P9 6 SER NO 1 2 3 4 5 6 7 MANUFACTURED 1 9 9 I NFORMAC I ON 9 5 2 Mensajes de aviso Si no aparece ninguna imagen en la pantalla ésta mostrará uno de los siguientes mensajes Para solucionar el problema consulte Solución de problemas en la página 18 1 Condición de la ...

Страница 92: ...ada en la ranura de bus adecuada El ordenador está en el modo de ahorro de energía Pulse cualquier tecla del teclado del ordenador o mueva el ratón Cerciórese de que el interruptor de encendido del ordenador está en la posición de activado Compruebe que la tarjeta gráfica se encuentra completamente insertada en la ranura de bus adecuada Compruebe que el rango de frecuencia de vídeo se encuentra de...

Страница 93: ...rcuito distinto Pruebe el monitor con otro ordenador y en una habitación distinta Defina el índice de barrido en el ordenador para obtener una imagen con la mayor calidad posible para ello consulte el manual del ordenador Si detecta este síntoma evite el uso de cables prolongadores de vídeo y o de cajas conmutadoras de vídeo Puede deberse a la longitud excesiva de los cables o a una conexión débil...

Страница 94: ...or o el ordenador presenta algún problema la pantalla se mostrará en blanco y el indicador u se iluminará en verde o parpadeará en naranja Si el indicador u se ilumina en color verde 1 Desconecte el cable de entrada de vídeo o apague el ordenador conectado 2 Pulse el botón u dos veces para apagar y volver a encender el monitor 3 Mantenga pulsado el botón durante 2 segundos antes de que el monitor ...

Страница 95: ...Getting Started Getting Started I Italiano ...

Страница 96: ...rammi o servizi IBM a cui viene fatto riferimento È infatti possibile utilizzare qualsiasi altro prodotto programma o servizio equivalente dal punto di vista funzionale che non violi i diritti di proprietà intellettuali della IBM o altri diritti protetti legalmente La valutazione e la verifica del funzionamento con altri prodotti programmi o servizi ad eccezione di quelli indicati espressamente da...

Страница 97: ... CENTR 7 Uso dell indicazione a schermo GEOMETRIA 8 Uso dell indicazione a schermo COLORE 9 Uso dell indicazione a schermo CONVERGENZA 10 Uso dell indicazione a schermo LANGUAGE 11 Uso dell indicazione a schermo OPZIONI 11 Utilizzo dell indicazione a schermo GUIDA 14 Reimpostazione dei dati di regolazione 15 Caratteristiche tecniche Funzione di risparmio energetico 16 Cavi di smorzamento 16 Uso im...

Страница 98: ... prossimità di una presa di rete facilmente accessibile per CA da 100 a 120 V per CA da 200 a 240 V solo per CA 240 V Precauzioni Installazione Evitare il surriscaldamento interno consentendo un adeguata circolazione dell aria Non collocare il monitor su tappetini o coperte né in prossimità di tendaggi che potrebbero bloccarne le prese di ventilazione Non installare il monitor vicino a fonti di ca...

Страница 99: ... Svolgono la stessa funzione dei tasti per la regolazione di altre voci 7 Interruttore ed indicatore di accensione u pagine 16 20 Per accendere e spegnere il monitor Quando il monitor viene acceso l indicatore di accensione si illumina in verde quando il monitor entra nel modo di risparmio energetico l indicatore lampeggia in arancione e in verde in modo alternato o si illumina in arancione 8 Conn...

Страница 100: ... 50 mm intorno al monitor Altezza Collocare il monitor in modo che quando si è seduti di fronte ad esso il bordo superiore dello schermo sia leggermente inferiore al livello degli occhi Orientamento Collocare il monitor in modo che il riflesso provocato da sorgenti luminose sia minimo ad esempio ad angolo retto con le finestre Collocare il monitor esattamente di fronte alla propria posizione di la...

Страница 101: ...to caso selezionare l altro connettore Redimensionamento e centratura automatici dell immagine È possibile regolare l immagine in modo che venga visualizzata sullo schermo intero in modo facile premendo il tasto ridimensionamento e centratura automatici Premere il tasto L immagine viene visualizzata automaticamente sullo schermo intero Note Utilizzare questa funzione con computer su cui è possibil...

Страница 102: ...azione a schermo MENU Indicazione a schermo MENU Per visualizzare l indicazione a schermo MENU premere il tasto Nell indicazione a schermo MENU sono inclusi dei collegamenti ad altre indicazioni a schermo descritte di seguito 1 USCITA Chiude l indicazione a schermo MENU 2 DIMENS CENTRO Visualizza l indicazione a schermo DIMENS CENTRO per regolare le dimensioni la centratura e l ingrandimento o la ...

Страница 103: ...istra l immagine spostare verso l alto l immagine spostare verso il basso l immagine aumentare la larghezza dell immagine diminuire la larghezza dell immagine aumentare l altezza dell immagine diminuire l altezza dell immagine ingrandire l immagine ridurre l immagine Per regolare la centratura orizzontale dell immagine regolare la centratura verticale dell immagine regolare le dimensioni orizzonta...

Страница 104: ... immagine effettuare la regolazione del bilanciamento della forma dell immagine 2 6 GEOMETR I A Premere una volta il tasto per tornare all indicazione a schermo MENU premerlo due volte per tornare alla visualizzazione normale Se non viene premuto alcun tasto l indicazione a schermo MENU si chiude automaticamente dopo circa 30 secondi Per reimpostare il valore premere il tasto ripristina mentre l i...

Страница 105: ... 85 Se si modificano la luminosità e il contrasto l impostazione sRGB viene disattivata Per ulteriori informazioni sulla modifica della luminosità e del contrasto vedere a pagina 6 Nota Il computer e gli altri prodotti collegati ad esempio una stampante devono essere conformi a sRGB Uso dell indicazione a schermo COLORE È possibile modificare la temperatura di colore del monitor Per esempio è poss...

Страница 106: ...za orizzontale Convergenza verticale Per effettuare la regolazione della convergenza orizzontale effettuare la regolazione della convergenza verticale Premere una volta il tasto per tornare all indicazione a schermo MENU premerlo due volte per tornare alla visualizzazione normale Se non viene premuto alcun tasto l indicazione a schermo MENU si chiude automaticamente dopo circa 30 secondi Per reimp...

Страница 107: ...ndicata Premere una volta il tasto per tornare all indicazione a schermo MENU premerlo due volte per tornare alla visualizzazione normale Se non viene premuto alcun tasto l indicazione a schermo MENU si chiude automaticamente dopo circa 30 secondi Uso dell indicazione a schermo LANGUAGE Le indicazioni a schermo possono essere visualizzate in inglese francese tedesco spagnolo italiano olandese sved...

Страница 108: ...a mentre l indicazione a schermo è attiva Regolazione dell effetto moiré Se sullo schermo appaiono motivi ellittici o ondulati regolare il livello di eliminazione dell effetto moiré 1 Premere il tasto Appare l indicazione a schermo MENU 2 Premere i tasti per selezionare OPZIONI quindi premere di nuovo il tasto Appare l indicazione a schermo OPZIONI 3 Premere i tasti per selezionare REGOLAZ MOIRE 4...

Страница 109: ...e le procedure che vanno dal punto 1 al punto 3 descritte sopra e premere il tasto per selezionare NO SMAGNET S I OPZ I ON I BLOCCO MENU NO S I OPZ I ON I Ripristino del colore Dopo molti anni di utilizzo nella maggior parte dei monitor il colore tende a perdere gradualmente luminosità La funzione RIPRISTINO COLORE permette di ripristinare il colore ai livelli di qualità originali Le indicazioni c...

Страница 110: ...rmo Premere il tasto per passare direttamente all indicazione a schermo OPZIONI quindi selezionare SMAGNET Premere una volta il tasto per tornare all indicazione a schermo MENU premerlo due volte per tornare alla visualizzazione normale Se non viene premuto alcun tasto l indicazione a schermo MENU si chiude automaticamente dopo circa 30 secondi Note Per utilizzare questa funzione il monitor deve e...

Страница 111: ...l caso in cui non sia visualizzata alcuna indicazione a schermo premere il tasto ripristina Sono ripristinati tutti i valori preimpostati in fabbrica per il segnale di ingresso corrente Si noti che la reimpostazione del segnale corrente non ha alcun effetto sulla luminosità e il contrasto sulla lingua per le indicazioni a schermo sulla posizione delle indicazioni a schermo né sul bloccaggio dei co...

Страница 112: ...incronizzazione orizzontale presente assente presente assente Segnale di sincronizzazione verticale presente presente assente assente Note Se si preme un qualsiasi tasto sul monitor mentre il computer si trova nel modo di risparmio energetico sullo schermo appare IL MONITOR E IN MODO RISPARMIO ENERGETICO pagina 17 Dopo pochi secondi il monitor entra di nuovo nel modo di risparmio energetico Una vo...

Страница 113: ...ro di serie e l anno di fabbricazione L indicazione a schermo scompare automaticamente dopo circa 30 secondi MODEL I BM P9 6 SER NO 1 2 3 4 5 6 7 MANUFACTURED 1 9 9 I NFORMAZ I ON I 9 5 2 Messaggi di avvertimento Se sullo schermo non appare alcuna immagine apparirà uno dei messaggi descritti di seguito Per risolvere il problema vedere la sezione Guida alla soluzione dei problemi a pagina 18 1 Cond...

Страница 114: ...l corretto alloggiamento del bus Il computer è nel modo di risparmio energetico Premere un tasto qualsiasi sulla tastiera o muovere il mouse Controllare che l interruttore di accensione del computer sia nella posizione di accensione Controllare che la scheda grafica sia inserita completamente nel corretto alloggiamento del bus Controllare che il campo di frequenza video rientri in quello specifica...

Страница 115: ...il monitor ad un computer completamente diverso in un altra stanza Impostare il valore della frequenza di refresh per ottenere un immagine migliore facendo riferimento al manuale per le istruzioni del computer Eliminare l uso di prolunghe del cavo video e o di cassette di contenimento dell interruttore del video se si verifica questo problema Una lunghezza eccessiva del cavo o un collegamento debo...

Страница 116: ...gnostica Nel caso in cui si verifichino problemi al monitor o al computer lo schermo si oscura e l indicatore u si illumina in verde oppure lampeggia col colore arancio Se l indicatore u è verde 1 Scollegare il cavo di ingresso video o disattivare il computer collegato 2 Premere due volte il tasto u per spegnere e riaccendere il monitor 3 Premere e tenere premuto per 2 secondi il tasto prima che i...

Страница 117: ...onsible Party Sony Electronics Inc Address 1 Sony Drive Park Ridge NJ 07656 U S A Telephone No 201 930 6972 This Device complies with Part 15 of the FCC Rules Operation is subject to the following two conditions 1 This device may not cause harmful interference and 2 this device must accept any interference received including interference that may cause undesired operation Power Cords For your safe...

Страница 118: ...z des Bildes kann sich auf Grund des Magnetfeldes am Ort der Aufstellung aus der korrekten Grundeinstellung verändern Zur Korrektur empfiehlt es sich deshalb die Regler an der Frontseite für H STAT und V STAT so einzustellen daß die getrennt sichtbaren Farblinien für Rot Grün und Blau bei z B der Darstellung eines Buchstabens zur Deckung Konvergenz gelangen Siehe hierzu auch die Erklärungen zu H S...

Страница 119: ...ten Es sind ordnungsgemäß abgeschirmte und geerdete Kabel und Stecker zu verwenden um das Störungspotential in bezug auf Radio und Fernsehempfang oder andere elektrische oder elektronische Geräte zu reduzieren Solche Kabel und Stecker sind bei autorisierten IBM Fachhändlern erhältlich In Übereinstimmung mit EN 50082 1 1992 Leistungskriterium A wird darauf hingewiesen daß bestimmte elektromagnetisc...

Страница 120: ...reseller will repair it or replace it with one that is at least functionally equivalent without charge The replacement may not be new but will be in good working order If IBM or your reseller is unable to repair or replace the Machine you may return it to your place of purchase and your money will be refunded If you transfer a Machine to another user warranty service is available to that user for ...

Страница 121: ...M is liable only for 1 damages for bodily injury including death and damage to real property and tangible personal property and 2 the amount of any other actual direct damages or loss up to the greater of U S 100 000 or the charges if recurring 12 months charges apply for the Machine that is the subject of the claim UNDER NO CIRCUMSTANCES IS IBM LIABLE FOR ANY OF THE FOLLOWING 1 THIRD PARTY CLAIMS...

Страница 122: ... amount of energy since they are often left running continuously What does labelling involve This product meets the requirements for the TCO 95 scheme which provides for international and environmental labelling of personal computers The labelling scheme was developed as a joint effort by the TCO The Swedish Confederation of Professional Employees Naturskyddsforeningen The Swedish Society for Natu...

Страница 123: ...lly bound chlorine and bromine Lead Lead can be found in picture tubes display screens solders and capacitors Lead damages the nervous system and in higher doses causes lead poisoning TCO 95 requirement permits the inclusion of lead since no replacement has yet been developed Cadmium Cadmium is present in rechargeable batteries and in the colourgenerating layers of certain computer displays Cadmiu...

Страница 124: ... it is vital to save energy Electronics equipment in offices is often left running continuously and thereby consumes a lot of energy What does labelling involve This product meets the requirements for the TCO 99 scheme which provides for international and environmental labelling of personal computers The labelling scheme was developed as a joint effort by the TCO The Swedish Confederation of Profe...

Страница 125: ...ontain flame retardants with organically bound bromine or chlorine Flame retardants are allowed in the printed circuit boards since no substitutes are available Cadmium Cadmium is present in rechargeable batteries and in the colour generating layers of certain computer displays Cadmium damages the nervous system and is toxic in high doses The relevant TCO 99 requirement states that batteries the c...

Страница 126: ...nitor UVNH Pearl White NA EMEA 04N7193 6551 33N Monitor UVNH Pearl White JPN 04N7194 6551 63N Monitor UVNH Stealth Black NA EMEA 04N7195 6551 73N Monitor UVNH Stealth Black JPN 04N7196 6551 23S Monitor UVSH Pearl White ANZ 04N7197 6551 63S Monitor UVSH Stealth Black ANZ 04N7198 6551 23N 6551 33N 6551 23S Tilt Swivel UVNH Pearl White WW 04N7199 6551 63N 6551 73N 6551 63S Tilt Swivel UVNH Stealth Bl...

Страница 127: ...Getting Started Getting Started XI ...

Страница 128: ...nted in Japan P96 User Guide Part Number 04N7204 EC D03437 04N7204 3 868 265 12 1 Copyright IBM Corporation All rights reserved International Business Machines Corporation New Orchard Road Armonk NY 10504 ...

Отзывы: