IBM P77 Скачать руководство пользователя страница 4

2

Precautions

Warning on power connections

• Use the supplied power cord. If you use a different power cord, 

be sure that it is compatible with your local power supply.

• Before disconnecting the power cord, wait at least 30 seconds 

after turning off the power to allow the static electricity on the 
screen’s surface to discharge.

• After the power is turned on, the screen is demagnetized 

(degaussed) for about 5 seconds. This generates a strong 
magnetic field around the screen which may affect data stored 
on magnetic tapes and disks placed near the monitor. Be sure to 
keep magnetic recording equipment, tapes, and disks away 
from the monitor.

Installation

Do not install the monitor in the following places:
• on surfaces (rugs, blankets, etc.) or near materials (curtains, 

draperies, etc.) that may block the ventilation holes

• near heat sources such as radiators or air ducts, or in a place 

subject to direct sunlight

• in a place subject to severe temperature changes
• in a place subject to mechanical vibration or shock
• on an unstable surface
• near equipment which generates magnetism, such as a 

transformer or high voltage power lines

• near or on an magnetically charged metal surface
• in a dusty or smoky environment
• into a wall or enclosure
• in a small space that does not allow adequate ventilation around 

the top, bottom, and sides of the monitor that may block the 
ventilation holes.

Protection

•  Do not put foreign objects into the monitor.
•  Disconnect the monitor if environment exceeds 60ºC/140ºF.
•  Ensure AC power cord is not trapped under furniture, TV, etc.
•  Do not overload wall outlets, extension cords, or convenience 

receptacles beyond their capacity.

Maintenance

• Clean the screen with a soft cloth. If you use a glass cleaning 

liquid, do not use any type of cleaner containing an anti-static 
solution or similar additive as this may scratch the screen’s 
coating.

• Do not rub, touch, or tap the surface of the screen with sharp or 

abrasive items such as a ballpoint pen or screwdriver. This type 
of contact may result in a scratched picture tube.

• Clean the cabinet, panel and controls with a soft cloth lightly 

moistened with a mild detergent solution. Do not use any type 
of abrasive pad, scouring powder or solvent, such as alcohol or 
benzene.

Transportation

When you transport this monitor for repair or shipment, use the 
original carton and packing materials.

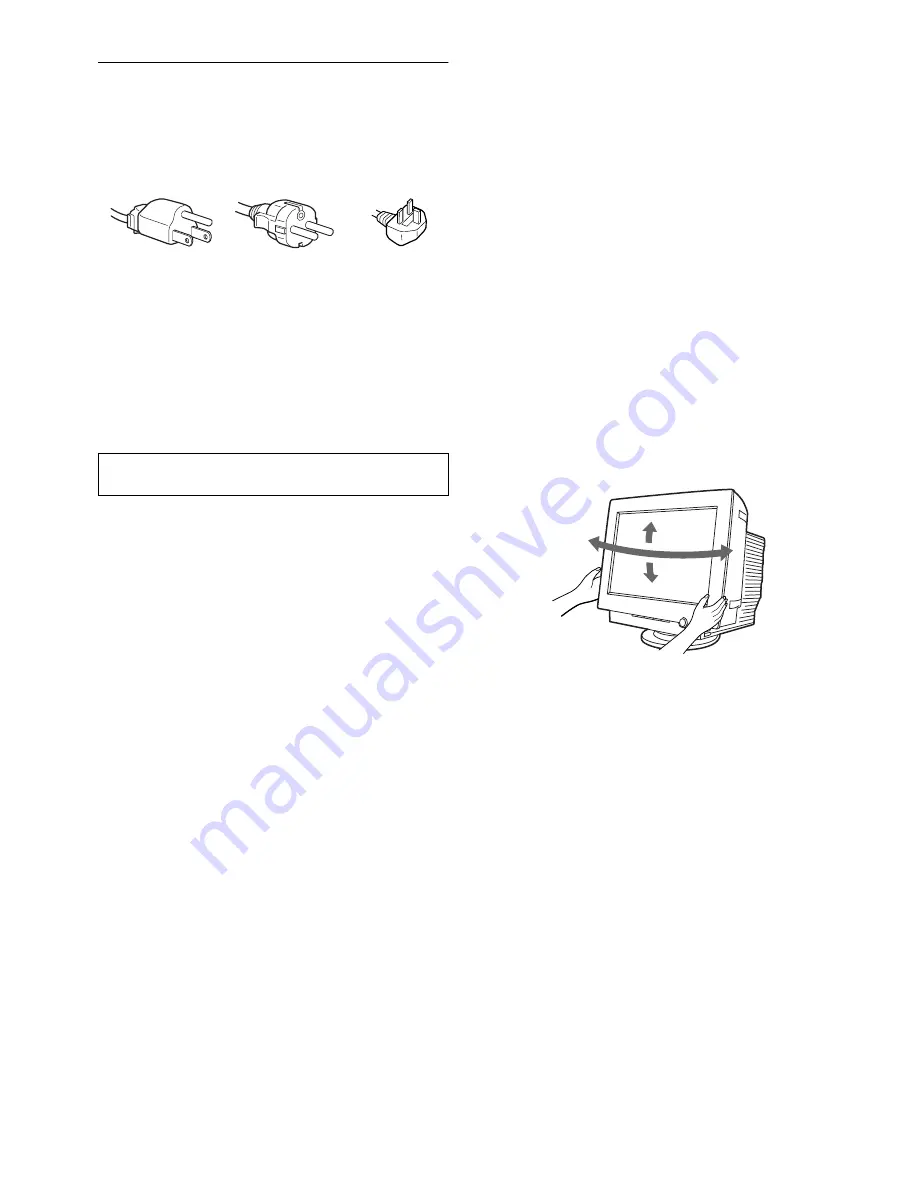
Use of the tilt-swivel

This monitor can be adjusted within the angles shown below. To 
find the center of the monitor’s turning radius, align the center of 
the monitor’s screen with the centering line on the stand.
Hold the monitor at the bottom with both hands when you turn it 
horizontally or vertically. Be careful not to pinch your fingers at 
the back of the monitor when you tilt the monitor up vertically.

The equipment should be installed near an easily accessible 
outlet.

Example of plug types

for 100 to 120 V AC

for 200 to 240 V AC

for 240 V AC only

90°

90°

15°

Содержание P77

Страница 1: ...Operating Instructions 4 XXX XXX XX 1 English Color Monitor P77 ...

Страница 2: ...IBM s intellectual property rights or other legally protectable rights may be used instead of the IBM product program or service Evaluation and verification of operation in conjunction with other products programs or services except those expressly designated by IBM are the user s responsibility IBM may have patents or pending patent applications covering subject matter in this document The furnis...

Страница 3: ...ss and contrast 7 Adjusting the size and the centering of the picture SIZE CENTER 7 Adjusting the shape of the picture GEOMETRY 8 Adjusting the color of the picture COLOR 8 Adjusting the convergence CONVERGENCE 8 Selecting the on screen menu language LANGUAGE 8 Additional settings OPTION 9 Technical Features 10 Preset and user modes 10 Power saving function 10 Troubleshooting 10 If thin lines appe...

Страница 4: ...tilation holes Protection Do not put foreign objects into the monitor Disconnect the monitor if environment exceeds 60ºC 140ºF Ensure AC power cord is not trapped under furniture TV etc Do not overload wall outlets extension cords or convenience receptacles beyond their capacity Maintenance Clean the screen with a soft cloth If you use a glass cleaning liquid do not use any type of cleaner contain...

Страница 5: ...ton and indicator pages 4 10 13 This button turns the monitor on and off The power indicator lights up in green when the monitor is turned on and lights up in amber when the monitor is in power saving mode 5 AC input connector pages 2 4 13 This connector provides AC power to the monitor 6 6 6 6 Video input connector HD15 page 4 This connector inputs RGB video signals 0 700 Vp p positive and sync s...

Страница 6: ... complete If necessary use the monitor s controls to adjust the picture If no picture appears on your screen Check that the monitor is correctly connected to the computer If CHECK SIGNAL CABLE appears on the screen check the input signal connection and confirm that your computer s graphic board is completely seated in the correct bus slot If you are replacing an old monitor with this model and OUT...

Страница 7: ...board keeping your hands and fingers relaxed Allow a space in front of the keyboard to rest your wrists when not typing Consider using a wristpad Eyesight Working with monitors in common with any kind of prolonged close work can be visually demanding Look away from the screen periodically and have your eyesight checked regularly Screen settings Set the screen brightness and contrast to a comfortab...

Страница 8: ...ss the m M buttons to highlight one of the following menus then press the buttton to select the menu b 1 1 1 1 EXIT Close the menu 2 SIZE CENTER page 7 Adjusts the picture s size centering or zoom 3 GEOMETRY page 8 Adjusts the picture s rotation and shape 4 COLOR page 8 Adjusts the picture s color temperature You can use this to match the monitor s colors to a printed picture s colors 5 CONVERGENC...

Страница 9: ...ing the size and the centering of the picture SIZE CENTER 1 Press the button The main MENU appears on the screen 2 Press the m or M button to highlight SIZE CENTER and press the button The SIZE CENTER menu appears on the screen 3 First press the m or M button to select the desired adjustment item Then press the or button to adjust the setting Note Adjustment stops when either the horizontal or ver...

Страница 10: ... press the m or M button to select Then press the or button to adjust the color temperature Adjusting the convergence CONVERGENCE The CONVERGENCE settings allow you to adjust the quality of the picture by controlling the convergence The convergence refers to the alignment of the red green and blue color signals If you see red or blue shadows around letters or lines adjust the convergence 1 Press t...

Страница 11: ...utton to select MOIRE ADJUST Then press the or button until the moire effect is at a minimum Moire is a type of natural interference which produces soft wavy lines on your screen It may appear due to interference between the pattern of the picture on the screen and the phosphor pitch pattern of the monitor Resetting the adjustment The RESET option erases your customized settings To restore your mo...

Страница 12: ...e ACTIVATE USING PC appears on the screen if you press any button on the monitor After a few seconds the monitor enters the power saving mode again If the horizontal or vertical sync signal is received by the monitor the power indicator lights in amber Troubleshooting Before contacting technical support refer to this section If thin lines appear on your screen damper wires The lines you are experi...

Страница 13: ...inters electric fans fluorescent lighting or televisions Move the monitor away from power lines or place a magnetic shield near the monitor Try plugging the monitor into a different AC power outlet preferably on a different circuit Try turning the monitor 90 to the left or right xProblems caused by the connected computer or other equipment Check your graphics board manual for the proper monitor se...

Страница 14: ...ized technical support and give the following information Model name P77 Serial number Name and specifications of your computer and graphics board Letters and lines show red or blue shadows at the edges Adjust the convergence page 8 Monitor buttons do not operate If the control lock is set to ON set it to OFF page 9 A hum is heard right after the power is turned on This is the sound of the auto de...

Страница 15: ...ideo board Specifications CRT 0 24 mm aperture grille pitch center 17 inches measured diagonally 90 degree deflection Trinitron Viewable image size Approx 326 7 242 5 mm w h 12 7 8 9 5 8 inches Viewing image Approx 406 4 mm 16 0 inches Resolution Maximum Horizontal 1600 dots Vertical 1200 lines Recommended Horizontal 1024 dots Vertical 768 lines Standard image area Approx 312 234 mm w h 12 3 8 9 1...

Страница 16: ...ce use only Monitor Information Part No M T Model Description 22P6359 6639 T3N P77 Monitor NH Pearl White Japan 22P6360 6639 U3N P77 Monitor NH Stealth Black Japan 22P6361 6639 T3N P77 Monitor NH Pearl White 22P6362 6639 U3N P77 Monitor NH Stealth Black 22P6363 6639 T3S P77 Monitor SH Pearl White 22P6364 6639 U3S P77 Monitor SH Stealth Black ...

Отзывы: