background image

3

Getting Started

Getting Started

F

GB

ES

C

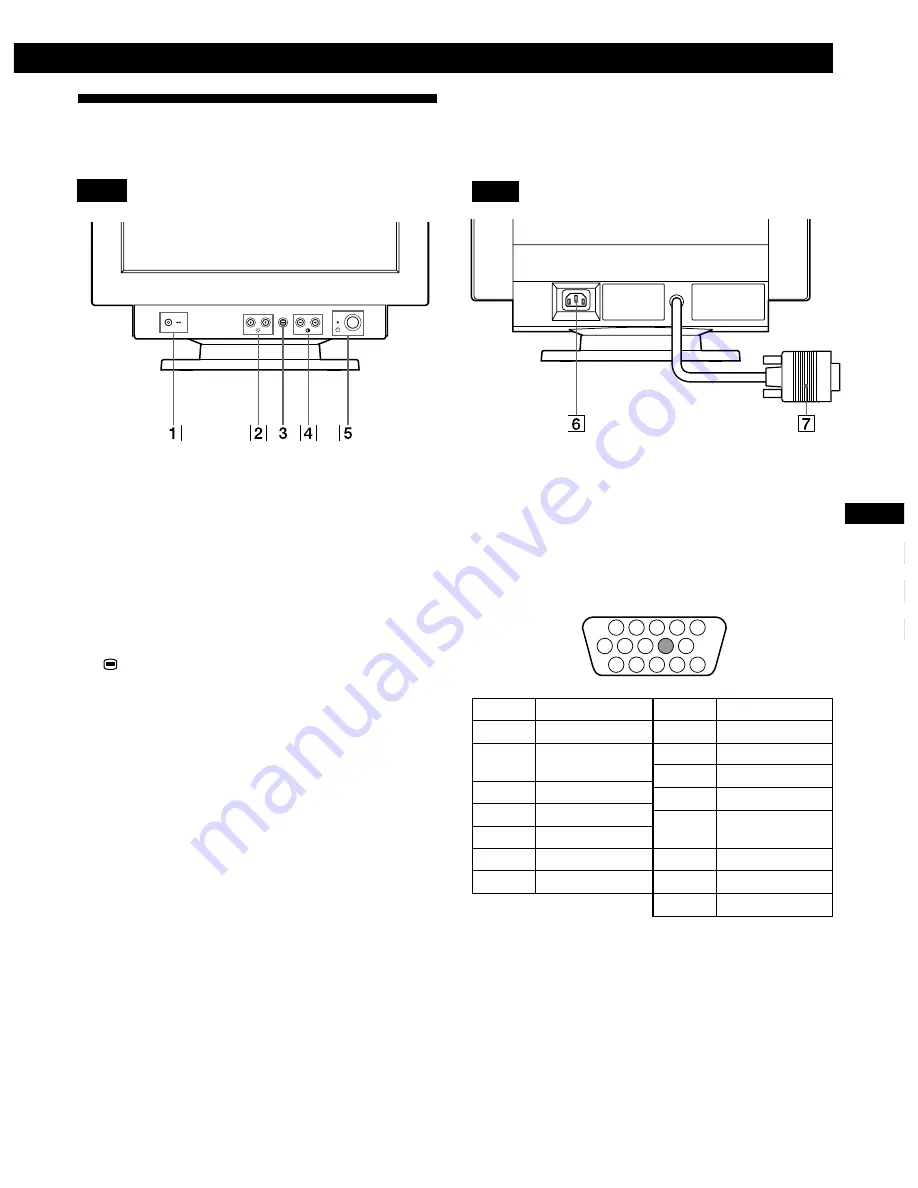
Identifying Parts and Controls

See the pages in parentheses for further details.

Front

1

?

 (reset) button (page 13)

Resets the adjustments to the factory settings.

2

¨

 (brightness) down and up (

.

/

>

) buttons

(pages 5 – 13)

Adjust the picture brightness.

Function as the (

.

/

>

) buttons when adjusting other

items.

3

 button (pages 5 – 13, 15)

Displays the MENU OSD.

4

>

 (contrast) left and right (

?

/

/

) buttons

(pages 5 – 13, 18)

Adjust the contrast.

Function as the (

?

/

/

) buttons when adjusting other

items.

5

u

 (power) switch and indicator (pages 14,

18)

Turns the monitor on or off.
The power indicator lights up in green when the
monitor is turned on, and either flashes in green and
orange, or lights up in orange when the monitor is in
power saving mode.

Rear

6

AC IN connector (page 4)

Provides AC power to the monitor.

7

Video input connector (HD15) (page 4)

Inputs RGB video signals (0.700 Vp-p, positive) and
SYNC signals.

Pin No.

1

2

3

4

5

6

7

Pin No.

8

9

10

11

12

13

14

15

Signal

Red

Green
(Sync on Green)

Blue

ID (Ground)

DDC Ground*

Red Ground

Green Ground

Signal

Blue Ground

Ground

ID (Ground)

Bi-Directional
Data (SDA)*

H. Sync

V. Sync

Data Clock(SCL)*

*

Display Data Channel (DDC) Standard of VESA

1 2

3 4 5

8

7

6

11 12 13 14 15

10

9

Содержание P76

Страница 1: ...3 867 449 11 1 Operating Instructions Mode d emploi Bedienungsanleitung Manual de instrucciones Istruzioni per l uso P76 Color Monitor FR GB DE ES IT ...

Страница 2: ......

Страница 3: ...EFAHRENHINWEIS Um die Gefahr eines elektrischen Schlags zu vermeiden folgendes beachten Unter keinen Umständen die Abdeckungen abnehmen Das Produkt nicht in Betrieb nehmen wenn der Sockel nicht montiert ist Das Gerät nicht während eines Gewitters an eine Steckdose anschließen oder von ihr trennen Das Netzkabel ist an eine ordnungsgemäß verdrahtete und geerdete Steckdose anzuschließen Jedes Gerät m...

Страница 4: ...ccare la spina dalla presa di alimentazione che deve essere facilmente accessibile Manipulación El monitor de color es pesado por lo que debe manipularlo con cuidado IBM recomienda moverlo con la ayuda de dos personas PERIGO Para evitar o perigo de choques eléctricos Não retire as coberturas Não utilize este produto antes de montar a base Não ligue nem desligue este produto durante uma tempestade ...

Страница 5: ... eller lyfts av två personer VAARA Sähköiskun vaaran välttämiseksi Älä avaa laitteen kansia missään tilanteessa Älä käytä laitetta ellei jalustaa ole kiinnitetty Älä kytke laitetta pistorasiaan tai irrota sitä pistorasiasta ukonilman aikana Virtajohto on kytkettävä asianmukaisesti johdotettuun ja maadoitettuun pistorasiaan Kaikki muutkin laitteet joihin tämä tuote on liitetty on kytkettävä asianmu...

Страница 6: ...lantıları usulüne uygun olarak yapılmış bir prize takılmalıdır Bu cihazın bağlanacağı diğer tüm cihazlar da elektrik ve toprak bağlantıları usulüne uygun olarak yapılmış prize takılmış olmalıdır Monitörün elektrikle bağlantısını kesmek için fişini prizden çekmeniz gereklidir Priz kolayca erişilebilecek bir yerde olmalıdır Kaldırma Renkli monitörünüz ağırdır kaldırırken dikkatli olunuz IBM monitörü...

Страница 7: ...Getting Started Getting Started F GB ES C English ...

Страница 8: ...ucts programs orservicesdonotimplythatIBMintendstomaketheseavailablein allcountriesinwhichIBMoperates AnyreferencetoanIBMproduct programorserviceisnotintendedtostateorimplythat onlyIBM sproduct program orservicemaybeused Anyfunctionallyequivalentproduct program orservicethatdoesnot infringeanyofIBM sintellectualpropertyrightsorotherlegallyprotectablerightsmaybeusedinsteadoftheIBMproduct program or...

Страница 9: ...3 Setup 4 Customizing Your Monitor Selecting the On screen Display Language 5 Adjusting the Picture Brightness and Contrast 5 Introducing the On screen Display System 5 Using the SIZE CENTER On screen Display 6 Using the GEOMETRY On screen Display 7 Using the COLOR On screen Display 8 Using the CONVERGENCE On screen Display 9 Using the LANGUAGE On screen Display 10 Using the OPTION On screen Displ...

Страница 10: ... Installation Prevent internal heat build up by allowing adequate air circulation Do not place the monitor on surfaces rugs blankets etc or near materials curtains draperies that may block the ventilation holes Do not install the monitor near heat sources such as radiators or air ducts or in a place subject to direct sunlight excessive dust mechanical vibration or shock Do not place the monitor ne...

Страница 11: ...ower switch and indicator pages 14 18 Turns the monitor on or off The power indicator lights up in green when the monitor is turned on and either flashes in green and orange or lights up in orange when the monitor is in power saving mode Rear 6 AC IN connector page 4 Provides AC power to the monitor 7 Video input connector HD15 page 4 Inputs RGB video signals 0 700 Vp p positive and SYNC signals P...

Страница 12: ...the computer Note Do not short the pins of the video signal cable Step 3 Connect the power cord With the monitor switched off connect one end of the proper power cord for your local supply to the monitor and the other end to a power outlet Step 4 Turn on the monitor and computer Step 5 Adjust the monitor s controls according to your personal preference The installation of your monitor is complete ...

Страница 13: ...s the button to display the MENU OSD This MENU OSD contains links to the other OSDs described below 1 EXIT Closes the MENU OSD 2 SIZE CENTER Displays the SIZE CENTER OSD for adjusting the picture s size centering or zoom 3 GEOMETRY Displays the GEOMETRY OSD for adjusting the picture rotation and pincushion etc 4 COLOR Displays the COLOR OSD for adjusting the color temperature 5 CONVERGENCE Display...

Страница 14: ...ntering Horizontal Sizing Vertical Sizing Zoom 2 6 S I ZE CENTER 4 Press the buttons to adjust the settings Select Horizontal Centering Vertical Centering Horizontal Sizing Vertical Sizing Zoom Press the button once to return to the MENU OSD and twice to return to normal viewing If no buttons are pressed the OSD closes automatically after about 30 seconds To reset press the reset button while the ...

Страница 15: ...just the picture side balance adjust the picture width adjust the picture shape balance For Rotation Pincushion Pin Balance Keystone Key Balance Press to rotate the picture clockwise to rotate the picture counterclockwise to expand the picture sides to contract the picture sides to move the picture sides to the right to move the picture sides to the left to increase the picture width at the top to...

Страница 16: ... TheCOLOROSDappears 3 Press the buttons to select the color temperature TherearetwocolortemperaturemodesintheOSD Thepresetadjustmentsare9 300Kand5 000K Selecting your own color temperature between 9 300K and 5 000K Pressthe buttonstoselect Variable and adjustbypressingthe buttons forahighertemperature bluish foralowertemperature reddish Press the button once to return to the MENU OSD and twice to ...

Страница 17: ...rs 3 Press the buttons to select the item you want to adjust Select Horizontal Convergence Vertical Convergence To adjust the horizontal convergence adjust the vertical convergence 2 6 CONVERGENCE For Horizontal Convergence Vertical Convergence 4 Press the buttons to adjust the settings Press the button once to return to the MENU OSD and twice to return to normal viewing If no buttons are pressed ...

Страница 18: ... I S DEUTSCH ESPAÑOL I TAL I ANO NEDERLANDS SVENSKA LANGUAGE Using the OPTION On screen Display The OPTION OSD allows you to manually degauss the screen adjust the moire cancellation level and adjust the OSD position It also allows you to lock the controls Degaussing the screen The monitor screen is automatically degaussed demagnetized when the power is turned on You can also manually degauss the ...

Страница 19: ... on DEGAUSS ON OPT I ON OSD H POS I T I ON 2 6 OPT I ON OSD V POS I T I ON 2 6 OPT I ON Adjusting the moire If elliptical or wavy patterns appear on the screen adjust the moire cancellation level 1 Press the button The MENU OSD appears 2 Press the buttons to select OPTION and press the button again The OPTION OSD appears 3 Press the buttons to select MOIRE ADJUST 4 Press the buttons to adjust the ...

Страница 20: ...isted in the HELP OSD or if the problem persists see Troubleshooting on page 16 1 Press the button The MENU OSD appears 2 Press the buttons to select HELP and press the button again The HELP OSD appears 3 Press the buttons to select a HELP menu item and press the button again Instructions or information to resolve the problem appears on the screen An explanation of each menu item is given below RE...

Страница 21: ...ction when CONTROL LOCK is set to ON DISTORTED SHAPE If the shape of the picture on the screen seems distorted try adjusting the picture s geometry Press the button to jump directly to the GEOMETRY OSD OUT OF FOCUS The picture may seem to be out of focus when the red and blue color signals are not aligned properly causing red or blue shadows to appear around letters and lines Try adjusting the pic...

Страница 22: ...ox 5 sec Approx 15 sec u indicator Green Green and orange alternate Green and orange alternate Orange Off Power consumption 130 W 15 W 15 W 3 W 0 W Power consumption mode Normal operation Standby 1st mode Suspend 2nd mode Active off 3rd mode Power off Screen active blank blank blank Horizontal sync signal present absent present absent Vertical sync signal present present absent absent Note When yo...

Страница 23: ...monitor s condition MONITOR IS WORKING This indicates that the monitor is working properly 2 The input signal condition and the remedies CHECK SIGNAL CABLE This indicates that no signal is input Check that the video signal cable is properly connected and all plugs are firmly seated in their sockets OUT OF SCAN RANGE and CHANGE PC SETTING These indicate that the input signal is not supported by the...

Страница 24: ...The computer is in power saving mode Try pressing any key on the computer keyboard Check that your computer power switch is in the on position Check that the graphic board is completely seated in the proper bus slot Check that the video frequency range is within that specified for the monitor Horizontal 30 96 kHz Vertical 48 120 Hz Refer to your computer s instruction manual to adjust the video fr...

Страница 25: ... fields Common causes for this symptom are electric fans fluorescent lighting or laser printers If you have another monitor close to this monitor increase the distance between them to reduce the interference Try plugging the monitor into a different AC outlet preferably on a different circuit Try the monitor on a different computer in a different room Set the refresh rate on the computer to obtain...

Страница 26: ...a self diagnosis function If there is a problem with your monitor or computer the screen will go blank and the u indicator will either light up green or flash orange If the u indicator is green 1 Disconnect the video input cable or turn off the connected computer 2 Press the u button twice to turn the monitor off and then on 3 Press and hold the button for 2 seconds before the monitor enters power...

Страница 27: ...ble Party Sony Electronics Inc Address 1 Sony Drive Park Ridge NJ 07656 Telephone No 201 930 6972 This Device complies with Part 15 of the FCC Rules Operation is subject to the following two conditions 1 This device may not cause harmful interference and 2 this device must accept any interference received including interference that may cause undesired operation Power Cords For your safety IBM pro...

Страница 28: ...z des Bildes kann sich auf Grund des Magnetfeldes am Ort der Aufstellung aus der korrekten Grundeinstellung verändern Zur Korrektur empfiehlt es sich deshalb die Regler an der Frontseite für H STAT und V STAT so einzustellen daß die getrennt sichtbaren Farblinien für Rot Grün und Blau bei z B der Darstellung eines Buchstabens zur Deckung Konvergenz gelangen Siehe hierzu auch die Erklärungen zu H S...

Страница 29: ...ten Es sind ordnungsgemäß abgeschirmte und geerdete Kabel und Stecker zu verwenden um das Störungspotential in bezug auf Radio und Fernsehempfang oder andere elektrische oder elektronische Geräte zu reduzieren Solche Kabel und Stecker sind bei autorisierten IBM Fachhändlern erhältlich In Übereinstimmung mit EN 50082 1 1992 Leistungskriterium A wird darauf hingewiesen daß bestimmte elektromagnetisc...

Страница 30: ...reseller will repair it or replace it with one that is at least functionally equivalent without charge The replacement may not be new but will be in good working order If IBM or your reseller is unable to repair or replace the Machine you may return it to your place of purchase and your money will be refunded If you transfer a Machine to another user warranty service is available to that user for ...

Страница 31: ...M is liable only for 1 damages for bodily injury including death and damage to real property and tangible personal property and 2 the amount of any other actual direct damages or loss up to the greater of U S 100 000 or the charges if recurring 12 months charges apply for the Machine that is the subject of the claim UNDER NO CIRCUMSTANCES IS IBM LIABLE FOR ANY OF THE FOLLOWING 1 THIRD PARTY CLAIMS...

Страница 32: ... amount of energy since they are often left running continuously What does labelling involve This product meets the requirements for the TCO 95 scheme which provides for international and environmental labelling of personal computers The labelling scheme was developed as a joint effort by the TCO The Swedish Confederation of Professional Employees Naturskyddsforeningen The Swedish Society for Natu...

Страница 33: ...lly bound chlorine and bromine Lead Lead can be found in picture tubes display screens solders and capacitors Lead damages the nervous system and in higher doses causes lead poisoning TCO 95 requirement permits the inclusion of lead since no replacement has yet been developed Cadmium Cadmium is present in rechargeable batteries and in the colourgenerating layers of certain computer displays Cadmiu...

Страница 34: ... it is vital to save energy Electronics equipment in offices is often left running continuously and thereby consumes a lot of energy What does labelling involve This product meets the requirements for the TCO 99 scheme which provides for international and environmental labelling of personal computers The labelling scheme was developed as a joint effort by the TCO The Swedish Confederation of Profe...

Страница 35: ...ontain flame retardants with organically bound bromine or chlorine Flame retardants are allowed in the printed circuit boards since no substitutes are available Cadmium Cadmium is present in rechargeable batteries and in the colour generating layers of certain computer displays Cadmium damages the nervous system and is toxic in high doses The relevant TCO 99 requirement states that batteries the c...

Страница 36: ...rts are for service use only Part No M T Model Description 21L4572 6556 03N Monitor UVNH Pearl White NA EMEA 21L4573 6556 43N Monitor UVNH Stealth Gray NA EMEA 61H0213 6556 03N Monitor UVSH Pearl White 61H0214 6556 43N Monitor UVSH Stealth Gray 61H0215 6556 03S Video Cable Pearl White 61H0216 6556 43S Video Cable Stealth Gray ...

Страница 37: ...Getting Started Getting Started XI ...

Страница 38: ...Printed in Japan P202 User Guide Part Number 61H0239 EC D03285 61H0239 ...

Отзывы: