background image

2

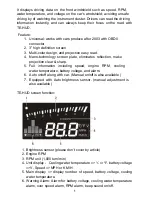
TE-HUD starting 

1.

OBD2 cable input (connector with vehicle OBD II)

2.

Power on/off switch

3.

Function setting button (can push up, down, inward)

4.

Short  push  function  setting  button,  showing  cooling  water  temperature, 
battery voltage, or speed.

5.

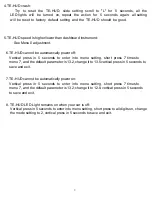
Beep sound on/off: Push function setting button down for 5 sec, all the Alarm 
function off, again push it 5 sec, Alarm function on.  

TE-HUD installation 

1.

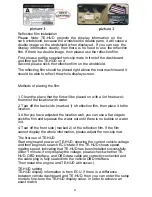
Make sure your car use

s


an 

OBDII connector (as picture 2), also use

s the


OBD II protocol (normally  you  will  find  a  stick 

near  connector


or  engine  bay 

(as  picture  1) showing OBD II certified, if not, c

onsult the vehicle's owner's 

manual

)

.

2.

Connect the OBD II cable (included in package) to your Car OBD II jack.


Connector other end of cable (mini USB connector) to TE-HUD device. 

Содержание TE-HUD

Страница 1: ...TE HUD User Manual iBeamUSA com MetraDealer com techsupport metra autosound com TECH SUPPORT l J 800 253 8324 ...

Страница 2: ...eliminates reflection make projection clear sharp 5 Full information including speed engine RPM cooling water temperature battery voltage and alarm 6 Auto on off along with car Manual on off is also available 7 Equipped with Auto brightness sensor manual adjustment is also available TE HUD screen function 1 Brightness sensor please don t cover by article 2 Engine RPM 3 RPM unit 1 000 turn min 4 Un...

Страница 3: ...ng button down for 5 sec all the Alarm function off again push it 5 sec Alarm function on TE HUD installation 1 Make sure your car uses an OBDII connector as picture 2 also uses the OBD II protocol normally you will find a stick near connector or engine bay as picture 1 showing OBD II certified if not consult the vehicle s owner s manual 2 Connect the OBD II cable included in package to your Car O...

Страница 4: ...eflection film then place it to the location 3 After you have adjusted the location well you can use a flat edge to slick the film and squeeze the water out until there is no bubble or water in it 4 Tear off the front side marked 2 of the reflection film If the film cannot display the whole information please adjust the non slip mat The first use of TE HUD Start engine and power on TE HUD showing ...

Страница 5: ... upside button or downside button to increase or decrease the parameter After finish the adjustment long press the wave button vertically for 5s to return to the display interface Menu Function Adjustmen t range Description Factory preset number Picture show 0 Speed 50 150 If TE HUD speed is higher than dashboard instrument low this number by push down function setting button normally low by 2 one...

Страница 6: ... ...

Страница 7: ... information e g water temperature battery voltage speed 3 Beep sound on off Push function setting button down for 5 sec all the Alarm function off again push it 5 sec Alarm function on 4 Restore the factory Settings try to reset the TE HUD slide setting scroll to L for 5 seconds all the LED lights will be turned on repeat the action for 5 seconds again all setting will be reset to factory default...

Страница 8: ... check the plug set the voltage value change another vehicle with OBD2 protocol No speed and engine speed display Not conform to OBDII or EU OBD port Consult vehicles owner s manual Speed is inaccurate The unit of speed is KM H Switching the unit of speed to MPH 1 Nothing on screen Make sure the TE HUD power button is on make sure OBD II is securely connected start car again 2 Power on but screen ...

Страница 9: ...ds to enter into menu setting short press 7 times to menu 7 and the default parameter is 13 2 change it to13 5vertical press in 5 seconds to save and exit 7 TE HU 8 TE HUD LED Light remains on when your car is off Vertical press in 5 seconds to enter into menu setting short press to all digits on change the mode setting to 2 vertical press in 5 seconds to save and exit D cannot be automatically po...

Страница 10: ..._______________________________________________________________ _______________________________________________________________________________ _______________________________________________________________________________ _______________________________________________________________________________ _______________________________________________________________________________ ________________...

Страница 11: ...____________________________________________________________ _______________________________________________________________________________ _______________________________________________________________________________ _______________________________________________________________________________ _______________________________________________________________________________ ___________________...

Страница 12: ...and negative pole otherwise the fuse will blow immediately for security protection If it happens please replace the blown fuse with a new one with same specification after connecting properly to the right pole Don t randomly increase the current rating of the fuse and NEVER use metal wire as a substitute KNOWLEDGE IS POWER Enhance your installation and fabrication skills by enrolling in the most r...

Отзывы: