background image

iB-WAP150N

150M Wireless-N Access Point


26 

¾


MAC of AP - 

Enter the MAC address of the root AP of which you want to expand wireless 

range.


¾


Channel Width


-

 Determines the channel width to be used. It is unnecessary to change the 

default value unless required.


¾


Max Tx Rate - 

Specifies the maximum transmit rate of the device through this field. 

¾


Enable Wireless Radio - 

Select or deselect this check box to allow or deny wireless stations 

to access the device. 


Click the 

Search

 button to detect the SSIDs in the local area. 

)


Note: 

To apply any settings you have altered on the page, please click the 

Save

 button, and then you 

will be reminded to reboot the device. 

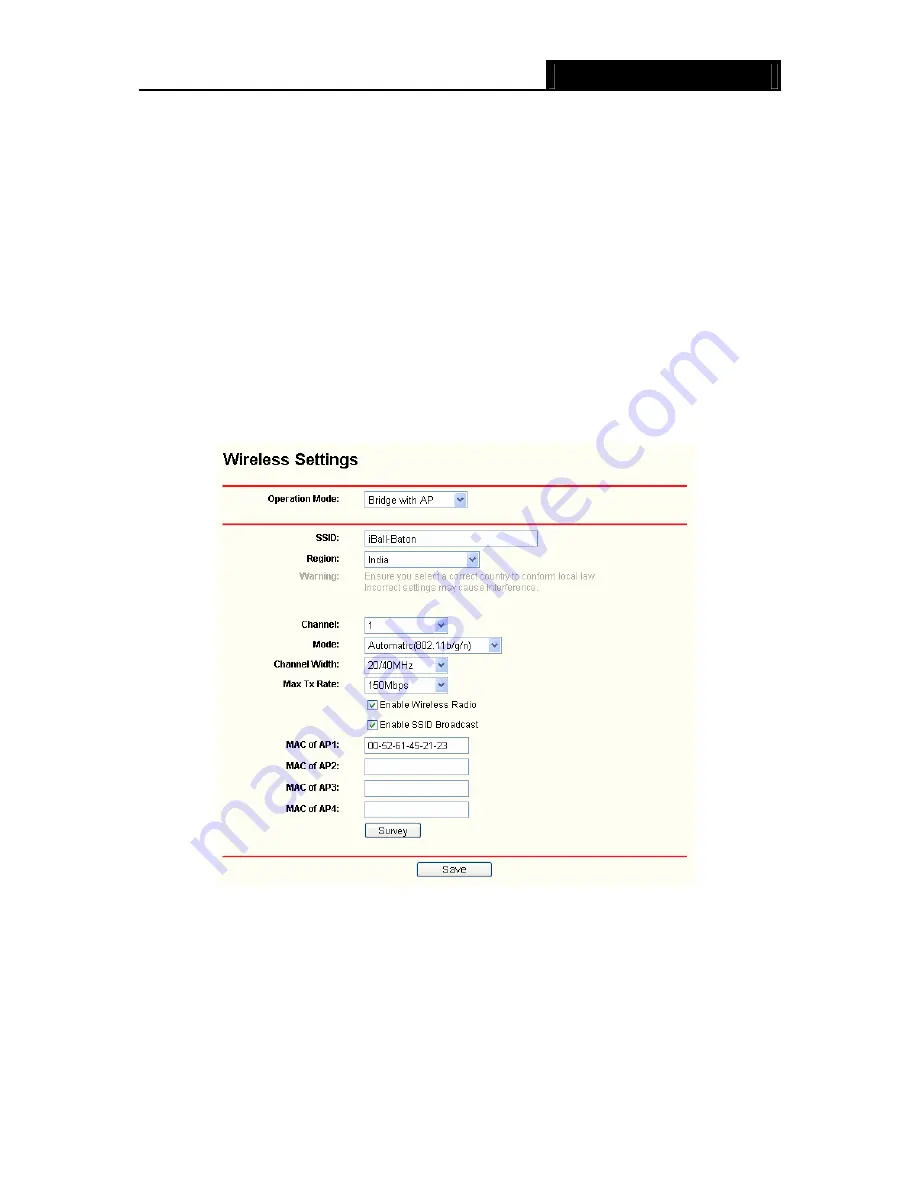
6) Bridge with AP: 

This mode can bridge the AP and up to 4 APs also in bridge mode to 

connect two or more wired LANs. 


Figure 4-29 (Wireless Settings in Bridge with AP mode) 

¾


SSID 

(Set Service Identifier) 

-

 Identifies your wireless network name. Create a name up to 32 

characters and make sure all wireless points in the wireless network with the same SSID. The 
default SSID is iBall-Baton. 

¾


Channel


-

 Determines the operating frequency to be used. It is not necessary to change the 

wireless channel unless you notice interference problems with another nearby access point. 

¾


Mode - 

This field determines the wireless mode which the device works on. 


11Mbps (802.11b) -

 Only 802.11b wireless stations can connect to the device. 

Содержание iB-WAP150N

Страница 1: ...150M Wireless N Access Point Model No iB WAP150N User Manual Ver 1 0 0 ...

Страница 2: ...d by turning the equipment off and on the user is encouraged to try to correct the interference by one or more of the following measures Reorient or relocate the receiving antenna Increase the separation between the equipment and receiver Connect the equipment into an outlet on a circuit different from that to which the receiver is connected Consult the dealer or an experienced radio TV technician...

Страница 3: ...ust not be co located or operating in conjunction with any other antenna or transmitter CE Mark Warning This is a class B product In a domestic environment this product may cause radio interference in which case the user may be required to take adequate measures ...

Страница 4: ...he PC 7 Chapter 4 Configure the Device 10 4 1 Login 10 4 2 Status 11 4 3 WPS 12 4 4 Network Settings 19 4 5 Wireless 20 4 5 1 Wireless Settings 21 4 5 2 Wireless Security 27 4 5 3 Wireless MAC Filtering 38 4 5 4 Wireless Advanced 41 4 5 5 Throughput Monitor 42 4 5 6 Wireless Statistics 42 4 6 DHCP 43 4 6 1 DHCP Settings 43 4 6 2 DHCP Clients List 45 4 6 3 Address Reservation 45 4 7 System Tools 46...

Страница 5: ...Dog 52 4 7 8 Restart 53 4 7 9 Password 53 4 7 10 System Log 54 Appendix A Application Example 57 Appendix B Factory Defaults 60 Appendix C Troubleshooting 61 Appendix D Specifications 62 Appendix E Glossary 63 Appendix F Contact Information 65 ...

Страница 6: ...ns the above items If any of the listed items are damaged or missing please contact with your distributor Conventions The AP or iB WAP150N or device mentioned in this User Guide stands for iBall Baton 150M Wireless N Access Point without any explanations Parameters provided in the pictures are just references for setting up the product which may differ from the actual situation You can set the par...

Страница 7: ...wall protections the iB WAP150N 150M Wireless N Access Point delivers complete data privacy It supports an easy web based setup for installation and management Even though you may not be familiar with the Access Point you can easily configure it with the help of this Guide Before installing the AP please look through this Guide to get the full information of the iB WAP150N 150M Wireless N Access P...

Страница 8: ...de the firmware to the latest version through the web based management page Supports Remote and Web management Allows you to manage your wireless LAN easily through the web based management page while the management by remote computer is also available 1 3 Appearance 1 3 1 The Front Panel Figure 1 1 The front panel of the iB WAP150N consists of several LED indicators which is designed to indicate ...

Страница 9: ...ed to the network by WPS function Table 1 1 1 3 2 The Rear Panel Figure 1 2 Viewed from left to right the following parts are located on the rear panel of iB WAP150N Wireless antenna The external antenna is used to transmit and receive wireless data POWER The power port connects to the power adapter provided with the 150M Wireless N Access Point LAN One LAN 10 100Mbps RJ45 port connects to a netwo...

Страница 10: ... seconds until the System LED becomes quick flash from slow flash And then release the button and wait the router to reboot to its factory default settings z Method two Restore the default settings from System Tools Factory Defaults of the AP Web based management page Note Ensure the AP is powered on before it restarts completely ...

Страница 11: ... strong electric field or magnetic field such as a microwave oven or refrigerator Place the AP near the center of the area in which your computers operates 2 2 Basic Requirements z Use only the power adapter provided with your AP z The electrical outlet shall be installed near the device and shall be easily accessible z Place your AP in a well ventilated place far from direct sunlight any heater o...

Страница 12: ...near the center of the area in which your PC s will wirelessly connect 3 Adjust the direction of the antenna Normally upright is a good direction 4 Connect the RJ45 patch cord from Router to Switch 5 Connect the RJ45 patch cord from Switch to Access Point Power on the AP 6 Then you can connect a desktop PC or laptop to your network Make sure your computer or laptop is equipped with a Wireless Adap...

Страница 13: ... xxx indicates IP address between 1 to 253 the Subnet mask as 255 255 255 0 and the Default gateway as 192 168 1 254 for your PC by following the instructions below Connect the local PCs to the LAN ports on the AP and configure the IP address manually for your PCs 1 Click Start in the lower left corner of the screen right click My Network Connections and choose Properties Figure 3 1 2 On the My Ne...

Страница 14: ...rotocol TCP IP and click Properties Figure 3 3 4 Configure the IP address manually 1 Select Use the following IP address 2 Enter 192 168 1 is any integer between 1 to 253 into the IP address filed 255 255 255 0 into the Subnet mask filed and 192 168 1 254 into the Default gateway filed 3 Click Ok to keep your settings Figure 3 4 ...

Страница 15: ... the connection between your PC and the AP has been successfully established Figure 3 5 If the result displayed is similar to that shown as Figure 3 6 below it means that your PC has not connected to the AP Figure 3 6 Please check following these steps a Check to see if your PC and the AP are right connected The LED of LAN port which you link to on the device and the LED on your PC s adapter shoul...

Страница 16: ...dmin for the User Name and Password both in lower case letters in Figure 4 2 below Then click OK or press Enter Figure 4 2 Login Windows Note If the above screen does not prompt it means that your web browser has been set to a proxy Go to Tools menu Internet Options Connections LAN Settings in the screen that appears cancel the Using Proxy checkbox and click OK to finish it After a successful logi...

Страница 17: ... the current settings or information for the Network including the MAC address IP address and Subnet Mask Wireless This field displays basic information or status for wireless function including Operating Mode SSID Channel Mode Channel Width Max Tx Rate and MAC Address Traffic Statistics This field displays the AP s traffic statistics System Up Time This filed displays the run time of the AP since...

Страница 18: ...tion mode of the device WPS Status To enable or disable the WPS function here Current PIN The current value of the device s PIN is displayed here The default PIN of the device can be found in the label or User Guide Restore PIN Restore the PIN of the device to its default Gen New PIN Click this button and then you can get a new random value for the device s PIN You can ensure the network security ...

Страница 19: ...etup and the PIN method you can add it to the network by PIN with the following two methods Two ways to configure the WPS by PIN method If the wireless adapter supports Wi Fi Protected Setup and the Push Button Configuration PBC method you can add it to the network by PBC with the following two methods PBC Method I Step 1 Press the WPS button on the front panel of the device as shown in Figure 4 6...

Страница 20: ... 4 9 Figure 4 9 Step 2 Double click the icon on the desktop to open the WPS Utility and then you can see the welcome screen shown click Next to continue Step 3 For the configuration of the wireless adapter please choose Push the button on my Access point in the configuration utility of the WPS as below and click Next Figure 4 10 Step 4 Wait for a while until the next screen appears as shown in Fig...

Страница 21: ...bled and click the Add device button in Figure 4 12 then the following screen will appear Figure 4 12 Add a New Device Step 2 Choose Press the button of the new device in two minutes and click Connect Step 3 For the configuration of the wireless adapter please choose Push the button on my access point in the configuration utility of the WPS as below and click Next ...

Страница 22: ... method you can add it to the network by PIN with the following two methods Two ways to configure the WPS by PIN method Enter a PIN into your AP device Method I Enter the PIN from your AP device Method II 1 Enter a PIN into your AP device Method I Step 1 Double click the icon on the desktop to open the WPS Utility welcome screen will appear Click Next to continue Select the second option Enter a P...

Страница 23: ...ick Next button as shown below in Figure 4 15 Figure 4 15 Step 2 Click Add device as displayed in Figure 4 16 Figure 4 16 Step 3 Select Enter the new device s PIN option and enter the PIN value of the wireless adapter as shown in Figure 4 17 Figure 4 17 Step 4 Message will appear shown below in Figure 4 18 Connect successfully in WPS Menu Interface ...

Страница 24: ...P can be found in its label or the WPS configuration screen 2 It will establish successful connection between the Wireless Access Point and Wireless adapter automatically 2 Enter a PIN from your AP device Method II Step 1 Login the iBall Baton iB WAP150N Menu and click WPS link on the left of the main menu Then Figure 4 20 will appear Write down the Current PIN code available Figure 4 20 ...

Страница 25: ... Point please enter the new one instead 2 The WPS LED on the AP will light for two minutes if the device has been successfully added to the network 3 The WPS function cannot be configured if the Wireless Function of the iB WAP150N is disabled Please make sure the Wireless Function is enabled before configuring the WPS 4 4 Network Settings The Network Settings option allows you to customize your lo...

Страница 26: ... functionality and performance for wireless network can help you make the AP an ideal solution for your wireless network Here you can create a wireless local area network just through a few settings Wireless Settings is used for the configuration of some basic parameters of the AP Wireless Security provides three different security types to secure your data and thus provide greater security for yo...

Страница 27: ...s device Figure 4 24 Wireless Settings in Access Point mode SSID Set Service Identifier Identifies your wireless network name Create a name up to 32 characters and make sure all wireless points in the wireless network with the same SSID The default SSID is iBall Baton This value is case sensitive For example TEST is NOT the same as test Channel Determines the operating frequency to be used It is n...

Страница 28: ...to allow or deny the device to broadcast its name SSID on the air If it s allowed when wireless clients survey the local area for wireless networks to associate with they will detect the SSID broadcast by the device Note To apply any settings you have altered on the page please click the Save button and then you will be reminded to reboot the device 2 Multi SSID This mode allows the device to supp...

Страница 29: ...ions can connect to the device 54Mbps 802 11g Only 802 11g wireless stations can connect to the device 150Mbps 802 11n Only 802 11n wireless stations can connect to the device Mixed Mode 802 11b g Both 802 11b and 802 11g wireless stations can connect to the device Automatic 802 11b g n All 802 11b 802 11g and 802 11n wireless stations can connect to the device Channel Width Determines the channel...

Страница 30: ...on before MAC of AP the AP client will connect to the AP according MAC address Enter the MAC address of AP that you want to access Channel Width Determines the channel width to be used It is unnecessary to change the default value unless required Enable Wireless Radio Select or deselect this check box to allow or deny wireless stations to access the device Click the Search button to detect the SSI...

Страница 31: ...eless Radio Select or deselect this check box to allow or deny wireless stations to access the device Click the Search button to detect the SSIDs in the local area Note To apply any settings you have altered on the page please click the Save button and then you will be reminded to reboot the device 5 Universal Repeater This mode allows the AP with its own BSS to relay data to a root AP to which it...

Страница 32: ...lick the Save button and then you will be reminded to reboot the device 6 Bridge with AP This mode can bridge the AP and up to 4 APs also in bridge mode to connect two or more wired LANs Figure 4 29 Wireless Settings in Bridge with AP mode SSID Set Service Identifier Identifies your wireless network name Create a name up to 32 characters and make sure all wireless points in the wireless network wi...

Страница 33: ... SSID Broadcast Select or deselect this check box to allow or deny the device to broadcast its name SSID on the air If it s allowed when wireless clients survey the local area for wireless networks to associate with they will detect the SSID broadcast by the device MAC of AP 1 4 Enter the MAC address of other AP s Click the Search button to detect the SSIDs in the local area Note To apply any sett...

Страница 34: ...this device without encryption It is strongly recommended that you choose one of the security types to enable security WEP Select 802 11 WEP security Type You can select one of following types 1 Automatic Select Shared Key or Open System authentication type automatically based on the wireless station s capability and request 2 Shared Key Select 802 11 Shared Key authentication type 3 Open System S...

Страница 35: ...You can select one of following versions 1 Automatic Select WPA or WPA2 automatically based on the wireless station s capability and request 2 WPA Wi Fi Protected Access 3 WPA2 WPA version 2 Encryption You can select either Automatic TKIP or AES Radius Server IP Enter the IP address of the Radius Server Radius Port Enter the port used by radius service Radius Password Enter the password for the Ra...

Страница 36: ...ation Within SSID Isolate wireless stations connected with the same SSID so that wireless stations cannot access each other through WLAN This function will be disabled if WDS Bridge is enabled Disable Security Check this box radio button to disable wireless security If disabled the wireless stations will be able to connect this device without encryption It is strongly recommended that you choose o...

Страница 37: ... PSK Select WPA based on pre shared key Version You can select one of following versions 1 Automatic Select WPA PSK or WPA2 PSK automatically based on the wireless station s capability and request 2 WPA PSK Pre shared key of WPA 3 WPA2 PSK Pre shared key of WPA2 Encryption When you select WPA PSK or WPA2 PSK for Authentication Type you can select either Automatic TKIP or AES as Encryption PSK Pass...

Страница 38: ...1 Shared Key authentication type 3 Open System Select 802 11 Open System authentication WEP Key Format You can select ASCII or Hexadecimal format ASCII format stands for any combination of keyboard characters in the specified length Hexadecimal format stands for any combination of hexadecimal digits 0 9 a f A F in the specified length WEP Key Select which of the four keys will be used and enter th...

Страница 39: ... on pre shared key Version You can select one of following versions 1 Automatic Select WPA PSK or WPA2 PSK automatically based on the wireless station s capability and request 2 WPA PSK Pre shared key of WPA 3 WPA2 PSK Pre shared key of WPA2 Encryption When you select WPA PSK or WPA2 PSK for Authentication Type you can select either Automatic TKIP or AES as Encryption PSK Passphrase Enter a passph...

Страница 40: ... 11 Shared Key authentication type 3 Open System Select 802 11 Open System authentication WEP Key Format You can select ASCII or Hexadecimal format ASCII format stands for any combination of keyboard characters in the specified length Hexadecimal format stands for any combination of hexadecimal digits 0 9 a f A F in the specified length WEP Key Select which of the four keys will be used and enter ...

Страница 41: ... on pre shared key Version You can select one of following versions 1 Automatic Select WPA PSK or WPA2 PSK automatically based on the wireless station s capability and request 2 WPA PSK Pre shared key of WPA 3 WPA2 PSK Pre shared key of WPA2 Encryption When you select WPA PSK or WPA2 PSK for Authentication Type you can select either Automatic TKIP or AES as Encryption PSK Passphrase Enter a passph...

Страница 42: ...1 Open System authentication WEP Key Format You can select ASCII or Hexadecimal format ASCII format stands for any combination of keyboard characters in the specified length Hexadecimal format stands for any combination of hexadecimal digits 0 9 a f A F in the specified length WEP Key Select which of the four keys will be used and enter the matching WEP key information for your network in the sele...

Страница 43: ...2 PSK automatically based on the wireless station s capability and request 2 WPA PSK Pre shared key of WPA 3 WPA2 PSK Pre shared key of WPA2 Encryption When you select WPA PSK or WPA2 PSK for Authentication Type you can select either Automatic TKIP or AES as Encryption PSK Passphrase Enter a passphrase here Group Key Update Period Specify the group key update interval in seconds The value can be e...

Страница 44: ... values must be identical on all wireless stations in your network Key Type You can select the WEP key length 64 bit or 128 bit or 152 bit for encryption Disabled means this WEP key entry is invalid 1 For 64 bit encryption You can enter 10 hexadecimal digits any combination of 0 9 a f A F zero key is not permitted or 5 ASCII characters 2 For 128 bit encryption You can enter 26 hexadecimal digits a...

Страница 45: ... or Modify Wireless MAC Address Filtering entry page will appear shown in Figure 4 37 Figure 4 37 Add or Modify Wireless MAC Address Filtering entry MAC Address Enter the wireless station s MAC address that you want to control Description Give a simple description of the wireless station Status Select a status for this entry either Enabled or Disabled To set up an entry follow these instructions F...

Страница 46: ...lick the Disabled All button to make all entries disabled Click the Delete All button to delete all entries Click the Next button to go to the next page and click the Previous button to return to the previous page For example If you desire that the wireless station A with MAC address 00 1E A6 B0 00 0B and station B with MAC address 00 1A A6 00 07 5F is able to access the device while all other wir...

Страница 47: ...a wireless network Beacon Interval value determines the time interval of the beacons The default value is 100 RTS Threshold Specifies the RTS Request to Send Threshold If the packet is larger than the specified RTS Threshold size the device will send RTS frames to a particular receiving station and negotiate the sending of a data frame The default value is 2346 Fragmentation Threshold This value i...

Страница 48: ...information in the following screen shown in Figure 4 39 Figure 4 39 Throughput Monitor Rate The Throughput unit Run Time How long this function is running Transmit Wireless transmit rate information Receive Wireless receive rate information Click the Start button to start wireless throughput monitor Click the Stop button to stop wireless throughput monitor 4 5 6 Wireless Statistics Selecting Wire...

Страница 49: ...xt button to go to the next page and click the Previous button to return the previous page Note This page will be refreshed automatically every 5 seconds 4 6 DHCP DHCP stands for Dynamic Host Configuration Protocol The DHCP Server will automatically assign dynamic IP addresses to the computers on the network This protocol simplifies network management and allows new wireless devices to receive IP ...

Страница 50: ...ime is measured in minutes After the time is up the PC will be automatically assigned a new dynamic IP address The range of the time is 1 2880 minutes The default value is 120 minutes Default Gateway optional Enter the IP address of the gateway for your LAN The factory default setting is 0 0 0 0 Default Domain optional Enter the domain name of the DHCP server You can leave the field blank Primary ...

Страница 51: ...current attached devices click on the Refresh button 4 6 3 Address Reservation Selecting DHCP Address Reservation will enable you to specify a reserved IP address for a PC on the LAN so the PC will always obtain the same IP address each time when it accesses the AP Reserved IP addresses should be assigned to servers that require permanent IP settings The screen below is used for address reservatio...

Страница 52: ...ackup or restore the AP s configuration files Ping Watch Dog can help to continuously monitor a particular connection to a remote host It s suggested that you change the default password to a more secure one because it controls access to the device s web based management page Besides you can find out what happened to the system in System Log There are nine submenus under the System Tools menu show...

Страница 53: ...f these values via the Device s Web Based Utility makes the corresponding object read only If there isn t such a config setting then the write request will succeed assuming suitable access control settings but the new value would be forgotten the next time the agent was restarted Get Community Enter the community name that allows Read Only access to the Device s SNMP information The community name...

Страница 54: ... SS into the right blanks NTP Server Prior Enter the address for the NTP Server then the Router will get the time from the NTP Server preferentially In addition for some built in common NTP Servers the Router can get time automatically once it connects the Internet To configure the system manually 1 Select your local time zone 2 Enter date and time in the right blanks 3 Click Save to save the conf...

Страница 55: ...his case ensure that the domain name you are specifying can be resolved by using Domain Name System DNS queries Traceroute This diagnostic tool determines the path taken to a given host by sending Internet Control Message Protocol ICMP Echo Request messages with varying Time to Live TTL values to the destination Each gateway along the path is required to decrement the TTL in an IP packet by at lea...

Страница 56: ...button to start the diagnostic procedure The Diagnostic Results page displays the result of diagnosis If the result is similar to the following screen the connectivity of the Internet is fine Figure 4 49 Diagnostic Results Note 1 Only one user can use this tool at one time 2 Options Number of Pings Ping Size and Ping Timeout are only available for Ping function Option Tracert Hops is available onl...

Страница 57: ...blank 3 Click Upgrade Note Do not turn off the device or press the RESET button while the firmware is being upgraded The device will reboot after the Upgrading has been finished 4 7 5 Factory Defaults Selecting System Tools Factory Default allows you to restore the factory default settings for the device on the screen shown in Figure 4 51 Figure 4 51 Restore Factory Defaults Click Restore to reset...

Страница 58: ...ged 3 The restoring process lasts for 20 seconds and restart automatically Do not power off the device during the process to avoid any damage 4 7 7 Ping Watch Dog Selecting System Tools Ping Watch Dog allows you to continuously monitor the particular connection between the device to a remote host It makes this device continuously ping a user defined IP address it can be the internet gateway for ex...

Страница 59: ...art the device Click the Reboot button to restart the device Some settings of the device will take effect only after rebooting which include Change LAN IP Address System will reboot automatically Change the Wireless configurations Change the Web Management Port Upgrade the firmware of the device system will reboot automatically Restore the device s settings to factory defaults system will reboot a...

Страница 60: ... Enter the new Password twice to confirm it Click Save when finished Click Clear All to clear all 4 7 10 System Log Selecting System Tools System Log allows you to query the Logs of the device on the screen shown in Figure 4 56 Figure 4 56 System Log The device can keep logs of all traffic You can query the logs to find what happened to the device Auto Mail Feature Indicates whether auto mail feat...

Страница 61: ...r the User Name and Password in the following fields z User Name Your mail account name filled in the From field The part behind is excluded z Password Your mail account password z Confirm The Password Enter the password again to confirm z Enable Auto Mail Feature Select it to mail logs automatically You could mail the current logs either at a specified time everyday or by intervals but only one c...

Страница 62: ... of current logs manually according to the address and validation information set in Mail Settings The result will be shown in the later log soon Click the Clear Log button to delete all the logs from the system permanently not just from the page Click the Next button to go to the next page or click the Previous button return to the previous page ...

Страница 63: ...the web based management page Configure your AP in the Access Point mode and check the Enable SSID Broadcast box referring to 4 5 1 Wireless Settings 4 View the Wireless Wireless Settings page and keep the SSID of the AP in mind Here we choose iBall Baton as the SSID for example You are suggested to change the SSID and secure your wireless network referring to 4 5 1 Wireless Settings and 4 5 2 Wir...

Страница 64: ...ht click Wireless Network and choose Enable to enable wireless network function 3 Right click the wireless connection icon on the screen of the PC and then select View Available Wireless Networks 4 Highlight the SSID of the AP Here is iBall Baton and click Connect to add to the network ...

Страница 65: ...iB WAP150N 150M Wireless N Access Point 59 5 Then the following page will display which indicates you have been successfully added to the network wirelessly ...

Страница 66: ...less Security Disable Wireless MAC Address Filtering Disable DHCP DHCP Server Disable Start IP Address 192 168 1 100 End IP Address 192 168 1 199 Address Lease Time 120 minutes Range 1 2880 minutes Default Gateway optional 0 0 0 0 Primary DNS optional 0 0 0 0 Secondary DNS optional 0 0 0 0 Note 1 The default SSID is iBall Baton 2 Default Multi SSID is iBall Baton iBall Baton1 iBall Baton2 Guest 3 ...

Страница 67: ...h or Router 2 Make sure the connected device is turned on 3 Make sure the correct cable is used Use a standard Category 5 Ethernet patch cable If the network device has Auto Uplink MDI MDIX ports you can use either a crossover cable or a normal patch cable 3 I cannot access the AP with a wireless capable computer There is a configuration problem Check the following items 1 You may not have the com...

Страница 68: ...ess Frequency Band 2 4 2 4835GHz Radio Data Rate 11n up to 150Mbps Automatic 11g 54 48 36 24 18 12 9 6M Automatic 11b 11 5 5 2 1M Automatic Frequency Expansion DSSS Direct Sequence Spread Spectrum Modulation DBPSK DQPSK CCK OFDM 16 QAM 64 QAM Security WEP WPA WPA2 WPA2 PSK WPA PSK Sensitivity PER 130M 68dBm 10 PER 108M 68dBm 10 PER 54M 68dBm 10 PER 11M 85dBm 8 PER 6M 88dBm 10 PER 1M 90dBm 8 PER An...

Страница 69: ...maximum alphanumeric key identifying a wireless local area network For the wireless devices in a network to communicate with each other all devices must be configured with the same SSID This is typically the configuration parameter for a wireless PC card It corresponds to the ESSID in the wireless Access Point and to the wireless network name WEP Wired Equivalent Privacy A data privacy mechanism b...

Страница 70: ...expensive RADIUS server WPA PSK is a simplified but still powerful form of WPA most suitable for home Wi Fi networking To use WPA PSK a person sets a static key or passphrase as with WEP But using TKIP WPA PSK automatically changes the keys at a preset time interval making it much more difficult for hackers to find and exploit them The Wi Fi Alliance will call this WPA Personal ...

Страница 71: ...iB WAP150N 150M Wireless N Access Point 65 Appendix F Contact Information For any help on iBall Baton products please contact support iBallBaton com www iBallBaton com ...

Отзывы: