background image

41

4. Wiring

4.1.1 

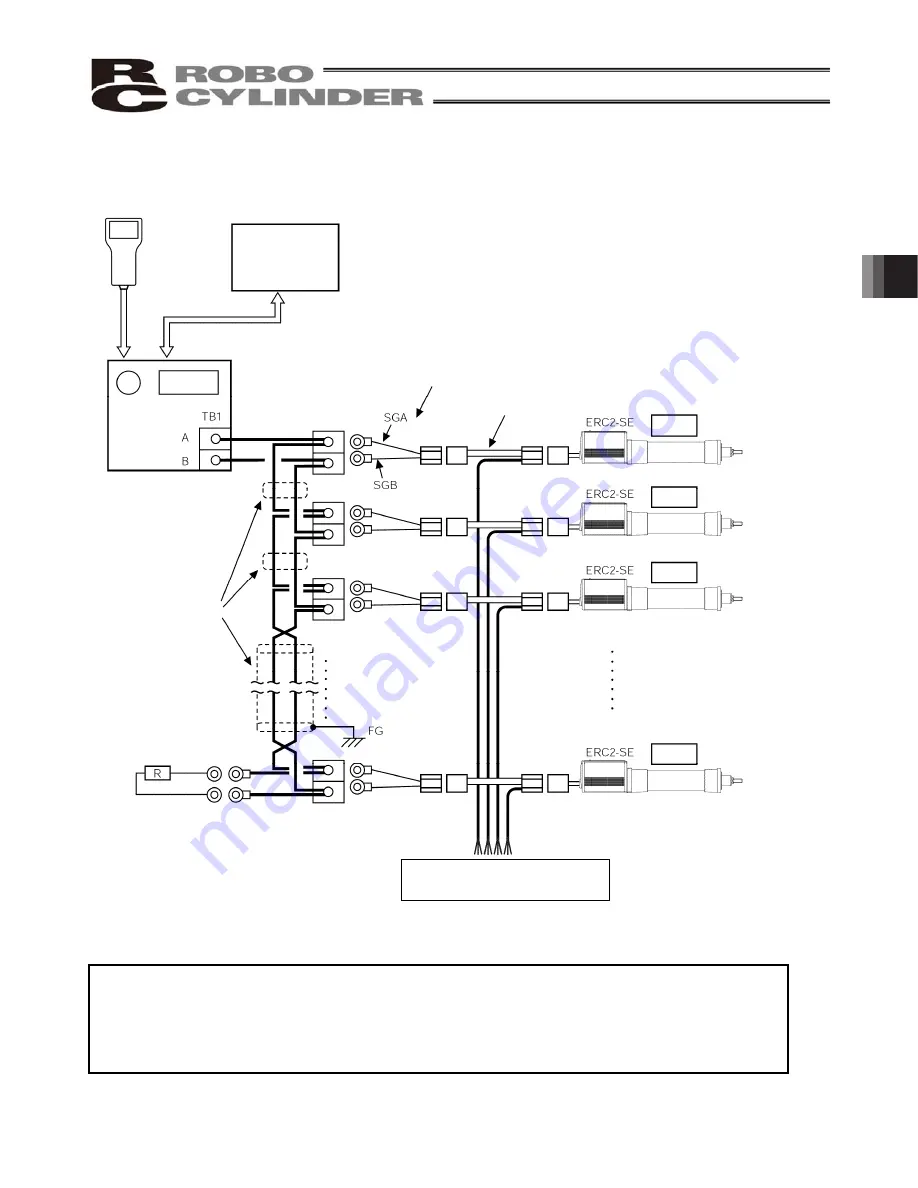
SIO Communication Connection Using a Relay Terminal Block 

*  The emergency stop circuit is the same as illustrated on the previous page. 

(Note 1)  If the total length of the communication cable is 10 m or longer and you experience 

communication errors, connect a terminal resistor to the last axis. 

(Note 2)  If the actuators use different power supplies, align 0 [V] on all power supplies. 
(Note 3)  Connect the shielded wire of each axis to FG. 
(Note 4)  If the overall length of link cable exceeds 30 m, use wire of 22AWG or larger size. 

Teaching pendant 

PC, PLC 

Relay terminal 

block

Actuator 1 

Actuator 2 

Actuator 3 

One-pair shielded cable 
(Fabricated by the customer) 

Terminal resistor 

1/2W, 220 

:

SIO converter 

Actuator 16 

J.S.T. 
Mfg. 

Power & I/O cable 

J.S.T. 
Mfg. 

24-VDC control power, motor power, 
brake signal, ground, shield

(

Fabricated by the customer) 

Содержание ERC2

Страница 1: ...Operation Manual Seventh Edition ERC2 Actuator with Integrated Controller SIO Type ...

Страница 2: ......

Страница 3: ...ng the Operation Manual keep it in a convenient place so that whoever is handling this product can reference it quickly when necessary Important This Operation Manual is original The product cannot be operated in any way unless expressly specified in this Operation Manual IAI shall assume no responsibility for the outcome of any operation not specified herein Information contained in this Operatio...

Страница 4: ... power supplies If not damage to the controller board SIO converter or other components may occur Connection Example 24V 0V 24V 0V 24V 0V 24V 0V 24V 0V 24 V power supply 1 24 V power supply 2 24 V power supply 3 24 V power supply 4 24 V power supply 5 SIO converter PLC PIO unit Actuator 1 Actuator 2 Actuator 3 Actuator 4 ...

Страница 5: ... series 3 Backup of Latest Data The built in controller of this actuator uses a nonvolatile memory to store position table data and parameters Normally data is retained after the power has been cut off but stored data will be lost if the nonvolatile memory is damaged Regular backup of latest position table data and parameters not only ensures that your important data is safeguarded but it also sav...

Страница 6: ...CE Marking If a compliance with the CE Marking is required please follow Overseas Standards Compliance Manual ME0287 that is provided separately ...

Страница 7: ...wer Supply 22 1 8 4 Noise Elimination 22 1 9 Cabling 24 2 Installation 27 2 1 Name of Each Part 27 2 1 1 Slider Type SA6C SA7C 27 2 1 2 Rod Type RA6C RA7C 28 2 1 3 1 Rod Type with a Single Guide RGS6C RGS7C 28 2 Rod Type with Double Guides RGD6C RGD7C 28 2 2 Installation 29 2 2 1 Slider Type 29 2 2 2 Rod Type 30 2 2 3 Installing the Load 32 3 Electrical Specifications 34 3 1 Controller 34 3 2 Inpu...

Страница 8: ... 6 2 1 Parameters Relating to the Actuator Stroke Range 85 6 2 2 Parameters Relating to the Actuator Operating Characteristics 87 6 2 3 Parameters Relating to the External Interface 91 6 2 4 Servo Gain Adjustment 93 7 Troubleshooting 95 7 1 Action to Be Taken upon Occurrence of Problem 95 7 2 Alarm Level Classification 96 7 2 1 How to Reset Alarms 96 7 3 Alarm Description and Cause Action 97 7 4 M...

Страница 9: ...0 1 3 ERC2 RA6C 118 10 1 4 ERC2 RA7C 119 10 1 5 ERC2 RGS6C 119 10 1 6 ERC2 RGS7C 120 10 1 7 ERC2 RGD6C 120 10 1 8 ERC2 RGD7C Recording of Position Table 121 Parameter Records 124 Change History 125 10 2 10 3 ...

Страница 10: ......

Страница 11: ... PSRUWDQW VDIHW SDUWV RI PDFKLQHU 6DIHW GHYLFH HWF Ɣ R QRW XVH WKH SURGXFW RXWVLGH WKH VSHFLILFDWLRQV DLOXUH WR GR VR PD FRQVLGHUDEO VKRUWHQ WKH OLIH RI WKH SURGXFW Ɣ R QRW XVH LW LQ DQ RI WKH IROORZLQJ HQYLURQPHQWV RFDWLRQ ZKHUH WKHUH LV DQ LQIODPPDEOH JDV LQIODPPDEOH REMHFW RU H SORVLYH 3ODFH ZLWK SRWHQWLDO H SRVXUH WR UDGLDWLRQ RFDWLRQ ZLWK WKH DPELHQW WHPSHUDWXUH RU UHODWLYH KXPLGLW H FHHGLQJ ...

Страница 12: ... the safety factor of the hook in such factors as shear strength Ɣ Do not get on the load that is hung on a crane Ɣ Do not leave a load hung up with a crane Ɣ Do not stand under the load that is hung up with a crane 3 Storage and Preservation Ɣ The storage and preservation environment conforms to the installation environment However especially give consideration to the prevention of condensation Ɣ...

Страница 13: ...oseness Failure to do so may cause a fire electric shock or malfunction of the product Ɣ Never cut and or reconnect the cables supplied with the product for the purpose of extending or shortening the cable length Failure to do so may cause the product to malfunction or cause fire 4 Installation and Start 3 Grounding Ɣ The grounding operation should be performed to prevent an electric shock or elec...

Страница 14: ...VDU WR VHFXUH safety Ɣ R QRW LQVHUW D ILQJHU RU REMHFW LQ WKH RSHQLQJV LQ WKH SURGXFW DLOXUH WR GR VR PD FDXVH DQ LQMXU HOHFWULF VKRFN GDPDJH WR WKH SURGXFW RU ILUH Ɣ KHQ UHOHDVLQJ WKH EUDNH RQ D YHUWLFally oriented actuator exercise SUHFDXWLRQ QRW WR SLQFK RXU KDQG RU GDPDJH WKH ZRUN SDUWV ZLWK WKH DFWXDWRU GURSSHG E JUDYLW 7HDFKLQJ Ɣ When the work is carried out with 2 or more persons make it cl...

Страница 15: ...minal block or any of the various setting switches in the power ON mode Failure to do so may result in an electric shock or malfunction 7 Automatic Operation Ɣ Check before starting the automatic operation or rebooting after operation stop that there is nobody in the safety protection fence Ɣ Before starting automatic operation make sure that all peripheral equipment is in an automatic operation r...

Страница 16: ...esult in a damage to the product Ɣ When releasing the brake on a vertically oriented actuator exercise precaution not to pinch your hand or damage the work parts with the actuator dropped by gravity Ɣ The slider or rod may get misaligned OFF the stop position if the servo is turned OFF Be careful not to get injured or damaged due to an unnecessary operation Ɣ Pay attention not to lose the cover or...

Страница 17: ...I WKH SURGXFW LV QRW KDQGOHG FRUUHFWO ZLOO UHVXOW LQ GHDWK RU VHULRXV LQMXU DQJHU DUQLQJ 7KLV LQGLFDWHV D SRWHQWLDOO KD DUGRXV VLWXDWLRQ ZKLFK LI WKH SURGXFW LV QRW KDQGOHG FRUUHFWO FRXOG UHVXOW LQ GHDWK RU VHULRXV LQMXU DUQLQJ DXWLRQ 7KLV LQGLFDWHV D SRWHQWLDOO KD DUGRXV VLWXDWLRQ ZKLFK LI WKH SURGXFW LV QRW KDQGOHG FRUUHFWO PD UHVXOW LQ PLQRU LQMXU RU SURSHUW GDPDJH DXWLRQ 1RWLFH 7KLV LQGLFDWHV ...

Страница 18: ...DWLRQ GHFHOHUDWLRQ VHWWLQJV VKRXOG FRUUHVSRQG WR WKH PLQLPXP YDOXHV DPRQJ DOO FRPELQHG D HV HHS WKH ORDG PRPHQW ZLWKLQ WKH DOORZDEOH YDOXH I WKH DFWXDWRU LV RSHUDWHG XQGHU D ORDG HTXDO WR RU JUHDWHU WKDQ WKH DOORZDEOH ORDG PRPHQW DEQRUPDO QRLVH RU YLEUDWLRQ IDLOXUH RU VKRUWHU OLIH PD UHVXOW Q DQ H WUHPH FDVH IODNLQJ PD RFFXU 0DNH VXUH WR DWWDFK WKH DFWXDWRU SURSHUO E IROORZLQJ WKLV LQVWUXFWLRQ PDQ...

Страница 19: ...ocol Please read this manual carefully and handle the product with utmost care while ensuring its correct operation It is advised that you also peruse the operation manual for your gateway unit as well as the Operation Manual for Serial Communication Protocol When starting your system or in the event of failure also refer to the operation manuals for the teaching pendant PC software and other comp...

Страница 20: ...ttings Available in the position number specification mode only Acceleration and deceleration can be set differently in the position table In situations where shock and vibration upon stopping must be minimized depending on the material or shape of the load you can decrease only the deceleration to allow the actuator to stop along a gradual deceleration curve 5 Limitation of moving speed during ad...

Страница 21: ...talled Whether or not the target position has been reached is determined based on the internal coordinate information received from the position detector encoder Accordingly no external detection sensor is required Speed setting Adjusted using a speed controller 1 Enter a feed speed in the Speed field of the position table in mm sec Initially the default speed has been set automatically 2 Specify ...

Страница 22: ... coordinates are stored in the controller After the power is turned on therefore a home return command must always be issued to establish coordinates 1 The actuator moves toward the mechanical end on the motor side at the home return speed 2 The actuator contacts the mechanical end and reverses its direction moves to the home position and then pauses Note Make sure no obstacles are present in the ...

Страница 23: ... M 5 m X Length specification Example X08 8 m R Robot cable specification Stroke 50 to 600 mm Standard lengths are multiples of 50 mm Example 100 100 mm I O signal pattern NP PIO NPN specification PN PIO PNP specification SE SIO specification Ball screw lead 16 16 mm 12 12 mm 8 8 mm 6 6 mm 4 4 mm 3 3 mm Type Slider type x SA6C x SA7C Rod type x RA6C x RA7C x RGS6C x RGS7C x RGD6C x RGD7C Encoder t...

Страница 24: ...Note 2 The payload capacity is based on operation at the rated acceleration In the case of a guide type find the applicable payload capacity in the above table and subtract the weight of the guide to obtain the effective payload capacity Model Stroke mm and maximum speed mm sec Note 1 Payload capacity Note 2 Rated acceleration Horizontal Vertical Horizontal Vertical Slider type Rod type ...

Страница 25: ...er after each type name indicates the lead Horizontal installation Vertical installation High speed type Load capacity kg Speed mm sec Medium speed type Low speed type Load capacity kg Load capacity kg Load capacity kg Speed mm sec Speed mm sec Speed mm sec Speed mm sec Speed mm sec Load capacity kg Load capacity kg ...

Страница 26: ...r after each type name indicates the lead Horizontal installation Vertical installation High speed type Load capacity kg Speed mm sec Medium speed type Low speed type Load capacity kg Load capacity kg Load capacity kg Speed mm sec Speed mm sec Speed mm sec Speed mm sec Speed mm sec Load capacity kg Load capacity kg ...

Страница 27: ...from deforming 2 Rod type x Keep the load applied to the rod below the value specified in the catalog x Make sure the center of the rod axis corresponds to the moving direction of the load x Application of lateral load may cause an actuator damage or breakdown x If the rod is to be subjected to lateral load provide a guide or other support in the moving direction of the load x Do not apply rotatin...

Страница 28: ...Anything other than our product 2 Modification or repair performed by a party other than us unless we have approved such modification or repair 3 Anything that could not be easily predicted with the level of science and technology available at the time of shipment from our company 4 A natural disaster man made disaster incident or accident for which we are not liable 5 Natural fading of paint or o...

Страница 29: ...aining to maintenance or management of human life or health 2 A mechanism or mechanical equipment intended to move or transport people such as a vehicle railway facility or aviation facility 3 Important safety parts of mechanical equipment such as safety devices 4 Equipment used to handle cultural assets art or other irreplaceable items 3 Contact us at the earliest opportunity if our product is to...

Страница 30: ... Once removed out of the box hold the actuator by the frame if it is a rod type or by the base if it is a slider type x When carrying the actuator be careful not to allow it to collide with other objects In particular pay attention to the front bracket motor bracket and motor cover x Do not exert excessive force on each part of the actuator In particular pay attention to the motor cover and cables...

Страница 31: ...iolet light or radiation 10 Chemical resistance is not considered at all in the design of this product 11 The actuator and cables are not subject to electrical noise In general the installation environment shall be such that the operator can work without wearing any protective gears 1 8 2 Storage Environment The storage environment shall conform to the installation environment but special caution ...

Страница 32: ...mination This section explains how to eliminate noise in the use of the controller 1 Wiring and power supply 1 Provide a dedicated class D grounding using a wire with a size of 0 75 mm2 or larger Class D grounding Good Avoid this grounding method 2 Precautions regarding wiring method Wire extension cables separately from high power lines for power circuits etc Do not bundle them together or place ...

Страница 33: ...el with the coil 2 DC solenoid valves magnet switches and relays Measure Install a diode in parallel with the coil Determine the diode capacity in accordance with the load capacity In a DC circuit connecting a diode in reverse polarity will damage the diode internal parts of the controller and or DC power supply so exercise due caution m Point Install a surge absorber to each coil over a minimum w...

Страница 34: ...e cable from receiving a deflecting load exceeding its own weight use a self standing cable hose provide a large bending radius along the wiring path or provide other measure to minimize the load applied to the cable x Do not cut the cable for the purpose of extension length reduction or reconnection If you intend to change the cable layout please consult IAI ...

Страница 35: ...ead the information carefully to connect the cables properly 1 Do not let the cable flex at a single point 2 Do not let the cable bend kink or twist 3 Do not pull the cable with a strong force 4 Do not let the cable receive a turning force at a single point 6 Do not pinch drop a heavy object onto or cut the cable 5 When fixing the cable provide a moderate slack and do not tension it too tight Stee...

Страница 36: ...ently routed in the duct Power Line Duct I O Line Flat Cable etc Follow the instructions below when using a cable track z If there is an indication to the cable for the space factor in a cable track refer to the wiring instruction given by the supplier when storing the cable in the cable track z Avoid the cables to get twined or twisted in the cable track and also to have the cables move freely an...

Страница 37: ...or cover Cable Rod Frame Rod end bracket Top Bottom Non motor Screw cover Coupling bolt Right Left Motor end Side cover LED Top Bottom Front bracket Slider Rear bracket Motor bracket Rear cover Base Motor cover Cable 2 Installation 2 1 Name of Each Part 2 1 1 Slider Type SA6C SA7C 2 1 2 Rod Type RA6C RA7C Rear cover ...

Страница 38: ...g bolt Right Left Motor end LED Top Bottom Cable Motor cover Rod Frame Rear bracket Motor bracket Rear cover Guide bracket Guide bearing Guide rod Non motor end Coupling bolt Right Left Motor end LED Top Bottom Cable Motor cover Rod Frame Rear bracket Motor bracket Rear cover Mounting bracket Guide bearing Guide rod Guide bracket ...

Страница 39: ... the actuator by using these surfaces as references Note Reduced flatness due to installation of an overhang load will cause the base to deform and inhibit smooth movement of the slider If the slider movement becomes heavier on the motor end or the slider begins generating noise correct the flatness Otherwise the slider mechanism may end its life prematurely Install the actuator in the mounting ho...

Страница 40: ...tuator receive excessive forces Flange tightening bolts Model Nominal thread size Tightening torque RA6C M5 3 4 N m 0 35 kgf m RA7C M6 5 4 N m 0 55 kgf m z Affixing through holes in a flange Caution If the actuator is installed horizontally exercise caution not to let the actuator receive excessive forces Flange tightening bolts Model Nominal thread size Tightening torque RGD6C M5 Steel bolt beari...

Страница 41: ...ets optional If optional foot brackets are used install the foot brackets using hex cap bolts Foot bracket tightening bolts Model Nominal thread size Tightening torque RA6C RGS6C RGD6C M6 5 4 N m 0 55 kgf m RA7C RGS7C RGD7C M8 11 5 N m 1 17 kgf m ...

Страница 42: ... 3 N m 0 74 kgf m 3 4 N m 0 35 kgf m The affixing method of the load shall conform to the installation method of the actuator In an application where the actuator is moved with the slider fixed install the load using the tapped holes in the slider in the same manner The slider has two reamed holes Use these holes when high repeatability is required for load installation removal When fine tuning th...

Страница 43: ...talled Applying excessive rotating moment to the rod may damage the rod RA6C Width across flats 13 mm RA7C Width across flats 17 mm z Rod type with a guide s Model Nominal thread size RGS6C M5 RGD6C M5 RGS7C M6 RGD7C M6 Tightening torque Nominal thread size Bolt bearing surface steel Bolt bearing surface aluminum M5 7 3 Nxm 0 74 kgf m 3 4 Nxm 0 35 kgf m M6 12 3 Nxm 1 26 kgf m 5 4 Nxm 0 55 kgf m Do...

Страница 44: ...circuit Communication RS485 1 channel terminated externally Communication protocol Modbus RTU Modbus ASCII Electromagnetic brake A drive circuit is provided 24 VDC r 10 0 15 A max Electromagnetic brake Release The user must provide a selector switch Current consumption 0 15 A max Extension cable length 10 m or less Communication cable length 100 m max in total cable length Isolation strength 500 V...

Страница 45: ...No Signal name Description 1 SGA 2 SGB 3 5V 4 GND RS485 serial communication 5 24V Control power 24 V 6 BKR Brake release The brake is released when 24 V 150 mA is supplied 7 MPI Motor drive power 24 V 8 GND Control power 0 V 9 Shield J S T Mfg Receptacle housing Pin contact ...

Страница 46: ...es with the following parts x e con connector x 1 x e con connector with terminal resistor x 1 x 4 way junction x 1 CN2 Manufacturer J S T Mfg Housing Contact Kaneko Cord Connector cover No connector at cable end Manufacturer J S T Mfg Model V0 5 3 Model number nameplate CN1 Manufacturer J S T Mfg Plug housing YLP 09V X1 Socket contact SYF 01T P0 5A X9 Orange Blue Green Orange Blue Green Wire CN1 ...

Страница 47: ... the user Positive side of the 24 V power supply Power supply for the teaching pendant and conversion circuit Current consumption 0 1 A max Negative side of the 24 V power supply EMG1 EMG2 24V 0V FG FG of the 24 V power supply 2 Link connection terminal block TB1 A connection port for linking the controller A on the left side connects to SGA wire color orange red 1 in the extension cable B on the ...

Страница 48: ...A connection port with the teaching pendant For the communication cable use the cable with RS232C RS485 converter supplied with the PC software RCM 101 MW 6 PORT switch A switch for enabling disabling the mini DIN connector Set this switch to ON when a device is connected to the mini DIN connector or OFF when no device is connected 7 Monitor LEDs LED1 Lit when the controller is transmitting LED2 L...

Страница 49: ...ur PC software RS232C type RCM 101 MW USB type RCM 101 USB Optional Teaching pendant RCM T Optional Cable length 5 m ERC2 SE actuator RS232C crossed cable generic brand 1 Connect the communication line from the actuator to either TB1 or J4 J5 on the SIO converter as shown below 2 The customer must produce an appropriate cable SIO converter Vertical RCC TU SIO A Horizontal RCC TU SIO B e CON connec...

Страница 50: ...bles are different The colors in parentheses are for robot cables ERC2 SE actuator Serial communication Orange Blue Blue Yellow Brown Red Green Black Gray Gray Red Purple Black Orange Yellow Green Teaching pendant EMG pushbutton SIO converter TP connector EMG reset switch EMG pushbutton Terminal block Power supply The brake is released when the contacts are closed I F connector Brake release 24 V ...

Страница 51: ...the actuators use different power supplies align 0 V on all power supplies Note 3 Connect the shielded wire of each axis to FG Note 4 If the overall length of link cable exceeds 30 m use wire of 22AWG or larger size Teaching pendant PC PLC Relay terminal block Actuator 1 Actuator 2 Actuator 3 One pair shielded cable Fabricated by the customer Terminal resistor 1 2W 220 SIO converter Actuator 16 J ...

Страница 52: ...on all power supplies Note 3 The gateway unit power must be the same as 0 V of the ERC2 control power Note 4 Connect the shielded wire of each axis to FG Note 5 If the overall length of link cable exceeds 30 m use wire of 22AWG or larger size Teaching pendant Actuator 1 Actuator 2 Actuator 3 Actuator 16 J S T Mfg J S T Mfg 24 VDC control power motor power brake signal ground shield e CON connector...

Страница 53: ... cursor to Address No o 3 Enter an appropriate address and press the ENTER key o 4 Enter 2 under Adjustment No and press the ENTER key z Overview of operation on the simple teaching pendant RCM E 1 Open the User Adjustment screen o 2 Press the ENTER key to open the screen showing Address No o 3 Enter an appropriate address and press the ENTER key o 4 Enter 2 under Adjustment No and press the ENTER...

Страница 54: ...ateway unit power must be the same as 0 V of the ERC2 control power Note 4 Connect the shielded wire of each axis to FG Note 5 If the overall length of link cable exceeds 30 m use wire of 22AWG or larger size PC software RS232C type RCM 101 MW USB type RCM 101 USB Optional Teaching pendant Relay terminal block Actuator 1 Actuator 2 Actuator 3 One pair shielded cable Fabricated by the customer Term...

Страница 55: ...teway unit power must be the same as 0 V of the ERC2 control power Note 4 Connect the shielded wire of each axis to FG Note 5 If the overall length of link cable exceeds 30 m use wire of 22AWG or larger size PC software RS232C type RCM 101 MW USB type RCM 101 USB Optional Teaching pendant Actuator 1 Actuator 2 Actuator 3 Actuator 16 Gateway unit J S T Mfg J S T Mfg 4 way junction e CON connector 2...

Страница 56: ...way unit power must be the same as 0 V of the ERC2 control power Serial communication ERC2 SE actuator Teaching pendant EMG pushbutton Gateway unit TP connector EMG reset switch EMG pushbutton Power supply The brake is released when the contacts are closed I F connector Brake release 24 V 150 mA Control power 24 V Motor drive power 24 V Shield Gateway power Port switch Orange Blue Blue Yellow Brow...

Страница 57: ...ted in advance by entering the target position in the Position field The target position can be specified as an absolute distance from the home absolute mode or as an incremental travel from the current position incremental mode Once the target position is entered other fields will be automatically populated with the defaults set by the applicable parameters The defaults set in the respective fiel...

Страница 58: ...nt 1 No x Indicate the position data number 2 Position x Enter the target position to move the actuator to in mm Absolute mode Enter the distance to the target actuator position from the actuator s home Incremental mode Enter the distance to the target actuator position from the current position by assuming a movement by constant pitch feed 3 Speed x Enter the speed at which the actuator will be m...

Страница 59: ... and acceleration deceleration changes the transferring mass significantly and the actuator characteristics also vary from one model to another Therefore consult IAI s Sales Engineering Section for the maximum limits that can be entered in your specific application 5 Push x Select positioning operation or push hold operation The factory setting is 0 0 Normal positioning operation Other than 0 Push...

Страница 60: ...one x Define the zone in which the zone output signal turns ON For added flexibility different values can be set for each target position Setting example The position complete signal turns ON here because the actuator has contacted the load and the controller has determined that the push hold operation has completed Push speed Positioning band Maximum push distance Target position Position Zone Zo...

Страница 61: ...he power saving mode to be applied while the actuator is standing by is set by parameter No 53 The full servo control mode can be selected by setting 4 in this field Full servo control mode The pulse motor is servo controlled to reduce the holding current standstill current that flows after completion of positioning Although the exact degree of current reduction varies depending on the actuator mo...

Страница 62: ...d type Low speed type Lead 3 mm Lead 4 mm Medium speed type Medium speed type Lead 6 mm Lead 8 mm High speed type High speed type Lead 12 mm Lead 16 mm Caution The precision of push force at standstill is not guaranteed The above graphs are provided for reference purposes only If the push force is too small malfunction may occur during push hold operation due to slide resistance etc so exercise ca...

Страница 63: ...ranteed The above graphs are provided for reference purposes only If the push force is too small malfunction may occur during push hold operation due to slide resistance etc so exercise caution The maximum current limiting value is shown in the above graphs The minimum value is 20 Push force N Push force N Current limiting value Current limiting value Push force N Push force N Push force N Push fo...

Страница 64: ...d current limiting value during push hold operation etc directly Take note that the position table may or may not be required depending on the operation mode For details refer to the Operation Manual for Gateway Unit and the Operation Manual for Serial Communication Protocol 5 3 Explanation of Functions The table below lists the key functions available on ERC2 SE actuators in the position number s...

Страница 65: ...eration therefore change the acceleration deceleration data while the actuator is moving and then restart the operation Set acceleration and deceleration separately in the position table Pitch incremental feed Set in the position table Same as on the left Change bit 2 of the CTLF control flag to 1 to perform incremental operation X No direct command is available to process a pitch feed request Pro...

Страница 66: ... a normal condition Present alarms will be reset at the 0 o 1 edge of this bit 7 6 040AH 5 STP Pause command The 0 status of this bit indicates a normal condition When this bit changes to 1 the actuator will pause decelerate to a stop 040BH 4 HOME Home return command Home return operation will be performed at the 0 o 1 edge of this bit 040CH 3 CSTP Positioning start The 0 status of this bit indica...

Страница 67: ...command position number using a 6 bit binary code Positioning operation will start when the positioning start signal bit CSTR is changed to 1 15 to 6 5 PC32 4 PC16 3 PC8 2 PC4 1 PC2 Position number specification register POSR Address 9800H POS specification 0 PC1 This register is the same as the one explained above except that with this register positioning operation will start the moment a comman...

Страница 68: ...ister is rewritten Upper Lower Upper Lower 32 bit integer unit 0 01 mm Setting range 0H to 000F423FH 0 to 999999 In positioning operation this register sets a band within which a completion of positioning is detected In push motion operation the push motion operation must be specified using the CTLF flag this register sets a push band 32 bit integer unit 0 01 mm sec Setting range 0H to 000F423FH 0...

Страница 69: ...tion 16 bit integer unit setting range 00H to FFH 0 to 100 Note Movement will start when this register is rewritten This flag sets a bit pattern to specify operation settings 1 Bit 1 b1 0 Normal operation 1 Push hold operation 2 Bit 2 b2 0 The push direction after completion of approach operation represents the forward direction 1 The push direction after completion of approach operation represent...

Страница 70: ... status An alarm is present that inhibits continuation of operation when this bit is 1 0106H 9 ALML Minor failure status An alarm is present that permits continuation of operation when this bit is 1 8 to 6 010AH 5 STP Pause command active A pause command is being executed when this bit is 1 010BH 4 HEND Home return completion Home return has completed when this bit is 1 010CH 3 PEND Position compl...

Страница 71: ... status register ZONS Address 9013H Common 014FH 0 ZONE1 Zone output 1 This bit will turn 1 when the current position enters the range specified by the zone boundary 1 parameters 15 to 6 013AH 5 PM32 013BH 4 PM16 013CH 3 PM8 013DH 2 PM4 013EH 1 PM2 Position number status register POSS Address 9014H POS specification 013FH 0 PM1 A completed position number is output using a 6 bit binary code Contro...

Страница 72: ...teaching Change parameter No 35 Safety speed 4 Using a PC or teaching pendant to set optimal values in the Position Speed Acceleration and Deceleration fields etc of the position table Caution When the power is turned on while an emergency stop is actuated and then the emergency stop is cancelled the servo will turn on with a maximum delay of 170 msec after the cancellation of emergency stop Safet...

Страница 73: ...robot hand or work part damaged by the actuator dropping suddenly due to its dead weight If the actuator cannot be moved by hand one option is to change parameter No 28 Default direction of excited phase signal detection If you wish to change this parameter consult IAI in advance Controller ready PWR This signal indicates whether the controller can be controlled externally When the signal bit is 0...

Страница 74: ... button is pressed Operation 1 The actuator starts moving toward the mechanical end on the home side 2 The actuator contacts the mechanical end and reverses its direction moves to the home position and then pauses o The home return completion HEND signal turns ON PLC processing 2 The home return command HOME signal turns OFF PLC processing 3 Continuous operation starts Caution Take note of the fol...

Страница 75: ...tomatically perform home return operation as part of the first positioning operation CSTR signal Home return completion HEND This signal bit is 0 immediately after the power has been turned on It will turn 1 at the following timings 1 Home return operation initiated by the HOME signal has completed 2 Home return operation performed as part of the first positioning operation initiated by the CSTR s...

Страница 76: ...ber specification or direct position data specification the actuator will perform home return operation and then move to the specified position An example of performing positioning operation using an actuator with a 400 mm stroke is explained below Example of position table T1 Set to T1 t 0 ms by considering the scan time of the host controller Comment Position mm Speed mm Acceleration G Decelerat...

Страница 77: ... When the actuator enters the positioning band INP specified with respect to the command value for position 1 PEND will turn 1 while MOVE will turn 0 and the completed position number will also be output in the form of six bits from PM1 to PM32 in the register POSS 4 Next specify position 2 and change CSTR to 1 in the same manner as explained in 1 The actuator will start moving to position 2 5 Pos...

Страница 78: ...ompletion of home return after push hold completion judgment during push hold operation and during pause Command position number PC1 to PC32 When a moving command is executed at the 0 o 1 edge of the CSTR signal bit a binary code specified by six signal bits from PC1 to PC32 will be read as the command position number Completed position number PM1 to PM32 These signals can be used to check the com...

Страница 79: ...t which will effectively shorten the tact time of the entire system When the servo turns on after the power on the current position will become the target position As a result this signal bit will turn 1 It will turn 0 if positioning operation is started thereafter with the CSTR signal bit changing to 1 Note If the servo is turned off or an emergency stop is actuated while the actuator is stopped ...

Страница 80: ...ion of increasing coordinate value from the starting point toward the target position whereas the push direction is negative when the actuator pushes the work part in the direction of decreasing coordinate value Here exercise caution because setting a wrong push direction will prevent the actuator from operating correctly specifically the actuator will perform push hold operation only for twice th...

Страница 81: ...e x Set the push force as a current limiting value in the Push field of the position table To specify the push force numerically set the applicable value in the push current limiting value during push hold operation register PPOW Determine an appropriate push force based on the characteristics shape material etc of the work part and then determine the corresponding current limiting value using the...

Страница 82: ... of push hold operation the actuator will chase the work part within the positioning band If the current drops below the current limiting value set during push hold operation the position complete signal will turn OFF The signal will turn ON when the current rises to or above the current limiting value again 2 The work part moves in the opposite direction The actuator is pushed back by a strong re...

Страница 83: ...n setting the push direction because if the direction is set incorrectly the position will deviate by twice the positioning band as shown below Speed Target position Positioning band Travel Positioning band Positioning band Actual operation Intended operation Actual position reached the load is missed ...

Страница 84: ...he remaining travel is held changing STP to 0 again will resume the movement to complete the remaining travel Changing the alarm reset RES bit to 1 while the actuator is paused will cancel the remaining travel When a cancellation of the pause command STP is recognized thereafter the position complete signal PEND will turn 1 in approx 1 msec The remaining travel will be cancelled upon detection of ...

Страница 85: ...reased at a certain point during movement However the position at which to implement each speed change must be set The speed change operation explained above is useful when among others the load is made of soft material or is a bottle or other shape that easily topples and you don t want to give vibration or shock to the work part when the actuator stops Example Move the actuator to position 2 300...

Страница 86: ... leading edge of this signal bit If any alarm remains whose cause is not yet removed the same alarm will generate again If an alarm reset is performed while the actuator is paused the remaining travel will be cancelled Caution 1 When the start CSTR signal is changed to 1 the position complete PEND bit will turn 1 while the moving MOVE bit will turn 1 Change the start CSTR signal bit to 1 after con...

Страница 87: ...tion at Different Acceleration and Deceleration 1 When the actuator is used in the position number specification mode acceleration and deceleration can be set differently in the position table 2 Numerical specification mode Acceleration deceleration data set in the register 9906H becomes effective when the data is received To set a deceleration different from an acceleration therefore change the a...

Страница 88: ...te In constant pitch feed the Position field of the position table indicates an incremental travel However the zone must be set using absolute coordinates with respect to the home Setting Zone signal Position number specification mode Numerical specification mode Individual zone boundaries in the position table Position zone output PZONE x Zone boundary 1 user parameters Parameter Nos 1 and 2 Zone...

Страница 89: ... an equal distance constant pitch feed 1 Operation example in the position number specification mode The following example explains how to perform positioning at a 50 mm pitch starting from position No 1 In this case create the position table shown below Whether the operation has completed is determined by the PLC by keeping a count of individual movements The zone signal can be used to double che...

Страница 90: ...e the start CSTR bit to 0 4 After the actuator has moved 50 mm again the position complete PEND bit turns 1 and the moving MOVE bit turns 0 The PLC increments its movement count by 1 Next change the start CSTR bit to 1 for the second 50 mm movement 5 Repeat steps 3 and 4 hereafter The PLC checks the zone PZONE signal status upon completion of positioning If the signal bit is 0 the PLC will determi...

Страница 91: ...on representing the initial position minus the specified travel Example Inputting a start signal for position 2 while the actuator is moving to position 1 will cause the actuator to move to the position 40 mm from the home If a start signal is input multiple times for a position number by incremental specification while the actuator is performing positioning operation the actuator will move to the...

Страница 92: ...ting and inputting a position number for push hold operation by incremental specification while the actuator is moving in the push hold mode the actuator will move by the incremental travel from where the start signal was input Therefore the end position will become indeterminate Example Inputting a start signal for position 2 while the actuator is moving to position 1 in the push hold mode will c...

Страница 93: ... actuator stands by after reaching the target position Set 0 or 4 in parameter No 53 Setting Disable power saving mode complete stop 0 Full servo control mode 4 Full servo control mode The pulse motor is servo controlled to reduce the holding current Although the exact degree of current reduction varies depending on the actuator model load condition etc the holding current decreases to approx one ...

Страница 94: ...eristics 16 c BRSL SIO communication speed bps 230400 17 c RTIM Minimum delay time for slave transmitter activation msec 5 22 a OFST Home return offset mm Set individually in accordance with the actuator characteristics 23 a ZNM2 Zone boundary 2 mm Effective actuator length 24 a ZNL2 Zone boundary 2 mm Effective actuator length 28 b PHSP1 Default direction of excited phase signal 0 Reverse 1 Forwa...

Страница 95: ...ution The minimum setting unit is 0 01 mm Note To change a soft limit set a value corresponding to 0 3 mm outside of the effective range Example Set the effective range to between 0 mm and 80 mm Parameter No 3 positive side 80 3 Parameter No 4 negative side 0 3 z Home return direction No 5 ORG Unless specified by the user the home return direction is set to the motor direction at the factory Shoul...

Страница 96: ...been changed the soft limit parameters must also be adjusted accordingly z Zone boundary 1 No 1 2 ZONM ZONL 2 No 23 24 ZNM2 ZNL2 These parameters set the zone in which the zone output signal ZONE1 or ZONE2 turns ON The zone output signal turns ON when the current position is inside the negative boundary and positive boundary settings For the ZONE1 signal set the boundary in parameter No 1 and boun...

Страница 97: ...normal conditions of use However if an increased slide resistance causes the home return to complete before the correct position depending on the affixing method load condition or other factor when the actuator is used in a vertical application the value set in parameter No 13 must be increased Do not increase the value beyond 75 z Current limiting value at standstill during positioning No 12 SPOW...

Страница 98: ...re the actuator is installed vertically with the motor at the bottom z Excited phase signal detection time No 29 PHSP2 When the servo is turned on for the first time after a power on excited phase is detected This parameter defines the time of this detection The parameter need not be changed in normal conditions because a detection time appropriate for the standard specification of the actuator ha...

Страница 99: ...n mode Define whether to enable or disable power saving in parameter No 53 Setting All power saving modes are disabled 0 Full servo control mode 4 The factory setting is 0 Disable Full servo control mode The pulse motor is servo controlled to reduce the holding current Although the exact degree of current reduction varies depending on the actuator model load condition etc the holding current decre...

Страница 100: ...rent limiting value has been retained for the time set in parameter No 6 Set an optimal time matching the current limiting value by considering the material and shape of the work part and so on The minimum setting unit is 1 msec while the maximum value is 9999 msec The factory setting is 255 msec Note If the work part has shifted and the current has changed during the push hold judgment the judgme...

Страница 101: ...has exited the range set by the specified positioning band with respect to the target position 2 When the servo is off The position complete signal is OFF unconditionally regardless of the current position 1 INP Regardless of the servo on off status the position complete signal turns ON if the current position is within the range set by the specified positioning band with respect to the target pos...

Страница 102: ... setting is the communication time corresponding to 3 5 characters in accordance with the Modbus specification This setting need not be changed for normal operations performed with a PC or teaching pendant If the scan time of the PLC is not optimal and the character transmission interval exceeds the silent interval the silent interval time can be extended using parameter No 45 The minimum setting ...

Страница 103: ...r determines the response when a position control loop is used Increasing the set value improves the tracking performance with respect to the position command However increasing the value excessively increases the chances of overshoot If the value is small the tracking performance with respect to the position command drops and positioning takes a longer time z Speed loop proportional gain No 31 VL...

Страница 104: ... longer If the set value is excessive on the other hand the actuator may overshoot or oscillate rendering the mechanical parts more prone to vibration z Torque filter time constant No 33 TRQF Parameter No Unit Input range Default 33 1 2500 Set individually in accordance with the actuator characteristics This parameter determines the filter time constant for torque commands If the resonance frequen...

Страница 105: ... supply d Check for alarm Confirm the details of error on the PC or teaching pendant e Check the cables for connection error disconnection or pinching Before performing a continuity check turn off the power to prevent a runaway actuator and disconnect the cables to prevent accidental power connection due to a sneak current path f Check the I O signals g Check the noise elimination measures groundi...

Страница 106: ...erates to a stop and then the servo turns OFF x Perform a software reset from a PC teaching pendant x Reconnect the power 7 2 1 How to Reset Alarms Enter the alarm reset input signal RES After the ALMH signal bit has returned to 0 confirm that the ALMH bit is 0 and then change the RES signal bit to 0 Caution Before resetting an alarm always identify and remove the cause of the alarm If the cause c...

Страница 107: ... by numerical specification after performing home return operation and confirming the complete signal HEND has turned ON 084 Movement command during home return Cause A movement command was issued by numerical specification while home return was still in progress Action Issue a movement command after performing home return operation and confirming the complete signal HEND has turned ON 085 Positio...

Страница 108: ...l speed Cause This alarm indicates that the motor speed exceeded the maximum speed set in the applicable system parameter This alarm will not generate in normal operation but may occur in the following conditions 1 Large actuator slide resistance in certain area or 2 Instantaneous increase in load due to application of external force which may cause the load to decrease and actuator to move rapidl...

Страница 109: ...ower the ambient temperature of the controller If the action in 1 does not apply contact IAI 0CC Abnormal control supply voltage This alarm indicates that the voltage of the 24 V input power supply is excessive 24 V 20 28 8 V or more Cause 1 High voltage of the 24 V input power supply 2 Defective internal part of the controller Action Check the voltage of the input power supply If the voltage is n...

Страница 110: ...tive If you wish to change the parameter setting contact IAI beforehand 4 Move the actuator away from the mechanical end and then turn on the power again Alternatively change the value of parameter No 28 Default direction of excited phase signal detection 5 If the load weight is normal turn off the power and move the actuator by hand to check the slide resistance If the actuator is suspected to be...

Страница 111: ...as not received within the specified time after writing the nonvolatile memory Cause 1 Faulty nonvolatile memory 2 The memory has been rewritten more than 100 000 times As a rough guideline the nominal service life of the nonvolatile memory is 100 000 rewrites Action If the alarm persists after reconnecting the power contact IAI 0F8 Damaged nonvolatile memory Abnormal data was detected in the nonv...

Страница 112: ...ir of data are inappropriate Example The same value was entered in both the parameters for and soft limits Enter appropriate values again 11F Absolute position too small The minimum movement toward the target position is determined by the lead length of the drive system and resolution of the encoder This message indicates that the entered target value is smaller than the minimum movement Example I...

Страница 113: ... Action 1 Adjust the wiring in a manner eliminating the effect of noise and review the installation of equipment etc 2 Change the slave numbers to avoid duplication If the message is still displayed after taking the above actions please contact IAI 307 Memory command refused This message indicates that the command was refused in the serial communication with the controller 309 Write address error ...

Страница 114: ... the middle in a vertical application Cause 1 The loading mass exceeds the rating 2 The ball screw is receiving torsional stress due to the affixing method of the actuator tightening of bolts only on one side etc 3 The slide resistance of the actuator itself is large Action 1 Increase the value set in user parameter No 13 Current limiting value during home return Increasing this value will cause t...

Страница 115: ...ollowing conditions at the time of power on 1 The slider or rod is contacting the mechanical end 2 An excessive external force is exerted to the load Action 1 Check if the slider or rod is contacting the mechanical end If it is move the slider rod away from the mechanical end If the actuator is equipped with a brake move the slider rod after releasing the brake by turning on the brake release swit...

Страница 116: ...after Guide ball screw Slider type 2 1 With a rod type actuator grease the rod slide surface if the surface is found dry at the start up inspection or every three months 2 With a slider type actuator grease the guide and ball screw as necessary by considering the use environment condition etc 8 2 Visual Inspection of Appearance Check the following items in the visual inspection Actuator Loose actu...

Страница 117: ...ubrication condition Even when the grease is brown the sliding surface is lubricated properly if the surface looks wet and glowing Warning The encoder phase is adjusted precisely to enable detection of rotation angle and home signal Never touch the encoder since it may cause a breakdown 3 If the grease is contaminated with dust and not glowing or if the grease has been consumed over a long period ...

Страница 118: ...f foreign object is contained in the grease wipe off the dirty grease before applying new grease 8 6 Greasing the Guide Slider Type 1 Applicable grease IAI uses lithium grease No 2 The following grease is applied to the guides prior to shipment Idemitsu Kosan Daphne Eponex Grease No 2 Equivalent grease products are available from other companies For details contact each manufacturer and ask for a ...

Страница 119: ...d base using a spatula as shown to the left Spread the grease evenly on the opposite side in the same manner 3 Move the slider back and forth several times by hand 4 Repeat steps 1 2 and 3 5 Use a waste cloth etc to wipe off excess grease from the slider Caution In case the grease got into your eye immediately go to see the doctor to get an appropriate care After finishing the grease supply work w...

Страница 120: ... cleaning the ball screw apply grease and stroke the slider to let the grease spread evenly As the final step wipe off excess grease from the ball screw This is because excessive grease will cause the agitation resistance to increase and allow the ball screw to generate heat easily Wiping off excess grease will also prevent extra grease on the ball screw from flying off and staining the surroundin...

Страница 121: ... lithium grease for maintenance Note Never use fluorine grease If fluorine grease is mixed with lithium grease the grease function will drop and it causes damage to the mechanism Caution In case the grease got into your eye immediately go to see the doctor to get an appropriate care After finishing the grease supply work wash your hands carefully with water and soap to rinse the grease OFF ...

Страница 122: ... values When a new motor has been installed enter the parameter position data to the controller Follow the procedure below to replace the motor unit or coupling spacer x Removal 1 Remove the coupling bolt from the rear bracket using a wrench with 3 mm width across flats 2 Hold the motor cover and pull backward to remove the motor unit Exercise caution to prevent pinching of parts Coupling bolt Mot...

Страница 123: ... of the coupling hub with respect to the coupling spacer When inserting the motor unit exercise due caution to prevent pinching of parts 3 Insert the coupling bolt into the fitting hole in the motor unit from over the rear bracket and tighten the bolt using a wrench with 3 mm width across flats Coupling bolt Coupling spacer Coupling spacer Coupling hub Coupling hub Motor unit ...

Страница 124: ...xamples Refer to the operation manuals specified below for operation examples using this product x Operation Manual for DeviceNet Gateway Unit x Operation Manual for CC Link Gateway Unit x Operation Manual for Serial Communication Protocol ...

Страница 125: ...60 3 10 2 6 652 510 10 4 12 2 7 702 560 60 4 12 2 8 752 610 10 5 14 3 0 802 660 60 5 14 3 1 852 710 10 6 16 3 3 902 760 60 6 16 3 4 4 5 4 F8 1 5 F4 5 4 5 Datum Surface DETAIL A Attachment Hole and Datum Surface Home Secure at least 100 Reamer Pitch Tolerance p0 02 2 F5㧴7 Reamed Depth 10 4 M5 Depth 10 Cable joint connector S E Stroke End ME Mechanical End Teaching Port Brake unit Ma Moment Offset D...

Страница 126: ... 5 530 30 4 12 4 0 724 5 580 80 4 12 4 2 774 5 630 30 5 14 4 3 824 5 680 80 5 14 4 5 874 5 730 30 6 16 4 6 924 5 780 80 6 16 4 8 Stroke Weight kg Ma Moment Offset Datum Position Part A Datum Surface DETAIL A Attachment Hole and Datum Surface Reamer Pitch Tolerance p0 02 2 F5㧴7 Reamed Depth 10 4 M5 Depth 10 Home S 4 5 Drilled Hole F 8 Counter Boring Depth 4 5 Secure at least 100 Cable joint connect...

Страница 127: ...the drawing M E M E Mechanical End 50 100 150 200 250 300 L A B C 293 5 175 393 2 91 1 6 343 5 225 493 2 141 1 7 393 5 275 593 2 191 1 8 443 5 325 693 2 241 2 0 493 5 375 793 2 291 2 1 543 5 425 893 2 341 2 2 Stroke Weight kg Cable joint connector Brake unit Secure at least 100 Teaching Port Home Rod Diameter F 22 Appearance Figure for Brake equipped Type Brake equipped type is longer in 43 5mm an...

Страница 128: ... 5 444 923 5 356 3 5 Stroke Weight kg Home Secure at least 100 Teaching Port M E Mechanical End Brake unit Cable joint connector M10s1 5 Nut 3 types 64 7 50 32 1 68 64 50 89 6 4 F 6 6 1 7 2 f l a t f a c e s note The angle of the 2 faces on the actual product would not be as shown in the drawing Appearance Figure for Brake equipped Type Brake equipped type is longer in 43 5mm and weight heavier in...

Страница 129: ... 0 3 2 1 0 3 2 3 0 3 2 4 0 4 2 6 Stroke Home ME Mechanical End Guide Weight kg Weight of Guide Main Unit kg 10 1 6 ERC2 RGS7C 117 M E 4 56 62 ST 61 64 64 12 5 F ST 3 5 57 5 10 30 22 12 5 10 62 5 29 3 12 5 101 5 3 22 5 37 5 50 7 68 64 62 34 25 6 M6 F 50 100 150 200 250 300 0 3 3 0 0 3 3 2 0 4 3 4 0 4 3 6 0 5 3 8 0 5 4 0 Stroke Home ME Mechanical End Guide Weight kg Weight of Guide Main Unit kg ...

Страница 130: ... Weight of Guide Main Unit kg 0 4 2 0 0 4 2 1 0 5 2 3 0 6 2 6 0 6 2 7 0 7 2 9 Stroke Home ME Mechanical End 10 1 8 ERC2 RGD7C ST 62 ST 61 4 170 145 125 12 5 64 64 F12 F36 ST 3 5 57 5 10 30 22 158 125 65 63 62 52 34 25 4 M6 8 M6 M E 50 100 150 200 250 300 0 5 3 2 0 6 3 5 0 7 3 7 0 8 4 0 0 9 4 2 1 0 4 5 Stroke Home ME Mechanical End Guide Weight kg Weight of Guide Main Unit kg ...

Страница 131: ...Incremental Recorded date Acceleration deceleration mode Zone mm Zone mm Positioning band mm Threshold Push Deceleration G Acceleration G Speed mm s Position mm 10 2 Recording of Position Table No 0 1 2 3 4 5 6 7 8 9 10 11 12 13 14 15 16 17 18 ...

Страница 132: ... mode Incremental Recorded date Acceleration deceleration mode Zone mm Zone mm Positioning band mm Threshold Push Deceleration G Acceleration G Speed mm s Position mm No 19 20 21 22 23 24 25 26 27 28 29 30 31 32 33 34 35 36 37 38 39 40 41 ...

Страница 133: ...d mode Incremental Recorded date Acceleration deceleration mode Zone mm Zone mm Positioning band mm Threshold Push Deceleration G Acceleration G Speed mm s Position mm No 42 43 44 45 46 47 48 49 50 51 52 53 54 55 56 57 58 59 60 61 62 63 ...

Страница 134: ...itioning band in position mm 12 b SPOW Current limiting value at standstill during positioning 13 b ODPW Current limiting value during home return 16 c BRSL SIO communication speed bps 17 c RTIM Minimum delay time for slave transmitter activation msec 22 a OFST Home return offset mm 23 a ZNM2 Zone boundary 2 mm 24 a ZNL2 Zone boundary 2 mm 28 b PHSP1 Default direction of excited phase signal detec...

Страница 135: ...al gain Sixth edition A page for CE Marking added April 2011 Seventh edition March 2012 P 1 to 7 Contents added and changed in Safety Guide 7C edition June 2015 P 108 Grease change due to production stop P 115 to 120 Weight added to appearance drawing P 18 to 19 Contents changed in 1 6 Warranty P 109 to 111 Warning notes added such as in case the grease got into your eye immediately go to see the ...

Страница 136: ......

Страница 137: ......

Страница 138: ...89524 SHANGHAI JIAHUA BUSINESS CENTER A8 303 808 Hongqiao Rd Shanghai 200030 China TEL 021 6448 4753 FAX 021 6448 3992 website www iai robot com 825 PhairojKijja Tower 12th Floor Bangna Trad RD Bangna Bangna Bangkok 10260 Thailand TEL 66 2 361 4458 FAX 66 2 361 4456 Technical Support available in USA Europe and China Head Office 2690 W 237th Street Torrance CA 90505 TEL 310 891 6015 FAX 310 891 08...

Отзывы: