Hyundai Smartboard A S65UCAI Скачать руководство пользователя страница 4

4

- Use an unstable and unshakable stand or install on a flat surface when installing the product.

- Make sure that at least 4 people work safely when moving or installing the product.

- Do not hanging on or climbing over the stand or product.

- Remove the power code when the product is not in use for a long time. 

-  If the product is dropped or its appearance is damaged, power off the product, unplug the power

  cord, and contact the service center.

- Make sure that the product does not drip or splash water, and do not place any liquid items such 

  as vases on the product.

- Ground the product and connect it to the protected main socket outlet.

- Leave the disconnected device to ready for use.

- Install the socket outlets close to and easliy accessible around the device.

-  When moving the product, use a cart, pedestal, tripod, bracket, custom table made

  by the manufacturer, or a tabel sold with a device containning the product.

  Also, be careful when moving the product using a cart, as it may fall, cause injury 

  or damage to the product. 

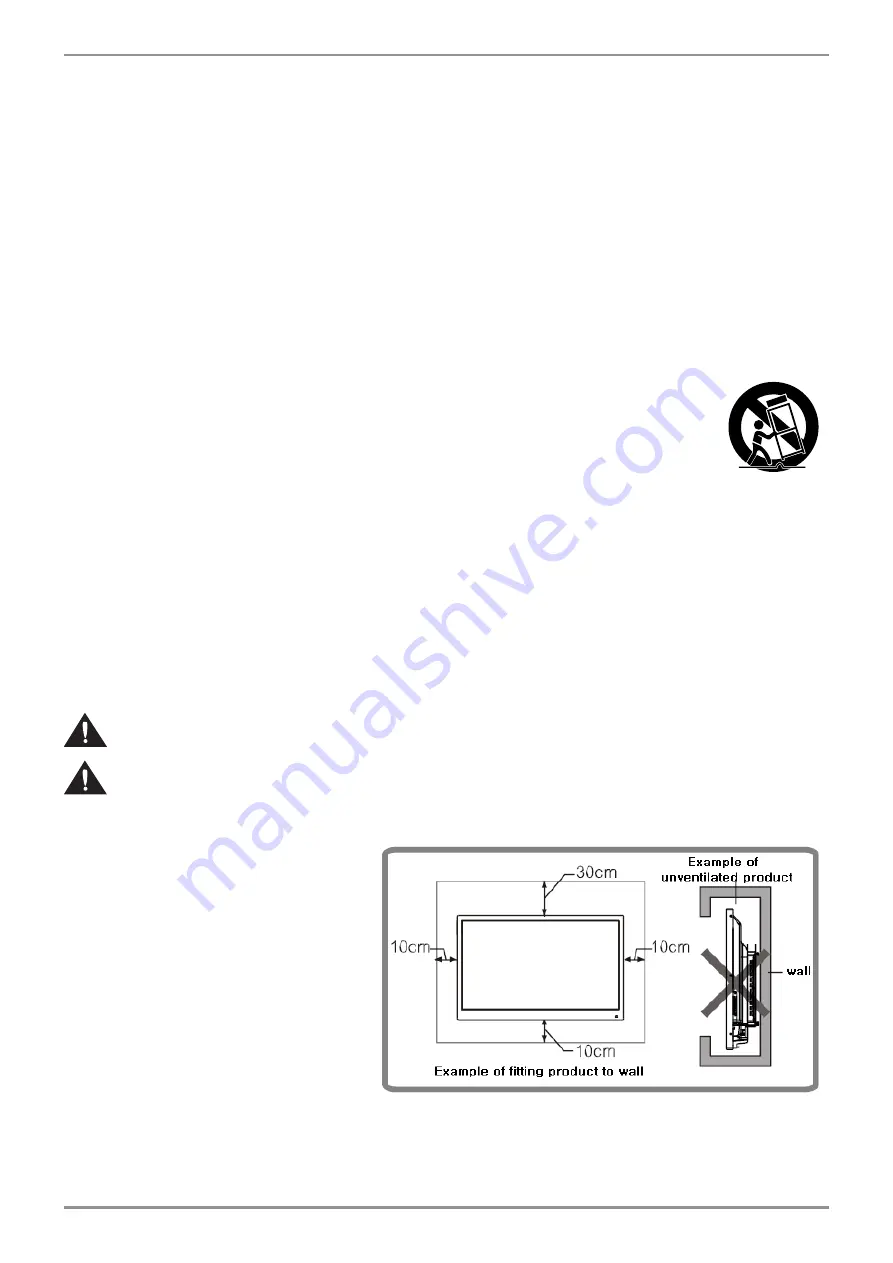
1. Install it at least 30cm away from the electric or heating system.
2. Avoid direct sunlight and where sunlight is reflected on the screen.
3. Ensure that the stand is secure and before installing the product.
4. Install the machine at a location 30cm from the wall and at least 10cm 
    from the floor for ventilation.


 Please take extra care when installing so that the produdct does not fall apart.

   Make sure to use the approved and correct parts to meet the VESA specification 

          and not warranted any injury or injury casued by the use of improper parts. 
          

-  Installing the product on the wall requires 

special expertise and should be conducted 

by a qualified installation specialist.

 Not liable for accidents or injuries casued 

 by improper installation or handling.

This product cannot be used in a vertical direction.

-  When moving the product, make sure that 

at least 4 people use the handle and floor 

surface of the product properly, but do not 

hold the screen and sensor parts,trays, or 

power buttons. This can cause product 

damage, failure, or injury.

- Please enough space around the product to avoid heat scalling inside it.

PRECAUTIONS FOR INSTALLATION

Содержание Smartboard A S65UCAI

Страница 1: ...User Guide SMART BOARD Model S65UCAI S75UCAI S86UCAI...

Страница 2: ...D FUNCTION OF EACH PART 1 2 3 6 7 8 REMOTE CONTROL 9 CONNECTING PERIHERAL EQUIPMENT 10 CONNECTING THE POWER CORD 11 ANDROID HOMEPAGE 12 POP UP MENU 13 SIDE BAR MENU 14 CHANGE SOURCE 15 QUICK MENU 16 W...

Страница 3: ...danger please observe the following instrctions when installing operating and cleaning the product To ensure your safety and prolong the service life of your LCD product please read the following prec...

Страница 4: ...use injury or damage to the product 1 Install it at least 30cm away from the electric or heating system 2 Avoid direct sunlight and where sunlight is reflected on the screen 3 Ensure that the stand is...

Страница 5: ...d may be attached to the product HOW TO USE If you are installing the product hold it on both sides and carefully lift it up Take care that the panel surface do not touch the floor When placing the pr...

Страница 6: ...ront part TITLE AND FUNCTION OF EACH PART 1 1 Indicator Remote control receiver and Optical sensor receiver 2 Power button 3 Home button go back to main home 4 Return button 5 System button 6 VOLUME V...

Страница 7: ...2 0 Input Port 2HDMI1 2 0 Input Port 3DP Input Port 4 Android USB2 Port 5 Android USB1 Port 6Touch USB Port 7SPDIF Output Port 8 HDMI Output Port 1 2 3 4 5 6 7 8 TITLE AND FUNCTION OF EACH PART 2 The...

Страница 8: ...Port 2RS232 Port 3YPbPr Port for option 4 AV Input Port for option 5 AV Output Port for option 6AUDIO Output Port 7PC AUDIO Port 8 VGA Port 1 2 3 4 5 6 7 8 TITLE AND FUNCTION OF EACH PART 3 The botto...

Страница 9: ...a new battery If the remote control is not used for a long time remove the battery Dropping or stepping may cause malfunction Do not drop or store in water or in a humid place If the remote sensor is...

Страница 10: ...r outlet TOUCH USB Port To use touch panel connect the touch panel to your computer with the provided USB cable HDMI Input Port Use the enclosed HDMI cable or as standard cable when purchased to used...

Страница 11: ...droid main interface if there is no signal input within 15min the product will automatically enter the standby mode In the Android main interface whether there is signal input or not the product will...

Страница 12: ...ar menu Swiped up along the edge of the bottom left corner of the screen Bottom bar menu Help Switch to mute mode Popup loop quick menu Two fingers are placed in the middle of the screen to call up th...

Страница 13: ...menu setting Swicthing to the Pop up menu 2 Reduce the Pop up menu Pop up menu 2 Operate the screen lock Specifing a range to take a screenshot Operate the qiuck clean memory View the current running...

Страница 14: ...menu System setting Signal source menu setting Small tools View the current running apps Returns to the Homepage Exit the sidebar menu Operate the overlay annotation writing software 1 2 3 4 5 6 7 1 2...

Страница 15: ...menu select the source with the orientation key and press OK button 2 Sidebar menu Select a source in the signal source settings to swtich to that signal source 3 Touch the button in the lower right...

Страница 16: ...ng a range to take a screenshot Shaded and higlighted excluding certain areas Operate Calculator Operate countdown function Lock the screen to prevent others using Improve speed by organizing unnecess...

Страница 17: ...mepage or select a remote control to run it 2 When running normally the screen above is displayed UI Setting Background Setting Brush Setting Nib Setting Single point Multi point Memo Spot light Impor...

Страница 18: ...ct allows you to specify different settings for your writing edition When enabling the accurate eraser function the thick brush part can be used like an eraser Nib Setting Touch to apply the settings...

Страница 19: ...2 or 3 screen division split writing Lasso Move When activating the function the icon is displayed darkly and you can select a certain area to copy move or delete Previous Step Next Step Revert the w...

Страница 20: ...urrent work states to an image and shares it with an email Converts the current work states to an image and shares it with QR cord Converts the current work states to an image and shares it with Perso...

Страница 21: ...olMail app in the Menu folder on the Home menu separately After launched the app the menu is shown above and use the email service you choose Currently the Google Gmail is not available If you fail yo...

Страница 22: ...Home Menu 2 The Screen Name is on the display then set your iOS devices network connection to the same with your IFPD 3 In the Control Center menu on iOS select Screen Mirroring The Screen Name will...

Страница 23: ...nu 2 Once the app is on the screen check the Screen Name on top of the screen Then set your devices network connection as the same with your IFPD 3 To connect IFPD visit the eshare app website or scan...

Страница 24: ...24 4 Launch the Eshare client and select the same Screen Name on the IFPD Mirroring will be start...

Страница 25: ...ernet connection connect RJ45 cable to the LAN port of IFPD Select DHCP in IP settings and then the machine will automatically obtain an IP address and connect to network Select Static in IP settings...

Страница 26: ...t Spot turn on hot spot switch But the WiFi connection will be disconnected Depending on the selecting bandwidth between 2 4G and 5G the connection may not be recognized properly So please make sure t...

Страница 27: ...te Setting During the setting the error may occur if the network connection is not available in Date and Time Auto Configuration mode Language Setting If you install an additional keyboard app for the...

Страница 28: ...Lock Control Setting System configuration The default Screen Lock password is 888888 Lock Control Note that you cannot control the product if you choose the touch lock option without remote controlle...

Страница 29: ...wn button on the remote control Check the audio output setting The remote controller is not working Check the power LED indicator If the power is connected the indicator is RED in standby mode Check i...

Страница 30: ...lm Enable Touch error range 1mm Bezel T B L R mm 27 47 27 27 Monitor 3840 x 2160 Contrast 1200 1 Display Color 1 07B 10bit OPS Power 12V DC 5A Input voltage 100 240V AC Power consumption 170 W 2 0 0 9...

Страница 31: ...31...

Страница 32: ...32...

Страница 33: ...33...

Страница 34: ...34...

Страница 35: ...35...

Страница 36: ...36...

Страница 37: ...37...

Страница 38: ...38...

Страница 39: ...39...

Страница 40: ...40...

Страница 41: ...41...

Отзывы: