background image

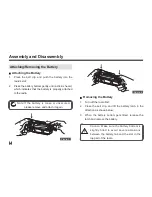
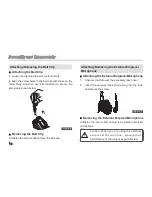
 Attaching/Removing the Belt Clip

  Attaching the Belt Clip 

. Loosen and remove the screws for belt clip; 
. Align the screw holes in the belt clip with those on the 
radio  body. And  then  use  a  screwdriver  to  secure  the 
screws as shown below. 

  Figure 6

Assembly and Disassembly

 Attaching/Removing the External Earpiece/   
 Microphone 

  Attaching the External Earpiece/Microphone

1.  Uncover (not remove) the accessory jack cover; 
2.  Insert  the  earpiece/microphone  plug  into  the  jack, 

and secure the screw. 


  Removing the External Earpiece/Microphone

Unfasten  the  screw  and  unplug  the  external  earpiece/
microphone. 

  Figure 7

Caution:  When  you  are  using  the  external 
e a r p i e c e / m i c r o p h o n e ,  w a t e r p r o o f 
performance of the radio may get affected. 

  Removing the Belt Clip

Unfasten the screws and remove the belt clip. 

Содержание TC-580

Страница 1: ...rtable Radio This easy to use radio will deliver you secure instant and reliable communication services at peak efficiency Please read this manual carefully before use The information presented herein...

Страница 2: ...agnetic Fields 3 kHz to 300 GHz American National Standards Institute C95 3 1992 IEEE Recommended Practice for the Measurement of Potentially Hazardous Electromagnetic Fields RF and Microwave The foll...

Страница 3: ...se interference with other devices or systems To avoid such interference turn off the radio in areas where signs are posted to do so DO NOT operate the transmitter in areas that are sensitive to elect...

Страница 4: ...a connection will ruin the transceiver DO NOT push the PTT when not actually desiring to transmit AVOID using or placing the transceiver in direct sunlight or in areas with temperatures below 30 C 22...

Страница 5: ...Part 90 of the FCC rules Operation is subject to the following two conditions 1 This device may not cause harmful interference and 2 This device must except any interference received including interfe...

Страница 6: ...chieve the accuracy and completeness of this manual but no warranty of accuracy or reliability is given All the above specifications and designs are subject to change without notice due to continuous...

Страница 7: ...wer 20 Inputting Password 20 Adjusting the Volume 20 Selecting a Zone 21 Selecting a Channel 21 Transmitting 21 Receiving 22 Programmable Auxiliary Functions 23 Advanced Operations 24 CTCSS CDCSS 24 D...

Страница 8: ...ere use of wireless communication equipment is completely prohibited to avoid potential electromagnetic interference and or compatibility conflicts Operating Instructions 1 Please only use accessories...

Страница 9: ...mulated dust and dirt may disable normal use 11 Users wearing a pacemaker a hearing aid or other medical devices shall abide by the following rules Make sure the radio is at least 20 cm away from your...

Страница 10: ...ems are received report any missing or damaged items to your dealer Accessories supplied with the radio Note 1 The pictures are for reference only 2 The antenna may vary with different frequency bands...

Страница 11: ...ammable 5 SK2 programmable 6 LCD Display 7 Function Keypad 8 LED Indicator 9 TK programmable 10 Radio On Off Volume Control Knob 11 Microphone 12 Speaker 13 Accessory Jack Cover 14 Numeric Keypad 15 B...

Страница 12: ...lect an option DN key to switch channels downwards during non menu operation or to scroll options downwards during menu operation UP key to switch channels upwards during non menu operation or to scro...

Страница 13: ...g or software upgrade Radio Status LED Indicator Transmitting Receiving Low battery alert When a call is transmitted within the Auto Reset Time When a call is received within the Auto Reset Time Misse...

Страница 14: ...t potential battery leakage causing damage to other people or to our living environment 7 Do not treat the worn battery as household garbage Recycling of the battery shall comply with your local laws...

Страница 15: ...ttery to be stored for a long time then wrap it up with a plastic bag and keep it in a dry and cool place This can provide defense against moisture intrusion and any damage caused by over self dischar...

Страница 16: ...attery is in good contact with the charging terminals The charging process begins when the charger LED solidly glows red 5 When charging is completed the charger LED solidly glows green when charging...

Страница 17: ...Switching Power to charge up to six batteries assembled as above simultaneously as shown in Figure 2 Please refer to the Owner s Manual for Six Unit Switching Power for detailed operation instructions...

Страница 18: ...the radio Figure 1 Note If the battery is loose or unsecured please remove and attach it again Figure 2 Removing the Battery 1 Turn off the radio first 2 Press the belt clip and lift the battery latch...

Страница 19: ...bly and Disassembly Figure 3 Figure 4 Attaching Removing the Antenna Attaching the Antenna Turn the antenna clockwise to fasten it Figure 5 Removing the Antenna Turn the antenna counter clockwise to r...

Страница 20: ...Earpiece Microphone Attaching the External Earpiece Microphone 1 Uncover not remove the accessory jack cover 2 Insert the earpiece microphone plug into the jack and secure the screw Removing the Exte...

Страница 21: ...eously As shown in the table below the display priority decreases from highest in the top row to lowest in the bottom row Each icon is displayed at its specific place When the icon with higher priorit...

Страница 22: ...rgency Indicator Scan Indicator Scan Stay Indicator Priority Scan Indicator High Power Indicator Low Power Indicator Monitor Indicator Squelch Off Indicator VOX Indicator Keypad Lock Indicator Whisper...

Страница 23: ...Light Time KTone Volume Power On PSW CH Display Radio Info On Off Settings Disabled Scan Channel DTMF Frequency Keypad Mode Main Menu Off Level 5 Open Level 9 Off 5 0 5 0 60s Off Infinite 5 5 0 60s Of...

Страница 24: ...used to switch channels upwards during non menu operation or scroll options upwards during menu operation DN key used to switch channels downwards during non menu operation or scroll options downwards...

Страница 25: ...N Alias Settings VOX Gain To select the VOX sensitivity level Off Level 1 5 SQL To select the squelch level Open Level 1 9 KLock Time To select the keypad lock time Off 5s 10s 15s 30s 60s BLight Time...

Страница 26: ...e Disabled To indicate the keypad mode is disabled Channel To indicate the keypad mode only supports channel number input DTMF To indicate the keypad mode only supports DTMF input Frequency To indicat...

Страница 27: ...and the icon displaces Inputting Password If the power on password feature is enabled by your dealer maximum length 8 digits please enter the Basic Operations password by using 0 9 and press to confi...

Страница 28: ...below are available for channel switch 1 Press or 2 Enter the channel number directly when the keypad mode supports to input channel numbers Refer to Advanced Operations Keypad Mode in page 32 for se...

Страница 29: ...e icon will appear with green LED glowing solidly TK SK1 and SK2 are programmable function buttons Note Hold the radio approximately 2 5 to 5 centimeters away from your mouth to reduce the rate of RF...

Страница 30: ...toggle programmable button press None Power Adjust Call 1 Call 2 Call 3 Call 4 Call 5 Compandor Display Mode Switch Emergency Off Emergency On Home Channel Keypad Mode Monitor Monitor Momentary Scan...

Страница 31: ...solidly after transmission the LED solidly glows orange There are three ways available for transmitting 1 Enter the Call List from the menu select the desired contact entry and press PTT to transmit...

Страница 32: ...Individual Call 3 Receiving a Group Call You may customize your Group Call ID The radio will sound a special alert when it receives a Group Call 4 Receiving Other Types of Codes If the radio supports...

Страница 33: ...io sounds an alert tone programmable and then scan starts from the current channel and goes in order of the channel number During scanning the LCD displays with green LED flashing If any signal is rec...

Страница 34: ...nabled for the channel assigned with a scan list the radio will start to scan automatically when it switches to the channel 3 Enter the main menu select Scan On and press to confirm There are seven wa...

Страница 35: ...riority Scan With this feature enabled you can scan the most frequently used channel so that information will not be missed These priority channels can be programmed by your dealer via programming sof...

Страница 36: ...Emergency Alarm Cycle is used up Advanced Operations 3 Turn the radio off Emergency Mode If the radio enters Emergency mode it will switch to the preset Emergency Revert Channel The alarm process inc...

Страница 37: ...e that transmission will be prohibited soon TOT Re Key Time After the PTT key is released transmission will remain inhibited until TOT Re Key Time expires TOT Reset Time Two transmissions with time in...

Страница 38: ...rogrammed Display Mode Switch key Enter Settings CH Display through the main menu select your desired display mode and press to confirm Advanced Operations Home Channel You can ask your dealer to assi...

Страница 39: ...e channel If the channel does not exist an Error alert will sound And you may also press to switch channels DTMF You can input a DTMF code through the numeric keypad To create A B C and D respectively...

Страница 40: ...feature at this time the alert tone will sound twice and the icon will disappear In auto reset mode press Monitor to cancel a call Monitor Momentary Refer to Monitor for purpose of Monitor Momentary I...

Страница 41: ...the alert tone will sound twice and the icon will disappear In auto reset mode press Squelch Off to cancel a call Squelch Off Momentary Refer to Squelch Off for purpose of Squelch Off Momentary When...

Страница 42: ...peration to inhibit VOX Note 1 If the PTT VOX Switch on the earpiece is set to PTT you can only transmit by pressing the external PTT no matter whether VOX is activated 2 When the PTT VOX Switch is se...

Страница 43: ...s the key again to restore normal display and the alert tone will sound twice Advanced Operations Whisper With this feature even if you speak at a low voice your voice can be heard clearly Press the p...

Страница 44: ...echarge or replace the battery the voice is weak The volume may have been set to a low level Increase the volume discontinuous or totally The antenna may have got loose or it may have Power off the ra...

Страница 45: ...ers channel Go to the dealer for this programming The noise is too loud You may have been too far away from other Move towards other members power members off your radio and then restore its power You...

Страница 46: ...sory jack cover when the radio is not in use Radio Cleaning Clean up the dust and fine particles on the radio surface and charging piece with a clean and dry lint free cloth or a brush regularly Use n...

Страница 47: ...rbud with in Line PTT VOX ESM11 Earbud with on MIC PTT VOX ESM12 D earset with Boom MIC VOX EHM16 Earpiece with on MIC PTT VOX Transpar ent Acoustic Tube EAM12 D earset with in Line MIC VOX EHM15 Six...

Страница 48: ...parent Acoustic Tube for use with remote speaker microphone ESS08 Receive Only Earbud for use with remote speaker microphone ESS07 Note Pictures above are for reference only and may vary from actual p...

Отзывы: