


NH-2700 4. Operating Instructions
4 - 33
2) Prepare the new paper roll. Please see the NOTE described below
3) Remove the roll guide by carefully pulling it off.
NOTE:
1.
Make sure the roll is in its proper roll form. (A deformed roll may cause jamming problems)
2.
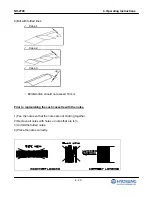
When replacing the new roll, make sure the end of the roll paper has a clean cut. (See the below
figure.)
4) Add the receipt paper into the rod and then
insert the roll guide tightly again to fix it.
5) The shiny side of the paper should be faced up
to be printed properly and the metallic tension
guide should be surrounded with paper to reduce
the tension during feeding.
6) Insert the leading edge of paper between lower
guide and upper guide of the receipt printer
slowly. When the machine is initialized, the
paper is going to start feeding.
Roll Guide
Roll Guide
Upper Guide
Lower Guide
Содержание NH-2700
Страница 1: ...NH 2700 Front Load Operator Manual Copyright 2010 Nautilus Hyosung Inc All right reserved...
Страница 5: ...NH 2700 1 Introduction 1 1 Chapter 1 Introduction...
Страница 9: ...NH 2700 2 Precautions for Safety 1 2 Chapter 2 Precautions for Safety...
Страница 13: ...NH 2700 3 Hardware Specifications 3 1 Chapter 3 Hardware Specifications...
Страница 24: ...NH 2700 4 Operating Instructions 4 1 Chapter 4 Operating Instructions...
Страница 34: ...NH 2700 4 Operating Instructions 4 11 Fig 4 12 Changing Battery 2...
Страница 58: ...NH 2700 4 Operating Instructions 4 35 NOTE THE BASIC MECHANISM OF RECEIPT PRINTER...
Страница 61: ...NH 2700 5 Operator Function 5 1 Chapter 5 Operator Function...
Страница 136: ...NH 2700 5 Operator Function 5 76 Touch Type...
Страница 139: ...NH 2700 5 Operator Function 5 79 5 7 6 3 1 SCREEN n Please press SCREEN n EN DISABLE button to set up SCREEN n...
Страница 203: ...NH 2700 5 Operator Function 5 143 5 13 2 9 RESULT After performing QUICK CONFIGURATION the result will be shown as below...
Страница 204: ...NH 2700 6 Installation 6 1 Chapter 6 Installation...
Страница 210: ...NH 2700 6 Installation 6 7 Fig 6 5 Installation space 2 Side view 45...
Страница 212: ...NH 2700 7 Appendix 7 1 Chapter 7 Appendix...
Страница 248: ...NH 2700 7 Appendix 7 37 2 Select SYSTEM SETUP menu 3 Select SYSTEM CONTROL menu...
Страница 321: ...NH 2700 7 Appendix 7 110 2 Press WELCOME ADVERTISEMENT button 3 Press WELCOME ADVERTISEMENT button...
Страница 322: ...NH 2700 7 Appendix 7 111 4 You can enable or disable Advertisement images to view by pressing SCREEN Key...
Страница 324: ...NH 2700 7 Appendix 7 113 2 Press ADVERTISEMENT button 3 Press TRANSACTION ADVERTISEMENT button...
Страница 334: ...NH 2700 7 Appendix 7 123 2 Press OPTIONAL FUNCTION 2 button 3 Press SCREEN SERVICES button...


