background image

EN © HYKKER. 

All rights reserved.


Soundbar 2in1


22 

should light up. Connect a cable to the soundbar to connect it to the sound source. 
Position or mount the soundbar where it will be used. Insert batteries into the remote. 
 
MOUNTING THE DEVICE


Make sure that the device is installed in such a way that it does not become damaged 
during use. 


The Soundbar provides four mounting options: 

A.


Horizontal position on the furniture underneath the TV 

B.


Horizontal suspension under the TV 

C.


Vertical positioning of the columns on the sides of the TV set 

D.


Vertical suspension of the columns on the sides of the TV set 

 
Option A 
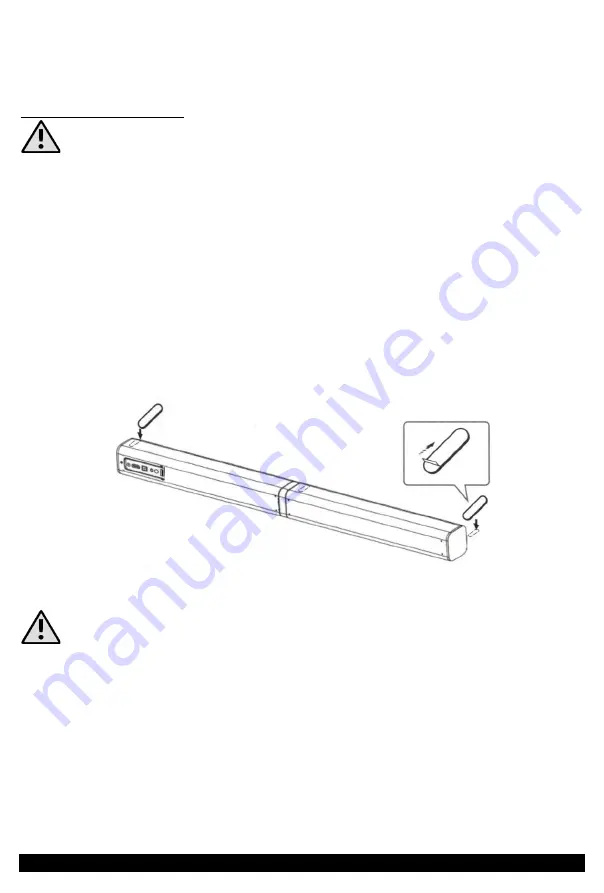
Assemble  the  device  into  a  soundbar  and  then  turn  it  upside  down.Peel  off  the 
protective tape from the self-adhesive feet one by one and then stick it close to the 
side edges of the device. Place the device on glued feet in place where it will be used 
and connect the cable to the sound source and power supply. 


Option B 

If you want to attach the soundbar to a wall which is made of plasterboard or other 

types of wall which differ from standard brick or concrete panels, choose a different 

type of dowels or screws suitable for the substrate. 

Assuming that you use the pins 

from the set, choose the size of the drill bit to match the diameter of the pins - 

Ø 5 mm.


Assemble the device into a soundbar. Choose where to mount the soundbar on the 

wall. Select the appropriate height so that the TV does not cover the speaker  - the 

recommended  distance  from  the  bottom  of  the  TV  is  approx.  5  cm.  The  spacing 

between the wall-mounting hooks on the back of the unit is 58 cm. Mark the location 

of the holes in the selected mounting location on the wall. Make sure that they are at 

the same level, then drill holes and place dowels in them. Slide the screws into the 

dowels and tighten them so that they are approx. 3 mm from the wall. Connect the 

power supply and the sound source cables to the soundbar, and then fix it on the pins 

Содержание ER-1912

Страница 1: ...GODNE Z PRZEZNACZENIEM 2 3 DANE TECHNICZNE 2 4 ZASADY BEZPIECZNEGO U YTKOWANIA 3 5 OBJA NIENIA SYMBOLI 5 6 ZAWARTO ZESTAWU 6 7 U YTKOWANIE 7 8 CZYSZCZENIE I KONSERWACJA 13 9 PROBLEMY I ICH ROZWI ZYWAN...

Страница 2: ...z telewizorem lub projektorem Wbudowany wzmacniacz pozwala na uzyskanie wysokiej g o no ci zar wno przy ogl daniu program w telewizyjnych koncert w mecz w etc a tak e s uchaniu muzyki Dost pno wykorz...

Страница 3: ...ych element w kt re mog by naprawiane przez u ytkownika Naprawia ten produkt mo e wy cznie wykwalifikowany serwis producenta lub autoryzowany punkt serwisowy Naprawa urz dzenia przez niewykwalifikowan...

Страница 4: ...awny 18 Trzymaj baterie z dala od dzieci i zwierz t 19 Nie wyrzucaj zu ytych baterii do mietnika lecz do specjalnych pojemnik w na zu yte baterie i akumulatory 20 Nigdy nie stosuj zu ytych baterii w p...

Страница 5: ...awowej stosuje si r wnie izolacj dodatkow Elementy opakowania nale y wyrzuci do odpowiednich kontener w Oznaczenie kontenera do kt rego nale y wyrzuci opakowanie papier Znak umieszczony na wyrobie ozn...

Страница 6: ...baterii i akumulator w razem z niesortowanymi odpadami komunalnymi U ytkownicy baterii i akumulator w musz korzysta z dost pnej sieci odbioru tych element w kt ra umo liwia ich zwrot recykling oraz u...

Страница 7: ...a uszkodzenie urz dzenia lub zasilacza adne uszkodzenia wynikaj ce z nieprawid owej obs ugi nie s obj te gwarancj Wyjmij urz dzenie oraz akcesoria z opakowania Dzi ki swojej konstrukcji soundbar mo na...

Страница 8: ...cz do soundbaru przew d kt rym b dzie on po czony ze r d em d wi ku Ustaw lub zamocuj soundbar w miejscu gdzie b dzie docelowo u ytkowany W baterie do pilota MONTA URZ DZENIA Upewnij si e urz dzenie...

Страница 9: ...y na ok 3 mm Pod cz do soundbaru przew d kt rym b dzie po czone ze r d em d wi ku oraz zasilanie po czym zamocuj go na przygotowanych wcze niej w cianie ko kach Sprawd czy wisi stabilnie i w razie pot...

Страница 10: ...o wykorzysta adapter minijack RCA do czony do zestawu je li w r dle d wi ku wyj cie audio wyposa one jest w z cza RCA tzw cinch 2 W cz soundbar przyciskiem na panelu z boku obudowy lub przy pomocy pil...

Страница 11: ...i z listy wybierz HYKKER SOUNDBAR 2in1 5 W razie potrzeby potwierd parowanie wpisuj c PIN 0000 w r dle d wi ku 6 Od tej pory przy w czeniu soundbaru w trybie Bluetooth b dzie on automatycznie czy si...

Страница 12: ...ak muzyka klasyczna rock pop jazz muzyka na ywo W czanie wy czanie zmiana trybu pracy Odtwarzanie pauza Nast pny utw r zwi kszanie g o no ci Poprzedni utw r zmniejszanie g o no ci W czanie wy czanie Z...

Страница 13: ...nienie gwarancji 9 PROBLEMY I ICH ROZWI ZYWANIE W razie jakichkolwiek problem w z urz dzeniem warto zapozna si z poni szymi poradami Urz dzenie nie w cza si Sprawd czy zasilacz jest pod czony do urz d...

Страница 14: ...centa PRZECHOWYWANIE URZ DZENIA Przechowuj czyste i wy czone urz dzenie w suchym pomieszczeniu z dala od r de ciep a i wilgoci Najlepiej gdy urz dzenie umie cisz w oryginalnym opakowaniu poza zasi gie...

Страница 15: ...2 INTENDED USE 16 3 TECHNICAL DATA 16 4 PRINCIPLES OF SAFE USE 16 5 EXPLANATIONS OF THE SYMBOLS 18 6 CONTENTS OF THE SET 20 7 USE 21 8 CLEANING AND MAINTENANCE 26 9 TROUBLESHOOTING 26 10 STORAGE AND T...

Страница 16: ...possibility for the user to connect many different devices The remote control provides comfort of use as it does not require to approach to the device 3 TECHNICAL DATA Name SOUNDBAR 2in1 Model ER 1912...

Страница 17: ...dbar 2in1 meets the requirements of safety standards and radio frequency recommendations All wireless devices may cause interference to other devices 8 The device should not be used in dusty condition...

Страница 18: ...y result in total or partial damage to the battery 23 Place worn or damaged batteries in a special container 24 Never expose batteries to direct sunlight radiators fire or excessive heat 25 Never disp...

Страница 19: ...te are being recycled Collecting this type of waste in designated locations and the actual process of their recovery contribute to the protection of natural resources Proper disposal of used electrica...

Страница 20: ...le to male Long connection cable 2m Short connection cable 80 mm Column stands 2 pieces Self adhesive feet 2 pieces Wall mounting studs 2 pieces User manual If any of the above items is missing or dam...

Страница 21: ...into the holes of the other and then turn the speakers against each other as shown in the picture Once the soundbar has been properly connected connect it with a short connection cable To use the dev...

Страница 22: ...d and connect the cable to the sound source and power supply Option B If you want to attach the soundbar to a wall which is made of plasterboard or other types of wall which differ from standard brick...

Страница 23: ...s to start the device Pressing the button again for 2 seconds will switch the device off Press briefly the same button to select the operating mode of the device The individual modes are indicated by...

Страница 24: ...th device with a soundbar for the first time the pairing procedure must be carried out 1 Turn on the soundbar in Bluetooth mode 2 A blue LED on the right side of the device should flash which means th...

Страница 25: ...nges the operating mode long press of the button mutes the sound switches between equalizer settings none classical music rock pop jazz live music Switching on off changing the operating mode Play pau...

Страница 26: ...ly a dry cloth Never use any agent with a high concentration of acids or alkalis 6 Use the original accessories only Violation of this rule may result in an invalidation of the warranty 9 TROUBLESHOOT...

Страница 27: ...e is not a nearby household appliance freezer microwave oven etc or a transmitter receiver network router walkie talkie etc It can also be caused by interference from the mains power supply connect th...

Страница 28: ...ares that the device complies with Directive 2014 53 EU The full text of the EU Declaration of Conformity is available at the following Internet address www mptech eu qr hykker 13 MANUFACTURER mPTech...

Отзывы: