background image

FIGURE 1

PREPARATION

Clean, level, and prepare the floor for installation.

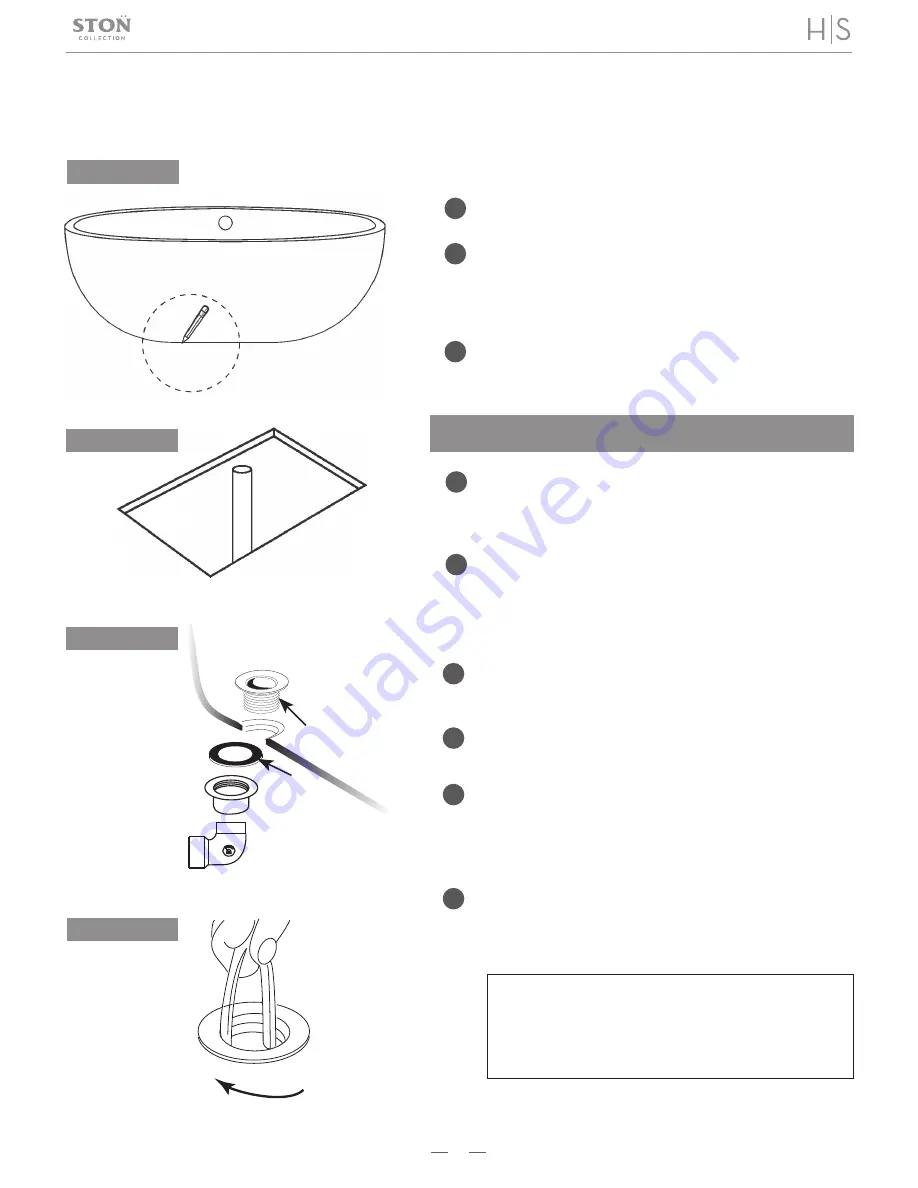
Place the unit in the exact installed position on the floor 
and trace the outline of the bath with a pencil or any 
erasable marking (Figure 1). Templates for Freestanding 
bathtubs come with the tub.

Determine the location of the drain pipe on the floor by 
taking measurements of the drain location underneath 
the unit (Figure 2).

3

1

2

Note:


Drain, waste locations, and trim options vary by model. 

FIGURE 2

4

5

Using a blanket, cardboard, or other clean protective 
surface, turn the unit on its side so that the unit is  
properly supported during drain installation.

Clean the drain hole area in preparation of setting the 
drain. The area should be dry and free of any debris.

Measure and dry fit all connections. Cut tubes as 
necessary.

Primer then glue drain elbow and female adapter. 
Primer and glue elbow to tee and adapter


(Figure 3)

.

Apply a thin ring of silicone around the underside of the 
strainer. Position gasket between the drain ell and the 
bottom of the bath. Begin threading the strainer into the 
drain ell


(Figure 3)

.

Insert the handle of a pliers into the drain and secure 
strainer to ell. Remove excess sealant


(Figure 4)

.

6

7

8

9

Silicone

®

UP

C

/

- 11

2” 

H

 S

C

 40

FIGURE 

3

FIGURE 

4

3

BATHTUB 

INSTALLATION

INSTALL DRAIN HARDWARE

Please refer to 

www.hydrosystem.com

 for

videos on how to install your bathtub and get 
specific dimensions on your model bathtub.

INSTALLATION  INSTRUCTIONS

Содержание Ston Series

Страница 1: ...ubs without a pedestal page 6 User maintenance and cleaning instructions page 7 Limited warranty page 8 1 C O L L E C T I O N Please refer to www hydrosystem com for videos on how to install your bathtub and get specific dimensions on your model bathtub INSTALLER Please pass these important instructions along to the homeowner INSTALLATION INSTRUCTIONS FOR FREESTANDING MODELS TABLE OF CONTENTS ...

Страница 2: ...educe the risk of electric shock connect this terminal to the grounding terminal of your electric service or supply panel with a conductor equivalent in size to the circuit conductors supplying this equipment 1 DANGER RISK OF ELECTRICAL SHOCK Connect only to a circuit protected by a ground fault circuit interrupter 2 This unit should be installed by a qualified service representative All electrica...

Страница 3: ...ation Clean the drain hole area in preparation of setting the drain The area should be dry and free of any debris Measure and dry fit all connections Cut tubes as necessary Primer then glue drain elbow and female adapter Primer and glue elbow to tee and adapter Figure 3 Apply a thin ring of silicone around the underside of the strainer Position gasket between the drain ell and the bottom of the ba...

Страница 4: ...rain hardware previously installed D980 CAP 2 7 8 5 16 1 1 2 OD Tubing 20 ga Cut to Fit Tub Dimensions Overflow O Ring 792A BJ UPC C WB 17 GA 24 D980 RING FIGURE 7 OVERFLOW INSTALL 13 Apply a thin bead of silicone around face of the overflow O ring Mount the D980 RING using the provided screws Figure 7 Adjust the ball joint to the contours of the tub and tighten the ring 14 Slide the escutcheon on...

Страница 5: ...er that the drain lines up with the P trap in the floor DO NOT LET THE TUB REST ON THE DRAIN PLUMBING Check the tub for level It must be level end to end and side to side Caulk the gap between the skirt and the floor ELECTRICAL REQUIREMENTS WARNING When using electrical products basic precautions should always be followed including the fol owing DANGER RISK OF ELECTRICAL SHOCK Connect only to a ci...

Страница 6: ...possible to minimize loss of heat Pipe insulation may be used on the air line to minimize heat loss THERMAL AIR LOOP Blower Air hose connect to tub 1 schedule 40 PVC pipe not supplied 1 check valve supplied This is a sub floor drain Access from below tub is recommended for installation If there is no access from below the installation is more difficult Clearance for the drain will be required and ...

Страница 7: ...ve the drain kit from the tub Use emery cloth grinder or wire brush to remove the plated finish from the pipe where it will be soldered to the tee Provide opening in floor below drain of approximately 6 x 6 This will be completely covered by the tub Install tub in precise location desired Use only 100 clear silicone to adhere tub to floor Using the distance noted in step 4 drill hole in floor for ...

Страница 8: ...WARRANTY OF MECHANTABILITY FITNESS NOR OTHER WARRANTY WHETHER EXPRESS IMPLIED OR STATUTORY IS MADE BY HYDRO SYSTEMS INC EXCEPT THAT IT WARRANTS THE GOODS TO BE FREE FROM DEFECTS IN MATERIALS AND WORKMANSHIP IN NORMAL USE AND SERVICE AS DESCRIBED ON THE FACE HEREOF WARRANTY OBLIGATIONS OF HYDRO SYSTEMS INC Should a defect in workmanship and or material in any item covered by this warranty become ev...

Отзывы: