Hyco Sapphire SAPUC1 Скачать руководство пользователя страница 5

5

4

. Maintenance

Draining the unit

It is recommended the unit is sanitised 

every 3 - 6 months

.

Before undertaking maintenance ensure the appliance is isolated from the 

electrical supply.

Unplug the power cable from the electrical outlet.

Isolate the water supply to the chiller and remove ¼” pipe from the “Water In” &

“Water out” connections at the top of the product. To do this the collars of the

push fit connectors should be pushed down as the ¼” pipe is pulled away for

the connections, a small spanner can be used to facilitate this.

Remove and position the chiller onto a location where the water can be drained

away from beneath the unit. To drain the unit simply unscrew the drain nut

located on the underside of the chiller, ensure the drain seal is retained in the

drain nut.

When the unit is drained, replace the drain nut and seal and then follow the

commissioning section of this instruction when reinstating.

Sanitising the unit

First drain down unit as per the “Draining the unit” section. Ensure the drain

nut and seal are replaced before adding the sanitising fluid to the tank via the

“Water in” fitting at the top of the chiller.

Reinstall the unit and recommission as per commissioning section of this

instruction. Follow the instructions of the sanitising fluid for required times

before thoroughly flushing the appliance through.

Filter Maintenance

If a filter is installed in line with the chiller the filter cartridge needs replacing at
the intervals specified in the filter instructions.

Содержание Sapphire SAPUC1

Страница 1: ...Product Instruction Manual Sapphire SAPUC1 Undersink chiller V19 1 3 ...

Страница 2: ...pecified on the rating plate The unit should be installed with easy access to the electrical plug This appliance should be installed indoors on a flat surface Install the appliance in a dry well ventilated area keep the ventilation openings on the sides and front of the unit uncovered and unobstructed with at least 10cm space from any surfaces This appliance can be used by children aged from 8 yea...

Страница 3: ...t cut and not to crush the ends of the pipe as this may cause the connection to fail A brass adapter and plastic connector are provided to connect the pipe to 15mm mains supply copper pipe Two identical connectors are provided to connect the pipe to the WATER IN inlet on the chiller and then to connect a new run of pipe from the WATER OUT outlet of the chiller to the desired tap cold water dispens...

Страница 4: ...en 8 and 12 minutes for the full capacity of the tank OFF COLD 1 2 3 4 5 6 C O L D E R 7 C 8 C 10 C 5 C 6 C 4 C Do not connect the electrical supply until the commissioning has been completed Electrical connection Connect the kettle style lead to corresponding socket located at the rear of the appliance before plugging the other end into an electrical socket Ventilation Depending on the installati...

Страница 5: ...unit simply unscrew the drain nut located on the underside of the chiller ensure the drain seal is retained in the drain nut When the unit is drained replace the drain nut and seal and then follow the commissioning section of this instruction when reinstating Sanitising the unit First drain down unit as per the Draining the unit section Ensure the drain nut and seal are replaced before adding the ...

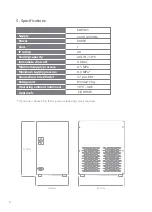
Страница 6: ... H 10 C Minimum supply pressure 0 1 MPa Maximum supply pressure 0 3 MPa Connections Inlet Outlet push fit Refrigerant R134a 110g Operating ambient min max 100 C 380 C 360mm 265mm 370mm Approvals Immediate draw off 3 litres CE WRAS If pressure is above 3 bar then a pressure reducing valve is required ...

Страница 7: ...a replacement product Incorrect installation and frost damage or failure to follow correct operating and maintenance instructions are excluded Consequential costs such as labour charges or damage to surroundings are expressly excluded Contact us If you experience a problem with this product you should first contact our service department on 01924 225 200 before taking any further action Experience...

Страница 8: ...rking life this equipment must not be disposed of as household waste It must be taken to a local authority waste collection centre or to a dealer providing this service Disposing of electrical and electronic equipment separately enables its components to be recovered and recycled to obtain significant savings in energy and resources In order to underline the duty to dispose of this equipment separ...

Отзывы: