background image

+

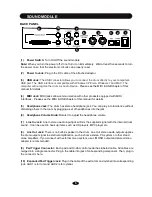
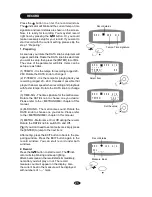
Press the SONG button and its indicator will

lights up. The song window will appear. There are
two types of song: Demonstration song and User
Song which is recorded by yourself.

1. DEMO SONG

(1) Select and Play Demo Song
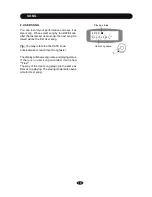
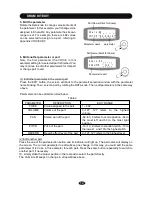
There are many demo songs built in. The name
and number of demo song, playing status, tempo
and time signature appear on the display.  Rotate
the DATE knob to choose a song.
Then press the            button to start play; the button
indicator lights up.
When  the  demo  song  is  playing,  press  the
button again to stop the playing, the         indicator
turns off.

(2) Demo Song Playing Mode
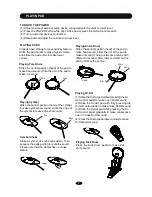
There are four modes to play song:
PLAY 1 - Playing selected song once
REPEAT 1 - Playing selected song repeatedly
PLAY ALL - Play all songs
REPEAT ALL - Playing all songs repeatedly
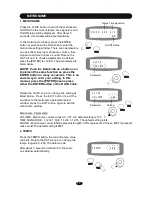
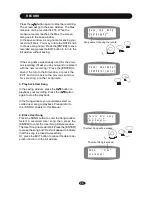
Press the SONG button twice to enter the play
mode window. Rotate the DATE knob to change
the playing mode.
The screen will turn back to the previous window
automatically after about 3 seconds, or press the
EXIT button to exit immediately.

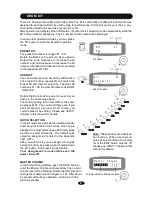
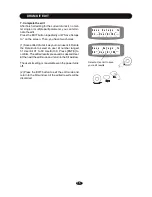
(3) Practice with Demo Song
You may practice your own performance with the
demo song.
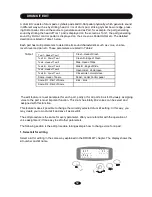
There are three practice modes for yourchoice:
FULL - When press the          button, you will hear
complete song
DRUM ONLY - When press the         button, you
will hear drum sound only. It helps you to get idea
how to perform drum.
DRUM MUTE - When press the         button, you
will hear background music without drum sound.
Then, you can play drums by yourself.
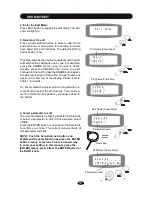
Press the MODE button repeatedly to change the
practice mode.
The screen will turn back to the previous window
automatically after about 3 seconds, or press the
EXIT button to exit immediately.

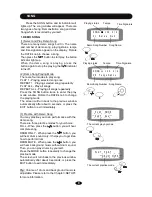
Tip: 

Volume of drum and background music is

adjustable. Please refer to the Chapter <SETUP>
for more information.

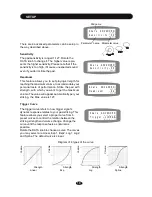
SONG   100 2/4
01 Baiao De2

Demo Song Number

Playing status       Tempo

 PLAY MODE
 PLAY ALL

The current playing mode

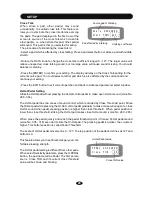
SONG

Song Name

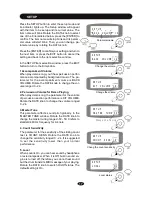
SONG 

u

 102 4/4

28 TangoDance

Demo Song Number

Playing status        Tempo

Time Signature

Song Name

 PLAY PART
    DRUM MUTE

The current practice mode

Time Signature

9

Содержание HD-010B

Страница 1: ...HD 010B DIGITAL DRUM USER S MANUAL ...

Страница 2: ...gned to provide reasonable protection against harmful interference in a resi dential installation This equipment generates uses and can radiate radio frequency energy and if not installed and used in accordance with the instructions may cause harmful interference to radio communications However there is no guarantee that interference will not occur in a particular installation If this equipment do...

Страница 3: ...FICATION This product should be serviced by qualified service personnel when w the power supply cord or the plug has been damaged w liquid has been spattered into the unit or it has been exposed to rain w the instrument does not appear to operate normally or exhibits a marked change in performance w the instrument has been dropped or the cabinet has been damaged w Do not attempt to open the unit o...

Страница 4: ...r pa r t 14 Edit other parameter in the current part 14 Edit another part 14 Complete the edit 15 S T R I K I N G C O U N T 1 6 S E T U P 1 7 Accompaniment Volume 17 Percussion Volume for Demo Play 17 Ma ster Tu ne 17 Co un t Se sit iv it y 17 L o c a l 1 7 E q u a l i z e r 1 8 A d v a n c e d P a r a m e t e r 1 8 S e s i t i v i t y 1 9 Headroom 19 Trigger Corve 19 Cross Talk 20 Hi Hat pedal se...

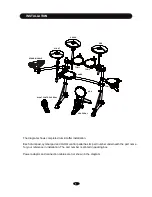
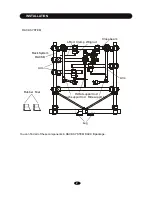
Страница 5: ...i Hat control pedal has its part number underneath the part name for your reference in installation The part number is printed in packing box Power adaptor and connection cables are not shown in the diagram 1 KICK PEDAL KICK SNARE TOM 3 RIDE CRASH HI HAT SOUND MODULE HI HAT CONTROL PEDAL TOM 2 TOM 1 ...

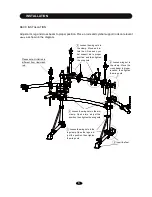
Страница 6: ...ION Rubber Feet L Rod Clamp Wing nut Arm Arm Leg Rack System RACKB Crash support rod Ride supprt rod Hi Hat support rod RACK SYSTEM You can find all of these components in RACK SYSTEM RACK B package Cross beam 2 ...

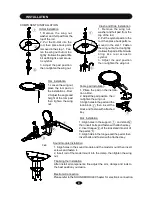
Страница 7: ... and then tighten the wing nuts 3 Loosen the wing nuts in the arm clamp Open arms adjust the position then tighten the wing nuts 1 Loosen the wing nuts in the leg clamp Open the legs ad just the position then tighten the wing nuts 2 Insert the feet Please note Hi Hat rod is different from ride crash rod Adjust arm leg and cross beam to proper position Place L rods and cymbal support rods on releva...

Страница 8: ...arm clamps and rods to the best position you desire 2 1 3 3 4 2 1 Remove the wing nut washer and felt pad from the top of the rod 3 Adjust the pad position then re tighten the wing nut 1 Remove the wing nut washer and felt pad from the top of the rod 3 Adjust the pad position then re tighten the wing nut 2 Put the Hi Hat into the rod then place back parts removed in the step 1 Fas ten the wing nut...

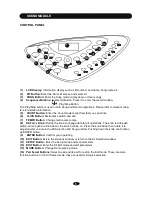
Страница 9: ...e the knob to change data for all operations The knob is with push switch when push the knob down the switch will be on Press the knob down then rotate it to adjust master volume in the Kit Selection and Song window Pushing down the knob can function as ENTER button 9 ENTER Button Confirm your operating 10 EXIT Button Exit to the previous window or return to the Kit Selection window 11 SETUP Butto...

Страница 10: ...u can play in total silence without disturbing others in the room by plugging a set of headphones into the jack 6 Headphone Volume Knob Rotate it to adjust the headphone volume 7 Line In Jack Line In stereo audio input jack will mix the supplied signal with the internal drum sound It can be used to hook up items such as CD players MP3 player etc 8 Line Out Jack There is no built in speaker in the ...

Страница 11: ...cymbal its sound will sustain Then squeeze the edge portion to mute the sound Please note that the Hi Hat has no choke feature Bow All pads have striking force sensitivity feature Strike the pad harder to make higher volume and strike the pad softer to make lower volume Playing Tom Drum Strike the central position head of the pad to make head sound strike the rim of the pad to make rim sound Playi...

Страница 12: ...ment is listed in the Appendix KIT LIST After you select a kit you can assign it to a quick selection button by pressing and holding down KIT 01 Pop DRUM KIT MASTER VOLUME In the Kit and Song window push the DATA knob to enter the Master Volume control window The current volume level will be blinking Rotate the DATA knob to change the master volume ranged 0 127 After about 5 seconds without any op...

Страница 13: ...e previous window automatically after about 3 seconds or press the EXIT button to exit immediately 3 Practice with Demo Song You may practice your own performance with the demo song There are three practice modes for yourchoice FULL When press the button you will hear complete song DRUM ONLY When press the button you will hear drum sound only It helps you to get idea how to perform drum DRUM MUTE ...

Страница 14: ...set demo song the next song fol lowed will be the first User song Tip You may rotate the the DATE knob anticlockwise to reach User Song faster The display will show song name and playing status If there is no user song recorded it will show Free The way of the User song playing is the same as Demo song playing The playing mode is also avail able for User song SONG 10 ...

Страница 15: ...ck to the metronome parameter select window press the EXIT button again to exit the metronome window Time signature CLICK VOLUME 102 Parameter Setting Metronome Parameters VOLUME Metronome volume ranged 0 127 the default setting is 100 TIME SIGNATURE 1 12 2 1 12 4 1 12 8 1 12 16 The default setting is 4 4 SOUND Metronome sound ENG represents English CHN represents Chinese MET represents click soun...

Страница 16: ...st impotant function This drum has totally 492 voices can be select and assigned with this function Crash R Edge of Crash Ride Head of Ride Ride R Edge of Ride Open HiHat Hi Hat open Close HiHat Hi Hat close Pedal Hi Hat Control pedal Kick Kick DRUM KIT EDIT This feature makes it possible to change the currently selected drum kit setting In this way you may create your own drum kit and save it as ...

Страница 17: ...will apear on the first row of the display Please refer to Table 1 for details Or simply strike the proper portion of a pad with nor mal strenth to select the part directly You could se lect the Hi Hat control pedal by pressing it down to the bottom 4 Select parameter to edit The current parameter is blinking Rotate the Data knob to select a parameter to edit In this example select VOICE Press the...

Страница 18: ...ed are listed below Snare R2 VOLUME 110 Parameter to edit Part Name Rim2 for Snare DRUM KIT EDIT Table 2 2 Edit another part Press the one of the pad selection button and its indicator will light up The part name will display on the screen The current parameter to edit will keep no change In this way you could edit the same parameter it is Voice in this example for each part Press the same button ...

Страница 19: ...Date knob to select an user kit number ranged 51 UserKit 01 to 80 UserKit 30 Press ENTE to confirm The edited results are saved as desired User kit then exit the edit mode and return to the Kit window The user kit setting is nonvolatile even the power turns off 2 Press the EXIT button to exit the edit mode and return to the Kit window All the edited results will be discarded Save Setups to 56 User...

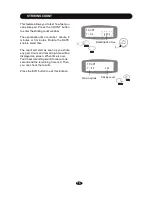
Страница 20: ...tes Rotate the DATE knob to select time The count will start as soon as you strike any pad Count and remaining time will be displayed on screen When time is over You ll hear reminding sound for about one second and the remaining time is 0 Then you can check the results Press the EXIT button to exit this function COUNT Time 2Min Remaining time COUNT 1 50 100 Striking count Examination time 16 ...

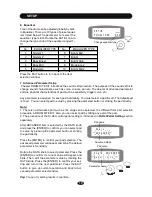
Страница 21: ...d 0 24 2 Percussion Volume for Demo Playing When play demo song the parameter for the volume of percussion section performance is KIT VOLUME Rotate the DATE knob to change the volume ranged 0 24 3 Master Tune This parameter affects sound pitch globally In the MASTER TUNE window Rotate the DATE knob to change the master tuning ranged 50 50 0 refers to standard 440 Hz frequency for A4 note SETUP BAC...

Страница 22: ...t from part selection procedure in DRUM KIT EDIT Also you can select pad by hitting any part of the pad 2 The procedure of the Hi Hat control pedal setting is introduced in Hi Hat Pedal Setting section separately After ADVANCED item is selected by the DATA knob and press the ENTER to confirm you can select pad to setup by pressing the pad select button or striking the pad directly Press the ENTER ...

Страница 23: ...to accommodate your personal taste of performance Strike the pad with strength with which you want to get the maximum volume The value will appear automatically per your striking the Max value is 127 Trigger Curve The trigger curve refers to how trigger signal s dynamic response relates to your pad striking This feature allows you select a proper curve from 6 preset curves to control the relation ...

Страница 24: ...meter select window Source pad of Xtalking Hi Hat Pedal Setting Strike the Hi Hat pad without pressing the Hi Hat control pedal to make open Hi Hat sound voice No 286 304 The Hi Hat pedal has two zones of sound control which is divided by Close Threshold point Strike the Hi Hat pad while pressing the Hi Hat control pedal gradually to make consecutive open to close Hi Hat sound when pedal pressing ...

Страница 25: ...er turns off Then press the pedal to position you desire as closs threshold while the real threshold value will be shown and blinking Press the ENTER button to confirm and turn to the bottom threshold setting the parameter is Pedal THR Then set the Pedal threshold in the same way above Hi Hat Pedal setup PEDAL ADVANCED Pedal THR 30 Press the ENTER button to confirm Press the EXIT button to exit cu...

Страница 26: ...also reset physi cal parameters changed during the Advanced setting Rotate the DATA knob to select mode then press ENTER The dialog screen will appear Press the ENTER button to confirm or press the EXIT button to cancel the reset operation and back to the Advanced parameter select window NOTE Don not strike any pad after press the EN TER button until the KIT indicator lights up It needs couple of ...

Страница 27: ...it 3 TIME SIG The time signature for the metronome Rotate the DATE knob to choose one you desire Please refer to the METRONOME chapter of this manual 4 M SOUND The metronome sound Rotate the DATE knob to choose one you desire Please refer to the METRONOME chapter in this manual 5 METRO Metronome On or Off during the record Rotate the DATE knob to switch On and Off Tip If you don t need to set some...

Страница 28: ...corded User song then press the ENTER to enter the User Song Delete window The User Song name will blink Press the ENTER to erase the song and Free will appear to indicate that this song is erased successfully Or press the EXIT button to cancel the delete op eration and turn to the Kit window Delete User Song UserSong01 The User Song will be erased SONG Free UserSong01 The User Song is erased Pres...

Страница 29: ... in computer or playback MIDI song from computer while play the drum MIDI The MIDI connector allows you to connect the drum directly to another MIDI divice 1 MIDI In This terminal receives MIDI data from an external MIDI device 2 MIDI Out This terminal transmits data from this instrument to other MIDI devices The transmitted data includes the note and touch velocity produced while playing on the d...

Страница 30: ...Reset All Controller All Notes OFF Program Change X Yes System Exclusive Yes Yes RPN X Yes NRPN Yes Yes Chanel 10 supports Bank 0 only If you need detailed information about Exclusive RPN and NRPN please contact your vender Note Transmited note through chanel 10 for each pad if fixed as below PAD NOTE PAD NOTE Tom1 48 Crash Edge 49 Tom1 Rim 62 Ride 51 Tom2 45 Ride Edge 59 Tom2 Rim 63 Hi Hat Open 4...

Страница 31: ...Bolero 37 EFXs U14 UserKit14 11 Mod Reggae 38 Hardcore U15 UserKit15 12 Reggae Rot 39 Punk Rock U16 UserKit16 13 Dub 40 Punch U17 UserKit17 14 Space 41 Rap U18 UserKit18 15 Shuffle 42 Chords U19 UserKit19 16 Studio 43 Percussion U20 UserKit20 17 Up Pop 44 Drum Machi U21 UserKit21 18 70 Disco 45 Brush U22 UserKit22 19 Funky 46 Exotic U23 UserKit23 20 Vintage 47 Beat Box U24 UserKit24 21 Hip Hop 48 ...

Страница 32: ...phop Kick 1 67 Snare 7 Q Snare 3 112 Snare 52 Electronic Snare 5 23 Kick 23 Hiphop Kick 2 68 Snare 8 Rock Snare 1 113 Snare 53 Funk Snare 3 24 Kick 24 Hiphop Kick 3 69 Snare 9 Electronic Snare 1 114 Snare 54 Rock Snare 7 25 Kick 25 Hiphop Kick 4 70 Snare 10 Rock Snare 2 115 Snare 55 Step Snare 26 Kick 26 Hiphop Kick 5 71 Snare 11 Jazz Snare 1 116 Snare 56 Rock Snare 8 27 Kick 27 Noise Kick 72 Snar...

Страница 33: ...r14 Low Tom 157 Tom Hi 21 FXS High Tom 2 202 Tom Mi 32 Ptalk Mid Tom 247 Tom Lo 41 Pr16 Low Tom 158 Tom Hi 22 Power High Tom 203 Tom Mi 33 Nc12 Mid Tom 248 Tom Lo 42 Reb Low Tom 159 Tom Hi 23 Step High Tom 204 Tom Mi 34 Pr12 Mid Tom 249 Hat Cl 1 Rock Close 1 160 Tom Hi 24 Room High Tom 205 Tom Mi 35 Reb Mid Tom 1 250 Hat Cl 2 Jazz Close 1 161 Tom Hi 25 Bk High Tom 206 Tom Mi 36 Reb Mid Tom 2 251 H...

Страница 34: ...Crash 20 Standard Splash 381 China 7 Chinese Sound 7 292 Hat Op 7 Funk Open 1 337 Crash 21 Standard Crash 5 382 China 8 Chinese Sound 8 293 Hat Op 8 FXS Open 1 338 Crash 22 Standard Crash 6 383 China 9 Chinese Sound 9 294 Hat Op 9 Rock Open 2 339 Crash 23 Rock Crash 3 384 China 10 Chinese Sound 10 295 Hat Op 10 Funk Open 2 340 Crash 24 In Crash A 385 China 11 Chinese Sound 11 296 Hat Op 11 Electro...

Страница 35: ... Voice Effect 06 479 Fxs 35 Voice Effect 35 422 Perc 36 Cuica Op 451 Fxs 7 Voice Effect 07 480 Fxs 36 Voice Effect 36 423 Perc 37 Trian Mu 452 Fxs 8 Voice Effect 08 481 Fxs 37 Voice Effect 37 424 Perc 38 Trian Op 453 Fxs 9 Voice Effect 09 482 Fxs 38 Voice Effect 38 425 Perc 39 Shaker 454 Fxs 10 Voice Effect 10 483 Fxs 39 Voice Effect 39 426 Perc 40 Jingle Bell 455 Fxs 11 Voice Effect 11 484 Fxs 40...

Страница 36: ...b effect with professional DSP processor Equalizer 10 preset types Metronome Tempo Time signature Sound Count Exercise 1 3 minutes Setup Menu Accomp Drum volume for Demo Master tuning count sensitivity Local Equalizer Advanced Sensitivity Dynamic range Velocity Curve Cross talk Hi Hat Pedal Reset Pad Edit Voice Volume Pan Pitch Reverb level Record 10 Songs Display Back light LCD 2 Row X 16 Charact...

Страница 37: ...GITAL DRUM Shanghai Huaxin Musical Instrument Co Ltd 35 Lao Shan Yi Cun Shanghai 200120 China Tel 86 21 58820000 Fax 86 21 58783113 Email huaxin huaxin music com www huaxin music com Kit B Rev 1 02D USER S MANUAL ...
Отзывы: