35
Drawing A
HWAM 2610
HWAM 2630
HWAM 2610
HWAM 2630
1.
Recommended for brick wall
10 cm
10 cm
1.
For inflammable back wall
19 cm
19 cm
2.
For inflammable side wall
36 cm
36 cm
1.
To inflammable wall,corner installation
34 cm*
20 cm*
3.
Distance to furnishings in front
80 cm
80 cm
*
All dimensions in connection with corner installation are only recommendations. Contact your chimney
sweep for a clarification.
For wall-mounting, HWAM 2610/2620 must be placed at least 3 cm above any inflammable flooring. This
also applies to any floorboard placed on the floor.
Remember to pay attention to any regulations concerning the required distance between
the wall and smoke pipe.
The distance to a brick wall is set to faciliate the servicing of the Autopilot system. HWAM 2610/2620
may be mounted with wall fittings only on a brick wall. The stove must be taken down when the Autopilot
system is to be serviced.
Requirements for chimney and smoke pipe
The chimney must be of a sufficient height to enable an adequate draft and to prevent smoke problems.
The stove requires a draft of at least 12 Pa.
The chimney must have a minimum opening equivalent to Ø 150 mm. The chimney opening should always
be at least the size of the outlet socket of the stove. The chimney must have an easily accessible soot door.
Smoke pipe and chimney must always be suitable for a stove connection. Ask your HWAM dealer for
more information.
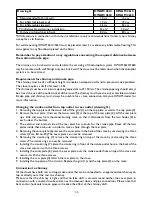
Changing the smoke outlet from top outlet to rear outlet (drawing G)
1. Removing the top plate of the stove: Lift off the grid (1) on the top plate as well as the top plate (2).
2. Remove the rear plate. Unscrew the two screws (3) at the top of the rear plate (4). Lift the rear plate
up a little and away from the wood-burning stove, so that it disconnects from the two hooks (5) in
each side at the bottom.
3. The external and internal side of the rear plate has cut-outs for the smoke pipe. Break off the two
plates inside these cut-outs in order to make a hole through the rear plate.
4. Removing the cover plate (6): remove the cover plate in the back of the stove by unscrewing the three
screws (Torx Bit no. 30). The cover plate can now be removed.
5. Removing the smoke ring (7): remove the smoke ring on top of the stove by unscrewing the three
screws. The smoke ring can now be removed.
6. Installing the smoke ring (7): place the smoke ring in front of the smoke outlet hole in the back of the
stove and secure it with the three screws.
7. Installing the cover plate (6): place the cover plate over the smoke outlet hole on top of the stove and
secure it with the three screws.
8. Installing the rear plate (4). Attach the rear plate to the stove.
9. Installing the top plate of the stove: 4. Replace the grid (1) and the top plate (2) on the stove.
Connection to chimney
All the stoves have both rear and top smoke outlet that can be connected to an approved steel chimney on
top or directly out at the rear to a chimney.
Make sure that the chimney is tight and that no false draft is caused around neither the cover plate, in
connection with a covered smoke outlet, nor the cleanout door and pipe connections. Please note that
bent and/or horizontal smoke pipes will reduce the effect of the chimney draft.
Содержание 2610
Страница 2: ...2 ...
Страница 4: ...4 B C A 3 1 1 4 45 4 3 2 1 11 12 14 14 15 9 11 10 17 14 12 13 1 4 6 5 15 7 8 16 ...
Страница 5: ...5 E F D 1 1 2 3 ...
Страница 6: ...6 G ...
Страница 7: ...7 H ...
Страница 42: ...42 ...
Страница 43: ...43 ...
Страница 44: ...44 ...
Страница 45: ...45 ...
Страница 46: ......
Страница 47: ......


