background image


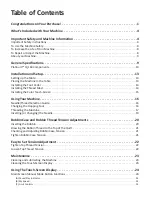
(D) Presets . . . . . . . . . . . . . . . . . . . . . . . . . . . . . . . . . . . . . . . . . . . . . . . . . . . . . . . . . . . . . . . . . . . . . . . . . . . . . . . . . . . . . . . . . . . . 25

(E) Basting Mode In Manual Operation

 . . . . . . . . . . . . . . . . . . . . . . . . . . . . . . . . . . . . . . . . . . . . . . . . . . . . . . . . . . . . . . . . . . . . 25

(F) Easy to Set Tension

 . . . . . . . . . . . . . . . . . . . . . . . . . . . . . . . . . . . . . . . . . . . . . . . . . . . . . . . . . . . . . . . . . . . . . . . . . . . . . . . . . . 25

(G) Bobbin Thread Indicator

 . . . . . . . . . . . . . . . . . . . . . . . . . . . . . . . . . . . . . . . . . . . . . . . . . . . . . . . . . . . . . . . . . . . . . . . . . . . . .

26

(H) Needle Stop

 . . . . . . . . . . . . . . . . . . . . . . . . . . . . . . . . . . . . . . . . . . . . . . . . . . . . . . . . . . . . . . . . . . . . . . . . . . . . . . . . . . . . . . .

26

(I)  Up/Down/TieOff

 . . . . . . . . . . . . . . . . . . . . . . . . . . . . . . . . . . . . . . . . . . . . . . . . . . . . . . . . . . . . . . . . . . . . . . . . . . . . . . . . . . . . 27

Main Screen Regulated Mode Button Functions

 . . . . . . . . . . . . . . . . . . . . . . . . . . . . . . . . . . . . . . . . . . . . . . . 27

Stitches Per Inch (SPI)

 . . . . . . . . . . . . . . . . . . . . . . . . . . . . . . . . . . . . . . . . . . . . . . . . . . . . . . . . . . . . . . . . . . . . . . . . . . . . . . . . . . . 27

Basting Stitches 

 . . . . . . . . . . . . . . . . . . . . . . . . . . . . . . . . . . . . . . . . . . . . . . . . . . . . . . . . . . . . . . . . . . . . . . . . . . . . . . . . . . . . . . . 27

Precision . . . . . . . . . . . . . . . . . . . . . . . . . . . . . . . . . . . . . . . . . . . . . . . . . . . . . . . . . . . . . . . . . . . . . . . . . . . . . . . . . . . . . . . . . . . . . 28

Cruise . . . . . . . . . . . . . . . . . . . . . . . . . . . . . . . . . . . . . . . . . . . . . . . . . . . . . . . . . . . . . . . . . . . . . . . . . . . . . . . . . . . . . . . . . . . . . . . . 28

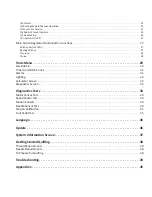
Tools Menu  � � � � � � � � � � � � � � � � � � � � � � � � � � � � � � � � � � � � � � � � � � � � � � � � � � � � � � � � � � � � � �29

Low Bobbin

 . . . . . . . . . . . . . . . . . . . . . . . . . . . . . . . . . . . . . . . . . . . . . . . . . . . . . . . . . . . . . . . . . . . . . . . . . . . . . 30

Timer And Stitch Count

 . . . . . . . . . . . . . . . . . . . . . . . . . . . . . . . . . . . . . . . . . . . . . . . . . . . . . . . . . . . . . . . . . . .

31

Alarms . . . . . . . . . . . . . . . . . . . . . . . . . . . . . . . . . . . . . . . . . . . . . . . . . . . . . . . . . . . . . . . . . . . . . . . . . . . . . . . . .

31

Lighting

 . . . . . . . . . . . . . . . . . . . . . . . . . . . . . . . . . . . . . . . . . . . . . . . . . . . . . . . . . . . . . . . . . . . . . . . . . . . . . . . . 32

Calculator Screen . . . . . . . . . . . . . . . . . . . . . . . . . . . . . . . . . . . . . . . . . . . . . . . . . . . . . . . . . . . . . . . . . . . . . . . . 32

Diagnostics Screen

 . . . . . . . . . . . . . . . . . . . . . . . . . . . . . . . . . . . . . . . . . . . . . . . . . . . . . . . . . . . . . . . . . . . . . . . 32

Diagnostics Tests

 � � � � � � � � � � � � � � � � � � � � � � � � � � � � � � � � � � � � � � � � � � � � � � � � � � � � � � � � � �33

Motor Sensor Test 

 . . . . . . . . . . . . . . . . . . . . . . . . . . . . . . . . . . . . . . . . . . . . . . . . . . . . . . . . . . . . . . . . . . . . . . . 33

Speed Sensor Test

 . . . . . . . . . . . . . . . . . . . . . . . . . . . . . . . . . . . . . . . . . . . . . . . . . . . . . . . . . . . . . . . . . . . . . . . . 33

Motion Sensors

 . . . . . . . . . . . . . . . . . . . . . . . . . . . . . . . . . . . . . . . . . . . . . . . . . . . . . . . . . . . . . . . . . . . . . . . . . . 34

Needle Sensor Test   . . . . . . . . . . . . . . . . . . . . . . . . . . . . . . . . . . . . . . . . . . . . . . . . . . . . . . . . . . . . . . . . . . . . . . 34

Tension Calibration

 . . . . . . . . . . . . . . . . . . . . . . . . . . . . . . . . . . . . . . . . . . . . . . . . . . . . . . . . . . . . . . . . . . . . . . . 35

Foot Pedal Test 

 . . . . . . . . . . . . . . . . . . . . . . . . . . . . . . . . . . . . . . . . . . . . . . . . . . . . . . . . . . . . . . . . . . . . . . . . . . 35

Language  � � � � � � � � � � � � � � � � � � � � � � � � � � � � � � � � � � � � � � � � � � � � � � � � � � � � � � � � � � � � � � � �36

Update � � � � � � � � � � � � � � � � � � � � � � � � � � � � � � � � � � � � � � � � � � � � � � � � � � � � � � � � � � � � � � � � � �36

System Information Screen

 � � � � � � � � � � � � � � � � � � � � � � � � � � � � � � � � � � � � � � � � � � � � � � � � � �37

Getting Started Quilting

 � � � � � � � � � � � � � � � � � � � � � � � � � � � � � � � � � � � � � � � � � � � � � � � � � � � �38

Thread Requirements 

 . . . . . . . . . . . . . . . . . . . . . . . . . . . . . . . . . . . . . . . . . . . . . . . . . . . . . . . . . . . . . . . . . . . . 38

Needle Requirements 

 . . . . . . . . . . . . . . . . . . . . . . . . . . . . . . . . . . . . . . . . . . . . . . . . . . . . . . . . . . . . . . . . . . . . 38

To Prepare for Quilting 

 . . . . . . . . . . . . . . . . . . . . . . . . . . . . . . . . . . . . . . . . . . . . . . . . . . . . . . . . . . . . . . . . . . . 38

Troubleshooting

 � � � � � � � � � � � � � � � � � � � � � � � � � � � � � � � � � � � � � � � � � � � � � � � � � � � � � � � � � � �39

Appendix 1 � � � � � � � � � � � � � � � � � � � � � � � � � � � � � � � � � � � � � � � � � � � � � � � � � � � � � � � � � � � � � � �45

Содержание Viking Platinum Q 160

Страница 1: ...User s Guide KEEPING THE WORLD SEWING 60 Stationary Machine ...

Страница 2: ......

Страница 3: ... notice If you find any problems in the manual please report them to us in writing This document is not warranted to be error free Singer Sourcing Limited LLC assumes no responsibility or liability for any errors or inaccuracies that may appear in the informational content contained in this manual Platinum Q 160 User s Guide ...

Страница 4: ......

Страница 5: ...n more about the art of quilting Plus you will find tips tricks and inspiration on a variety of quilting topics including the basics of setting up your machine and loading a quilt We invite you to share your projects with us by tagging us in your Facebook and Instagram posts we may even feature your post Your new quilting friends are already there and they can t wait to see your creations Remember...

Страница 6: ...he Color Touch Screen 15 Using Your Machine 16 Needle Thread Selection Guide 16 Changing the Hopping Foot 16 Threading the Machine 17 Inserting or Changing the Needle 19 Bobbin Case and Bobbin Thread Tension Adjustments 20 Inserting the Bobbin 20 Drawing the Bobbin Thread to the Top of the Quilt 21 Checking and Adjusting Bobbin Case Tension 21 Tighten Bobbin Case Tension 21 Easy to Set Tension Adj...

Страница 7: ...se 28 Tools Menu 29 Low Bobbin 30 Timer And Stitch Count 31 Alarms 31 Lighting 32 Calculator Screen 32 Diagnostics Screen 32 Diagnostics Tests 33 Motor Sensor Test 33 Speed Sensor Test 33 Motion Sensors 34 Needle Sensor Test 34 Tension Calibration 35 Foot Pedal Test 35 Language 36 Update 36 System Information Screen 37 Getting Started Quilting 38 Thread Requirements 38 Needle Requirements 38 To Pr...

Страница 8: ... Declaration of Conformity in the Appendix  IMPORTANT Do not operate your Platinum Q 160 quilting machine until you have completely read the information contained in this manual Please keep all packaging and order information for warranty purposes IMPORTANT SAFETY INSTRUCTIONS Read all instructions before using this machine When using this machine basic safety precautions should always be followe...

Страница 9: ...king correctly If a mechanical or electrical problem is encountered return the Platinum Q 160 to the nearest authorized service center or the manufacturer for examination repair electrical or mechanical adjustment It is not recommended that the Platinum Q 160 quilting machine be used with any machine quilting frame other than those recommended by Husqvarna Viking Use this quilting machine only for...

Страница 10: ...e cordon est endommagé ou ne fonctionne pas correctement En cas de problème mécanique ou électrique renvoyez la Platinum Q 160 au centre de service agréé le plus proche ou au fabricant pour inspection réparation ou réglage électrique ou mécanique Il est déconseillé d utiliser la machine à quilter Platinum Q 160 avec un autre cadre de machine à quilter que ceux recommandés par Husqvarna Viking Util...

Страница 11: ...use on a nominal 120 V or nominal 220 V circuit and has a grounding plug that looks like the plug illustrated in sketch A above A temporary adapter which looks like the adapter illustrated in sketches B and C may be used to connect this plug to a 2 pole receptacle as shown in sketch B if a properly grounded outlet is not available The temporary adapter should be used only until a properly grounded...

Страница 12: ...ore the machine near a heater an iron a halogen lamp or other hot things 2 Use only neutral soaps or detergents to clean the machine Benzene solvents and scouring powders can damage the case and the machine and therefore should never be used 3 Do not drop or bump the machine 4 Always consult the manual to replace or fix the hopping foot needle or any other part of the machine If necessary contact ...

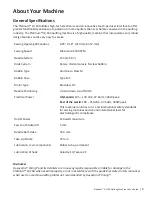
Страница 13: ...ass M Bobbin Case Type MF Motor Type Brushless DC Needle Positioning Up and down tie off stitch Electrical Power US Canada 105 120 VAC 47 63Hz 300W peak Rest of the world 100 250 VAC 47 63Hz 300W peak This machine conforms to UL and international safety standards for sewing machines and US and international laws for electromagnetic compliance Outlet Power 120 watts maximum Sew Foot Stroke Lift 5 m...

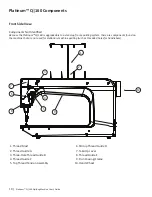
Страница 14: ...p frame quilting system there are components found on the machine that are not used for stationary machine quilting such as threaded holes for handlebars 4 8 6 3 7 2 10 1 5 1 Thread Mast 6 Stirrup Thread Guide D 2 Thread Guide A 7 Take Up Lever 3 Three Hole Thread Guide B 8 Thread Guide E 4 Thread Guide C 9 Front Casing Frame 5 Top Thread Tension Assembly 10 Hand Wheel 9 ...

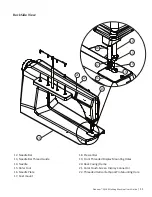
Страница 15: ...6 15 14 22 13 21 20 12 Needle Bar 18 Presser Bar 13 Needle Bar Thread Guide 19 Front Threaded Display Mounting Holes 14 Needle 20 Back Casing Frame 15 Ruler Foot 21 Color Touch Screen Display Connector 16 Needle Plate 22 Threaded Horizontal Spool Pin Mounting Hole 17 Feet mount ...

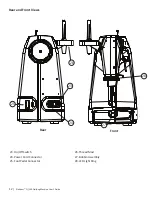
Страница 16: ...tinum Q 160 Quilting Machine User s Guide Rear and Front Views Rear Front 23 24 26 27 28 25 23 On Off Switch 26 Thread Mast 24 Power Cord Connector 27 Bobbin Assembly 25 Foot Pedal Connector 28 LED Light Ring ...

Страница 17: ...ongarm Table for table assembly Placing the Machine in the Table 1 We recommend having someone help lift and place the machine 2 Lift the machine by putting one arm through the throat space 3 Remove the insert if in place and set the machine into the machine tray Center the machine left to right in the opening 4 Slide the insert into place and move the machine until it is aligned with the insert 5...

Страница 18: ...ce the foot pedal under the table where operator can reach it from the front of the machine Installing the Thread Mast 1 Locate the two threaded holes on the left side of the machine near the top and towards the middle 2 Remove the 2 screws with the 3mm hex wrench Line up the holes of the thread stand with the holes on the machine and reinsert the screws 3 Turn the thread stand until the eyelets a...

Страница 19: ... the bag in which they are packed 2 There are two holes on front of the machine head 3 Align the holes in the color touch screen bracket with the two holes on the front of the machine 4 Use a 3mm hex wrench to insert the two bolts through the holes of the bracket and into the machine Tighten in place 5 Plug the remaining cable end into the display connector located on the side of the machine 6 Rem...

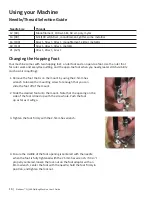
Страница 20: ... you need greater stitch visibility such as micro quilting 1 Remove the foot that is on the mount by using the 2 5mm hex wrench to loosen the mounting screw far enough that you can slide the foot off of the mount 2 Slide the desired foot onto the mount Note that the opening on the side of the foot is lined up with the screw hole Push the foot up as far as it will go 3 Tighten the foot firmly with ...

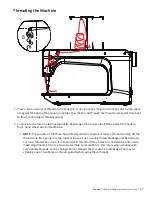
Страница 21: ...ps of thread coming off the thread cone from going into the top tension as a knot causing thread breakage and bad tension For most threads on a cone it is important to thread all three holes for consistent results and to make adjustments at the top tension assembly An exception to this rule is when working with very delicate threads such as holographic or threads that are prone to breakage You may...

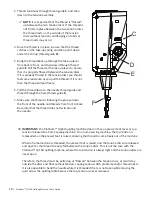
Страница 22: ...nd thread through the hole thread guide F 7 Make sure the thread is following the groove down the front of the needle and threads from front to back Be careful that the thread does not twist around the needle C D E F Â IMPORTANT The Platinum Q 160 quilting machine does not have a presser foot lever or top tension release like a home sewing machine On a home sewing machine the top tension is releas...

Страница 23: ...the screw This may result in damaged or stripped threads in the needle clamp Damage to the needle clamp may also make it difficult to fully insert the needle which will change the machine timing causing more issues Stripped threads and damage caused by improper needle installation or tightening are not covered under warranty NOTE It is recommended to use a new needle for each new quilt Also replac...

Страница 24: ...read hanging loose TENSION SPRING 3 To insert the bobbin case into the machine grasp the bobbin case with thumb and first finger Do not lift the lever on bobbin case Fit the bobbin case onto the hook spindle in the machine Rotate the case until the open throat keys into the alignment notch in the middle of the hook Push the case in until it stops in place Push the case inward further until it clic...

Страница 25: ...ric 3 4 inches away while holding the needle thread 4 Bobbin thread will pull up and through to the top allowing you to grasp the loop and pull it to the desired length Checking and Adjusting Bobbin Case Tension The bobbin case tension is the foundation tension for the entire machine To test that bobbin tension is correct hold the bobbin case in the palm of your hand with the open end facing up Wr...

Страница 26: ...adjustment which requires minute adjustments the top tension knob may require turns anywhere from 1 4 of a turn to two to four turns to achieve balanced tension Tighten Top Thread Tension To adjust the top tension tighter turn the top thread tension knob clockwise Loosen Top Thread Tension To loosen the tension turn the top thread tension knob counter clockwise NOTE Before adjusting the top tensio...

Страница 27: ...rtion of the hook that the bobbin case snaps into The bobbin basket remains stationary while the hook rotates around the basket The oil lubricates the region where these two components interlock A drop of oil in the region indicated will work its way back into the interlocking area of the hook and bobbin basket The frequency of lubrication depends upon the usage of the machine Lubricating is recom...

Страница 28: ...will change back to the play icon with a white background color When the machine foot controller is pressed the button color and icon show that the machine is running by changing the button to the pause icon and blue background When the foot controller is released this button will return to the blue button with the play icon A B C B My Speed My Speed Indicator is the current selected maximum speed...

Страница 29: ...le up at the specified interval Coordinate how quickly you move the quilt sandwich with how quickly the machine takes a basting stitch Experiment with the various speed options along with moving the quilt to find which of the settings work best for you to position the basting stitches on your quilt D E F Easy to Set Tension The tension box on the Main Screen shows the current tension setting as a ...

Страница 30: ...unds an alert indicating it is time to put in a new bobbin When recording a bobbin length REC will appear in this box When recording is turned off the bobbin remaining value will again appear in this space G H Needle Stop Needle Stop setting indicates whether the needle stops in the up or down position Blue indicates the selected button The Needle Stop buttons indicate the position the needle will...

Страница 31: ...lated Mode A when the R is blue I B Stitches Per Inch SPI Pressing the or buttons in the mid left portion of the screen will increase or decrease the stitches per inch SPI setting The setting is reflected in the white indicator box between the and buttons The value can be adjusted between 4 and 22 stitches per inch Basting Stitches There are four basting stitch settings controlled by the stitches ...

Страница 32: ... the minimum speed the machine will stitch regardless of how slowly the fabric is moving across the table The Cruise speed can be adjusted using the and buttons that appear below the Cruise button when Cruise mode is selected Cruise speed can be adjusted between 50 and 1 100 stitches per minute The Play Pause indicator will change as soon as you press it or the foot pedal In Precision mode the nee...

Страница 33: ...ht bar and setting their brightness levels E Calculator An on screen calculator may be accessed from the Tools screen F Diagnostics The Diagnostics button activates the screen where machine diagnostic functions can be performed Diagnostic functions are generally only used when working with an authorized Husqvarna Viking retailer to resolve issues G Set Language The Platinum Q 160 screens can appea...

Страница 34: ...UTTON ICONS A Record Stop B Bobbin Thread Capacity C New Bobbin D Save Preset E Set Alarm F Preset Value Put a new bobbin with the same thread into the machine and press the New Bobbin button C Then press the Alarm button E As you quilt the remaining bobbin thread value will estimate how much thread remains on the current bobbin and when you reach the capacity value an alarm will sound warning tha...

Страница 35: ...r to count the number of stitches in a quilt Press the Reset button to zero out the counter when starting a new quilt To see the lifetime stitch counter for the machine see the Information screen Alarms The Platinum Q 160 has alarms that can be turned on or off The overspeed alarm is enabled by pressing the alarm button next to the speed icon It only functions in regulated mode When enabled an ala...

Страница 36: ...ddition subtraction multiplication division square root and percentage Use the back space on the top right to delete a digit mistakenly entered Diagnostics Screen Six different diagnostics tests can be performed on the machine These functions test the motor control operation the foot pedal and the internal position sensors A Motor Sensor Test B Speed Sensor Test C Motion Sensor Test Stitch Regulat...

Страница 37: ... HOME button to return to the Main menu screen or the Tools button to return to the Diagnostics menu screen Speed Sensor Test The Speed Sensor test can helps determine if there is a problem with the Platinum Q 160 speed sensor Before performing this test remove the bobbin case and the top thread Press the foot pedal so that the machine will begin slowly running The white box will show a number tha...

Страница 38: ...ill indicate whether the needle position sensor is functioning properly Rotating the hand wheel should result in a beep for a third of a stitch cycle followed by no beep for the other two thirds If you hear a constant beep or no beep at all for a full 360 rotation of the hand wheel this indicates a failed test and the machine should be inspected by a qualified Husqvarna Viking repair technician ...

Страница 39: ...ng against the tension discs while not compressing the spring 3 While holding the spring in place press Reset 4 When calibration is complete replace the tension knob Foot Pedal Test The Pedal test will help determine if there is a problem with the Platinum Q 160 foot pedal Slowly depress the foot pedal a percent of depression will appear in the white box The foot pedal should be controllable from ...

Страница 40: ...he right side of the display as shown 2 Wait for the color of the selection buttons to change from blue to white 3 Select the machine display or sensor icon for update as needed 4 When the display update button is selected the screen will go blank and you will hear three beeps until the update has completed and the screen comes back on 5 Power down the machine between doing the display and the mac...

Страница 41: ...troller icon in the middle of the screen indicates whether the foot controller is attached A red X will appear if it is not connected properly C The left and right sensor icons indicate whether the sensors are functioning A red X will appear if sensors are not functioning properly D Information contained in the white boxes at the bottom of the screen identifies the electronics board revision numbe...

Страница 42: ...ome comfortable using the Platinum Q 160 quilters can begin with a few simple techniques using a sample quilt sandwich two pieces of fabric with a layer of batting between them Set the machine at a medium My Speed setting 700 SPI and begin moving the fabric until you become ac customed to the resistance By moving the fabric faster the stitches begin to elongate The My Speed setting can either be i...

Страница 43: ... or burred resulting in fabric damage as well as skipped stitches thread breakage or shredding Always change the needle if it has been hit bumped or pulled off center while maneuvering the machine over the quilt A slightly bent needle can be a major cause of skipped stitches Incorrect needle size Use the proper size needle for the work and thread being used Some battings and fabrics used in quilti...

Страница 44: ...p to the top of the sight hole above the needle bar clamp screw If the needle isn t installed properly it can cause damage in the bobbin area and throat plate The needle hits the throat plate Correctly position the needle throat plate or hopping foot Replace with a new needle Stitches are Puckered Corrective Measure s The tension is not balanced Balance the tension of the needle thread after ensur...

Страница 45: ...ee Once the hand wheel can be turned freely remove the thread from the hook and basket Now re oil the hook and make sure the hand wheel turns freely without the hook hitting the needle It is possible for a thread lock to cause a timing problem Thread Nests Under Quilt Corrective Measure s Not enough tension on top thread Check that the machine is threaded correctly Make certain that the thread is ...

Страница 46: ...hreaded correctly Inspect for accidental double wrapping of thread on thread guides Inspect the thread mast making sure the eyelets of the mast are directly over the spools Inspect the vertical positioning of the thread cones Tipped cones can dramatically affect thread tension and can cause breakage Debris in tension discs Inspect for particles and remove any fuzz or debris Bobbin rotation is not ...

Страница 47: ... type of needle Use only the needles recommended by Husqvarna Viking 134 sizes 12 through 21 Other possible problems Needle too close to hook causing friction and possible collision of hook point and needle causing broken thread Needle plate damage Hook damage Broken needles or damaged needle bar clamp Nothing visible on the display Corrective Measure s Display cables unplugged Locate the black ca...

Страница 48: ... 44 Platinum Q 160 Quilting Machine User s Guide ...

Страница 49: ...terference to radio communications However there is no guarantee that interference will not occur in a particular installation If this equipment does cause harmful interference to radio or television reception which can be determined by turning the equipment off and on the user is encouraged to try to correct the interference by one or more of the following measures Reorient or relocate the receiv...

Страница 50: ......

Страница 51: ......

Страница 52: ...www husqvarnaviking com 4710610 26A 2020 KSIN Luxembourg II S a r l All rights reserved ...


Отзывы: