background image

Assembly

Introduction

WARNING: Read and understand the safety

chapter before you assemble the product.

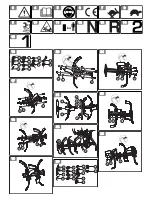
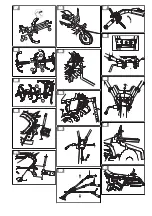
To assemble the tine blades (TF230)

• Refer to the illustration for an overview of the bolts,

screws, nuts and washers that is necessary to

assemble the tine blades. (Fig. 16)

• Obey the instructions in the illustrations below.

Note: The illustrations only show the assembly of the

tine blades on the right side. The same instructions

are applicable on the left side. Make sure that the

sharp edges point in the same direction on the right

and left tine blades.

(Fig.

17)

(Fig.

18)

(Fig.

19)

(Fig.

20)

(Fig.

21)

(Fig.

22)

To assemble the tine blades (TF338)

• Refer to the illustration for an overview of the bolts,

screws, nuts and washers that is necessary to

assemble the tine blades. (Fig. 23)

• Obey the instructions in the illustrations below.

Note: The illustrations only show the assembly of the

tine blades on the right side. The same instructions

are applicable on the left side. Make sure that the

sharp edges point in the same direction on the right

and left tine blades.

(Fig.

24)

(Fig.

25)

(Fig.

26)

(Fig.

27)

(Fig.

28)

(Fig.

29)

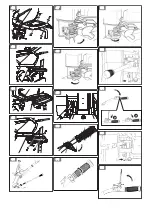
To assemble the product

1. Install the connection joint.

a) For TF230: (Fig. 30)
b) For TF338: (Fig. 31)

2. For TF230, install the support wheel. (Fig. 32)
3. Install the drag bar.

a) For TF230: (Fig. 33)
b) For TF338: (Fig. 34)

4. Install the handlebar. (Fig. 35)
5. Adjust the height of the handle and tighten the

knobs. (Fig. 36)

6. Turn the clutch control to the correct side. Attach the

bolt. (Fig. 37)

7. Install the cable cover.

a) Install the cables correctly.
b) Install the rubber holder. (Fig. 38)
c) Install the cable cover and tighten the screw.

(Fig. 39)

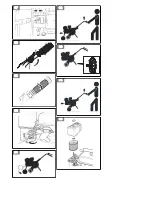
8. Install the tine cover (TF230).

CAUTION: Install the 4 bolts and nuts

before your tighten them fully.

a) (Fig. 40)
b) (Fig. 41)
c) (Fig. 42)

9. Install the tine cover (TF338):

a) (Fig. 43)
b) (Fig. 44)
c) (Fig. 45)

10. Install the gear lever. (Fig. 46)
11. After assembly, tighten all bolts and nuts again.

CAUTION: Do not disassemble the product.

Speak to an approved servicing dealer for

that task.

Operation

Introduction

WARNING: Read and understand the safety

chapter before you use the product.

To do before you operate the product

• Do an inspection of the work area. Remove all loose

objects that can eject from the product and cause

serious injury to the operator or others. Such items

include stones, glass or steel wire.

• Do a check of the engine oil level and fill engine oil if

it is necessary.

• Do a check of the oil level of the gearbox and fill oil if

it is necessary.

• Do a check of the fuel level and fill fuel if it is

necessary.

• Do an overhaul of the product.

a) Replace worn or damaged parts.
b) Do a check for fuel leaks.
c) Make sure that all guards and covers are

installed correctly.

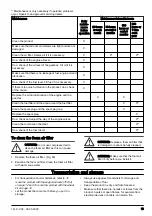
d) Do a check of all nuts and screws.

1419 - 002 - 02.03.2020

11

Содержание TF230

Страница 1: ...G Ръководство за експлоатация 15 22 EL Οδηγίες χρήσης 23 30 ES Manual de usuario 31 38 FR Manuel d utilisation 39 46 IT Manuale dell operatore 47 54 PT Manual do utilizador 55 62 RO Instrucţiuni de utilizare 63 70 TR Kullanım kılavuzu 71 78 ...

Страница 2: ...1 X5 2 X4 3 X4 4 X4 5 X 6 X4 7 X4 8 X4 9 10 X2 X26 X24 2 8 X2 6 X26 9 12 13 10 7 14 22 16 8 6 4 2 22 19 21 20 3 1 5 9 8 6 15 11 17 2 18 14 3 1 ...

Страница 3: ...1 X5 2 X4 3 X4 4 X4 5 X 6 X4 7 X4 8 X4 9 10 X2 X2 8 X2 6 X2 9 11 X24 X24 X24 12 13 12 13 10 7 16 18 6 8 6 4 2 5 21 3 1 5 9 15 8 3 11 17 2 19 20 14 2 ...

Страница 4: ...3 4 5 6 7 8 9 10 11 12 13 14 15 A C D E F G H J I B K L M 16 B F M 17 B F M 18 19 B F M 20 F J M G H L 21 H G 22 A C D E F G H J I B K L M N O 23 O N K 24 O N K 25 O N K 26 ...

Страница 5: ...O N K 27 M I L J 28 D C 29 30 31 32 33 34 35 36 37 38 39 40 41 ...

Страница 6: ...42 43 44 45 46 47 48 49 50 51 52 53 A B 54 55 56 ...

Страница 7: ...57 58 59 60 61 62 63 64 65 ...

Страница 8: ... Gear lever 9 Bumper 10 Clutch control 11 Throttle control 12 ON OFF switch 13 Top cover 14 Tine blade holder secondary 15 Tine blade holder primary 16 Connector joint 17 Tine cover bracket 18 Wheel kit 19 Hardware bag 20 Hardware bag for tine blades only 21 Tool bag Symbols on the product Fig 3 WARNING Be careful and use the product correctly This product can cause serious injury or death to the ...

Страница 9: ...ns If you have problems or questions about the product please speak to your Husqvarna dealer for more information The operator is responsible for any unsafe situations or risks that people and property are exposed to This product produces an electromagnetic field during operation This field may under some circumstances interfere with active or passive medical implants To reduce the risk of serious...

Страница 10: ... from turning difficulties to engage or disengage the clutch a collision with a foreign object or deterioration of the engine stop cable If the engine halt cable is severed use the starter control to stop the engine Allow the machine to cool down Disconnect the spark plug cap from the spark plug Check that the product is not damaged If the product is damaged speak to an approved service workshop f...

Страница 11: ...F230 Fig 33 b For TF338 Fig 34 4 Install the handlebar Fig 35 5 Adjust the height of the handle and tighten the knobs Fig 36 6 Turn the clutch control to the correct side Attach the bolt Fig 37 7 Install the cable cover a Install the cables correctly b Install the rubber holder Fig 38 c Install the cable cover and tighten the screw Fig 39 8 Install the tine cover TF230 CAUTION Install the 4 bolts ...

Страница 12: ... A in the direction of the handle to make the tine blades rotate Fig 54 4 Release the clutch lever B to make the tine blades stop To operate the product rearward WARNING Before you move the product rearward you must release the clutch lever to prevent injury 1 Make sure that no obstacles are behind the product 2 Release the clutch lever 3 Decrease the engine speed 4 Put the gear lever in the rever...

Страница 13: ...k plug and the spark plug cap X Replace the spark plug X Do a check and adjust the play of the engine valves X Clean the combustion chamber X Do a check of the fuel circuit X To clean the foam air filter CAUTION Do not use compressed air to clean the foam air filter as this can cause damage 1 Remove the foam air filter Fig 65 2 Examine the foam air filter Clean the foam air filter with warm soap w...

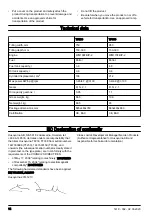
Страница 14: ...6 Net weight kg 66 5 93 Package dimensions mm 845x480x780 860x490x860 Certification CE EAC CE EAC EC Declaration of conformity Husqvarna AB SE 561 82 Huskvarna Sweden tel 46 36 146500 declares under sole responsibility that the tillers Husqvarna TF230 TF338 from serial numbers 1447000096 TF230 1447000139 TF338 and onwards the subsequent serial number is clearly stated in plain text on the type pla...

Страница 15: ...прът 7 Ръкохватка 8 Лост за предавки 9 Броня 10 Съединител 11 Регулатор на дроселната клапа 12 Прекъсвач 13 Горен капак 14 Държач за остриета второстепенен 15 Държач за остриета основен 16 Свързващ шарнир 17 Скоба на капака на остриетата 18 Комплект колела 19 Торба с крепежни елементи 20 Торба с крепежни елементи само за остриета 21 Чанта с инструменти Символи върху машината Фиг 3 ПРЕДУПРЕЖДЕНИЕ В...

Страница 16: ...ко има опасност от повреждане на машината други материали или съседната зона ако не се спазват инструкциите в ръководството Забележка Използва се за предоставяне на повече информация която е необходима в дадена ситуация Общи инструкции за безопасност ПРЕДУПРЕЖДЕНИЕ Прочетете и разберете следващите предупредителни указания преди да използвате продукта Прочетете всички инструкции в тази инструкция з...

Страница 17: ...те антифони за да намалите опасността от увреждане на слуха Никога не използвайте продукта за да транспортирате хора Съответствие с и стриктно придържане към условията на работа обслужване и ремонт както са определени от производителя също представляват съществен елемент от употребата по предназначение Спрете двигателя когато продуктът не се използва Не тичайте а ходете заедно с продукта Внимавайт...

Страница 18: ...безопасност не изменяйте характеристиките на Вашия продукт Не променяйте настройките на оборотите на двигателя и не го използвайте при по големи обороти Винаги използвайте оригинални резервни части Когато срокът на експлоатация на този продукт изтече и той вече не се използва той следва да бъде предаден на дистрибутора или на подходяща станция за рециклиране Внимавайте да не отрежете кабелите пров...

Страница 19: ...а скоростната кутия и допълнете масло ако е необходимо Извършете проверка на нивото на горивото и допълнете гориво ако е необходимо Извършете основен преглед на продукта a Заменяйте износените или повредени части b Проверявайте за течове на гориво c Уверете се че всички предпазители и капаци са монтирани правилно d Извършете проверка на всички гайки и винтове e Уверете се че електрическите проводн...

Страница 20: ...иетата Спиране на продукта 1 Освободете лоста на съединителя Фиг 56 2 Поставете лоста за предавки в позиция N Фиг 57 3 Поставете регулатора на дроселната клапа в положение MIN минимално Фиг 58 4 Поставете прекъсвача в положение OFF Изкл Фиг 59 5 Затворете крана за гориво Фиг 60 За да преместите продукта с опорните колела TF230 1 Спрете двигателя Направете справка с Спиране на продукта на страница ...

Страница 21: ...ивния филтър и зоната около него X X Почистете запалителната свещ и лулата на запали телната свещ X Подменете запалителната свещ X Извършете преглед и регулиране на хода на клапа ните на двигателя X Почистете камерата на горенето X Извършете проверка на горивната верига X За да почистите порестия въздушен филтър ВНИМАНИЕ Не използвайте въздух под налягане за почистване на порестия въздушен филтър ...

Страница 22: ...местимост на резервоара за масло l 0 6 0 6 Обем на цилиндъра cm3 196 212 Макс мощност KW к с при об мин 3 45 4 7 при 3100 3 6 4 9 при 3100 Предавки R N 2 1 R N 2 1 Вместимост на маслото за скоростна кутия l 0 95 1 1 Брутно тегло kg 86 5 106 Нетно тегло kg 66 5 93 Размер на опаковка mm 845 x 480 x 780 860 x 490 x 860 Сертификация CE EAC CE EAC Декларация за съответствие на ЕО Husqvarna AB SE 561 82...

Страница 23: ...ρα έλξης 7 Λαβή 8 Μοχλός ταχυτήτων 9 Προφυλακτήρας 10 Χειριστήριο συμπλέκτη 11 Χειριστήριο γκαζιού 12 Διακόπτης ON OFF 13 Πάνω κάλυμμα 14 Βάση οδοντωτής λεπίδας δευτερεύουσα 15 Βάση οδοντωτής λεπίδας κύρια 16 Σύνδεσμος 17 Μπράτσο καλύμματος οδοντωτής λεπίδας 18 Κιτ τροχών 19 Σάκος εξαρτημάτων 20 Σάκος εξαρτημάτων μόνο για τις οδοντωτές λεπίδες 21 Σάκος εργαλείων Σύμβολα στο προϊόν Εικ 3 ΠΡΟΕΙΔΟΠΟΙ...

Страница 24: ...υπάρχουν στο παρόν εγχειρίδιο χρήσης και πάνω στο προϊόν προτού το θέσετε σε λειτουργία Βεβαιωθείτε ότι έχετε κατανοήσει και τηρείτε τις οδηγίες Αν αντιμετωπίζετε κάποιο πρόβλημα ή έχετε απορίες σχετικά με το προϊόν απευθυνθείτε στον Husqvarna αντιπρόσωπο της περιοχής σας για περισσότερες πληροφορίες Ο χειριστής είναι υπεύθυνος για μη ασφαλείς καταστάσεις ή κινδύνους στους οποίους εκτίθενται τα άτ...

Страница 25: ...και τα πόδια σας μακριά από τις περιστρεφόμενες λεπίδες Ο κινητήρας και το σύστημα εξάτμισης θερμαίνονται πολύ κατά τη διάρκεια της λειτουργίας Υπάρχει κίνδυνος εγκαυμάτων σε περίπτωση που τα αγγίξετε Πρέπει να χρησιμοποιείτε το προϊόν μόνο με το φως της ημέρας ή σε συνθήκες καλού φωτισμού Μην χρησιμοποιείτε το προϊόν σε πλαγιές με κλίση πάνω από 20 Να το χρησιμοποιείτε εγκάρσια στην πλαγιά και όχ...

Страница 26: ...ΗΣΗ Προτού συναρμολογήσετε το προϊόν διαβάστε και κατανοήστε το κεφάλαιο για την ασφάλεια Συναρμολόγηση των οδοντωτών λεπίδων TF230 Ανατρέξτε στην εικόνα για μια επισκόπηση των μπουλονιών βιδών παξιμαδιών και ροδελών που απαιτούνται για τη συναρμολόγηση των λεπίδων Εικ 16 Ακολουθήστε τις οδηγίες στις εικόνες που βρίσκονται παρακάτω Περιεχόμενα Οι εικόνες δείχνουν μόνο τη συναρμολόγηση των οδοντωτώ...

Страница 27: ...θείτε ότι τα ηλεκτρικά καλώδια δεν έχουν υποστεί ζημιά Για το TF338 Απλώστε λάδι στο φίλτρο αέρα Ανεφοδιασμός με καύσιμο ΠΡΟΣΟΧΗ Μην χρησιμοποιείτε βενζίνη με αριθμό οκτανίων κάτω από 90 RON 87 AKI Μπορεί να προκληθεί ζημιά στο προϊόν 1 Σταματήστε τον κινητήρα και αφήστε το προϊόν να κρυώσει 2 Τοποθετήστε το προϊόν σε σημείο με καλή ροή αέρα 3 Γεμίστε το ντεπόζιτο καυσίμου ΠΡΟΣΟΧΗ Βεβαιωθείτε ότι ...

Страница 28: ...τουργίας του προϊόντος στη σελίδα 28 2 Διπλώστε τους τροχούς στήριξης προς τα κάτω Εικ 61 3 Ρυθμίστε τις χειρολαβές στη χαμηλή θέση 4 Ανασηκώστε τις οδοντωτές λεπίδες από το έδαφος με τις χειρολαβές Εικ 62 Μετακίνηση του προϊόντος με το κιτ τροχών 1 Σβήστε τον κινητήρα Ανατρέξτε στην ενότητα Διακοπή λειτουργίας του προϊόντος στη σελίδα 28 2 Αντικαταστήστε τις οδοντωτές λεπίδες για τους τροχούς Εικ...

Страница 29: ...Καθαρίστε το αφρώδες φίλτρο αέρα με ζεστό σαπουνόνερο ΠΡΟΣΟΧΗ Αν το αφρώδες φίλτρο αέρα έχει ζημιά ή δεν μπορεί να καθαριστεί πλήρως αντικαταστήστε το ΠΡΟΣΟΧΗ Βεβαιωθείτε ότι το αφρώδες φίλτρο αέρα είναι στεγνό προτού το τοποθετήσετε Μεταφορά και αποθήκευση Για μεταφορά σε μικρές αποστάσεις ανατρέξτε στις ενότητες Μετακίνηση του προϊόντος με τους τροχούς στήριξης TF230 στη σελίδα 28 και Μετακίνηση...

Страница 30: ...η Συμμόρφωσης ΕΚ Η Husqvarna AB SE 561 82 Huskvarna Σουηδία τηλ 46 36 146500 δηλώνει με αποκλειστική της ευθύνη ότι οι μοτοτσάπες Husqvarna TF230 TF338 από τους αριθμούς σειράς 1447000096 TF230 1447000139 TF338 και μετά ο ακόλουθος αριθμός σειράς αναγράφεται με απλό κείμενο στην πινακίδα στοιχείων του μηχανήματος συμμορφώνονται με τις απαιτήσεις ΤΩΝ ΟΔΗΓΙΩΝ ΤΟΥ ΣΥΜΒΟΥΛΙΟΥ με ημερομηνία 17 Μαΐου 20...

Страница 31: ...o 8 Palanca de cambios 9 Parachoques 10 Control del embrague 11 Acelerador 12 Interruptor encender apagar 13 Cubierta superior 14 Soporte de cuchilla auxiliar 15 Soporte de cuchilla principal 16 Articulación de conexión 17 Soporte de la cubierta de las cuchillas 18 Juego de ruedas 19 Bolsa de tornillería 20 Bolsa de tornillería solo para cuchillas 21 Maletín de herramientas Símbolos que aparecen e...

Страница 32: ... comprenda las siguientes instrucciones de advertencia antes de utilizar el producto Lea todas las instrucciones de este manual de usuario y del producto antes de ponerlo en funcionamiento Asegúrese de comprender y seguir las instrucciones Si tiene problemas o dudas sobre el producto póngase en contacto con su distribuidor de Husqvarna para obtener más información El operario es responsable de cua...

Страница 33: ...as giratorias esta distancia viene determinada por la longitud de la columna de dirección Mantenga alejados las manos y los pies de las cuchillas giratorias El motor y el sistema de escape pueden calentarse mucho durante el funcionamiento Riesgo de lesiones por quemaduras si se tocan Utilice el producto únicamente con la luz del día o en áreas con buena iluminación No utilice el producto en pendie...

Страница 34: ...para obtener una visión general de los pernos los tornillos las tuercas y las arandelas necesarios para montar las cuchillas Fig 16 Siga las instrucciones de las siguientes ilustraciones Nota En las ilustraciones solo se muestra el montaje de las cuchillas del lado derecho Las mismas instrucciones son válidas para el lado izquierdo Asegúrese de que los bordes afilados de las cuchillas de los lados...

Страница 35: ... Coloque el producto en una zona bien ventilada 3 Llene el depósito de combustible PRECAUCIÓN Asegúrese de que no haya demasiado combustible en el depósito ya que este se expande cuando se calienta 4 Apriete el tapón del depósito de combustible con cuidado para evitar el riesgo de incendio 5 Si se ha derramado combustible limpie el producto y la zona circundante 6 Aparte el producto 3 m 10 pies o ...

Страница 36: ...uedas Fig 63 3 Levante la barra de tiro del suelo con el manillar Fig 64 Mantenimiento Introducción ADVERTENCIA Asegúrese de leer y comprender el capítulo sobre seguridad antes de realizar tareas de mantenimiento en el producto Programa de mantenimiento Limpie el producto con más frecuencia si se utiliza en un entorno con mucho polvo El mantenimiento solamente es necesario si se producen problemas...

Страница 37: ...te y almacenamiento Para desplazamientos más cortos consulte Desplazamiento del producto con las ruedas de soporte TF230 en la página 36 y Desplazamiento del producto con el juego de ruedas en la página 36 Deje que el producto se enfríe antes de volver a colocarlo en su lugar de almacenamiento Use siempre recipientes homologados para el transporte y almacenamiento de combustible Mantenga el produc...

Страница 38: ...clusiva responsabilidad que las motoazadas Husqvarna TF230 TF338 a partir de los números de serie 1447000096 TF230 1447000139 TF338 el número de serie se indica claramente en la placa de identificación cumplen con las disposiciones de las DIRECTIVAS DEL CONSEJO Del 17 de mayo de 2006 relativa a máquinas 2006 42 CE Del 15 de diciembre de 2004 relativa a compatibilidad electromagnética 2004 108 CE S...

Страница 39: ... 8 Levier de vitesses 9 Pare chocs 10 Commande d embrayage 11 Commande d accélération 12 Interrupteur de marche arrêt 13 Capot supérieur 14 Support de lame dentée secondaire 15 Support de lame dentée principal 16 Joint de connecteur 17 Support protection des dents 18 Kit de roues 19 Sac de matériel 20 Sac de matériel pour lames dentées uniquement 21 Sacoche à outils Symboles concernant le produit ...

Страница 40: ...el ne sont pas respectées Remarque Symbole utilisé pour donner des informations supplémentaires pour une situation donnée Instructions générales de sécurité AVERTISSEMENT assurez vous de lire et de comprendre les instructions qui suivent avant d utiliser le produit Lisez toutes les instructions contenues dans ce manuel et apposées sur le produit avant de l utiliser Assurez vous de bien comprendre ...

Страница 41: ...ctement les conditions d utilisation d entretien et de réparation énoncées par le fabricant Arrêtez le moteur lorsque le produit n est pas utilisé Marchez avec le produit ne courez pas Faites très attention lorsque vous tirez le produit vers vous ou que vous inversez son sens de rotation Gardez une distance de sécurité avec les lames en rotation selon la longueur de la colonne de direction mainten...

Страница 42: ...ez les bords de la boîte Montage Introduction AVERTISSEMENT Assurez vous de lire et de comprendre le chapitre dédié à la sécurité avant de monter l appareil Pour monter les lames dentées TF230 Reportez vous à l illustration pour avoir une vue d ensemble des boulons vis écrous et rondelles nécessaires au montage des lames dentées Fig 16 Suivez les instructions sur les illustrations ci dessous Remar...

Страница 43: ...à 90 RON 87 AKI Cela peut endommager le produit 1 Arrêtez le moteur et laissez le produit refroidir 2 Placez le produit dans une zone bien ventilée 3 Remplissez le réservoir de carburant REMARQUE Assurez vous qu il n y a pas de trop de carburant dans le réservoir de carburant Le carburant se dilate lorsqu il devient chaud 4 Serrez le bouchon du réservoir de carburant avec précaution pour éviter to...

Страница 44: ...tées du sol à l aide du guidon Fig 62 Pour déplacer le produit avec le kit de roues 1 Arrêtez le moteur Reportez vous à la section Pour arrêter le produit à la page 44 2 Remplacez les lames dentées par les roues Fig 63 3 Soulevez la barre de glissement du sol à l aide du guidon Fig 64 Entretien Introduction AVERTISSEMENT assurez vous de lire et de comprendre le chapitre sur la sécurité avant de pr...

Страница 45: ...ltre à air en mousse s il est endommagé ou s il ne peut pas être entièrement nettoyé REMARQUE assurez vous que le filtre à air en mousse est sec avant de l installer Transport et stockage Pour le transport sur de courtes distances reportez vous aux sections Pour déplacer le produit à l aide des roues de support TF230 à la page 44 et Pour déplacer le produit avec le kit de roues à la page 44 Laisse...

Страница 46: ...arna AB SE 561 82 Huskvarna Suède tél 46 36 146500 déclarons sous notre seule responsabilité que le motoculteur Husqvarna TF230 TF338 à partir des numéros de série 1447000096 TF230 1447000139 TF338 et ultérieurs le numéro de série est clairement indiqué sur la plaque d identification est conforme aux dispositions des DIRECTIVES DU CONSEIL du 17 mai 2006 relative aux machines 2006 42 CE du 15 décem...

Страница 47: ... Impugnatura 8 Leva del cambio 9 Paracolpi 10 Comando della frizione 11 Comando dell acceleratore 12 Interruttore ON OFF 13 Coperchio superiore 14 Supporto dente secondario 15 Supporto dente principale 16 Giunto del connettore 17 Staffa del copridenti 18 Kit ruota 19 Sacchetto della bulloneria 20 Sacchetto della bulloneria solo per denti 21 Cassetta degli attrezzi Simboli riportati sul prodotto Fi...

Страница 48: ...ioni di sicurezza generali AVVERTENZA Leggere e comprendere le seguenti avvertenze prima di utilizzare il prodotto Prima dell uso leggere tutte le istruzioni contenute nel manuale dell operatore e sul prodotto Accertarsi di aver compreso le istruzioni e attenersi alle stesse In caso di problemi o domande sul prodotto rivolgersi al rivenditore Husqvarna per ulteriori informazioni L operatore è resp...

Страница 49: ...zione Mantenere una distanza di sicurezza dalle lame rotanti determinata dalla lunghezza del piantone dello sterzo Tenere mani e piedi lontani dalle lame rotanti Il motore e l impianto di scarico diventano molto caldi durante l uso Rischio di ustioni in caso di contatto Utilizzare il prodotto solo alla luce solare o in altre condizioni di sufficiente illuminazione Non utilizzare il prodotto su ter...

Страница 50: ... e rondelle necessari per montare i denti Fig 16 Attenersi alle istruzioni riportate nelle illustrazioni Nota Le illustrazioni mostrano solo il montaggio dei denti sul lato destro Le stesse istruzioni sono applicabili per il lato sinistro Assicurarsi che i bordi affilati siano rivolti nella stessa direzione sui denti lato destro e sinistro Fig 17 Fig 18 Fig 19 Fig 20 Fig 21 Fig 22 Montaggio dei de...

Страница 51: ...rburante Il carburante si espande quando si scalda 4 Serrare con cautela il tappo del serbatoio del carburante per evitare il rischio di incendio 5 Pulire il prodotto e l area circostante se sono presenti fuoriuscite di carburante 6 Spostare il prodotto ad almeno 3 m 10 ft dal luogo di rifornimento o dal carburante prima di avviare il motore Avviamento del prodotto 1 Aprire il rubinetto del carbur...

Страница 52: ...il capitolo sulla sicurezza prima di eseguire la manutenzione del prodotto Programma di manutenzione Pulire a intervalli più regolari se il prodotto viene utilizzato in condizioni con molta polvere La manutenzione è necessaria solo se si verificano problemi di funzionamento Rivolgersi a un centro assistenza autorizzato Manutenzione Manuten zione giornalie ra prima del fun ziona mento Intervallo di...

Страница 53: ...rto su distanze brevi fare riferimento a Spostamento del prodotto con le ruote di supporto TF230 alla pagina 52 e Spostamento del prodotto con il kit ruota alla pagina 52 Lasciare raffreddare che il prodotto prima del rimessaggio Utilizzare sempre contenitori approvati per la conservazione e il trasporto del carburante Conservare il prodotto in un luogo asciutto e al riparo dal gelo Assicurarsi ch...

Страница 54: ...usqvarna TF230 TF338 con numero di serie a partire da 1447000096 TF230 1447000139 TF338 il numero di serie è chiaramente indicato sulla targhetta nominale soddisfano i requisiti delle DIRETTIVE DEL CONSIGLIO del 17 maggio 2006 sulle macchine 2006 42 CE del mercoledì 15 dicembre 2004 sulla compatibilità elettromagnetica 2004 108 EC Sono state applicate le seguenti norme armonizzate EN 709 1997 A4 2...

Страница 55: ... 6 Lâmina de direção 7 Pega 8 Alavanca de velocidades 9 Para choques 10 Comando da embraiagem 11 Acelerador 12 Interrutor lig desl 13 Cobertura superior 14 Suporte das lâminas de dentes secundário 15 Suporte das lâminas de dentes principal 16 Junta do conector 17 Suporte da proteção do dente 18 Kit de rodas 19 Saco de material 20 Saco de material apenas para lâminas de dentes 21 Bolsa de ferrament...

Страница 56: ...egurança gerais ATENÇÃO Leia e certifique se de que compreende as instruções de aviso que se seguem antes de utilizar o produto Leia todas as instruções deste manual do utilizador e do produto antes da utilização Certifique se de que compreende e cumpre as instruções Caso tenha problemas ou questões relacionados com o produto contacte o seu revendedor Husqvarna para obter mais informações O operad...

Страница 57: ...ste muita atenção quando puxar o produto na sua direção ou quando inverter o sentido de rotação Mantenha uma distância segura das lâminas rotativas definida pelo comprimento da coluna de direção Mantenha as mãos e os pés afastados das lâminas rotativas O motor e o sistema de escape ficam muito quentes durante o funcionamento Risco de queimaduras em caso de toque Apenas utilize o produto durante o ...

Страница 58: ...ue se de que lê e compreende o capítulo sobre segurança antes de montar o produto Montar as lâminas de dentes TF230 Consulte a ilustração para obter uma visão geral dos parafusos porcas e anilhas necessários para montar as lâminas de dentes Fig 16 Siga as instruções apresentadas nas ilustrações abaixo Nota As ilustrações apresentam apenas a montagem das lâminas de dentes do lado direito As mesmas ...

Страница 59: ...índice de octanas inferior a 90 RON 87 AKI Caso contrário pode causar danos no produto 1 Desligue o motor e deixe o produto arrefecer 2 Coloque o produto numa área arejada 3 Encha o depósito de combustível CUIDADO Certifique se de que não existe demasiado combustível no respetivo depósito O combustível expande se quando fica quente 4 Aperte cuidadosamente a tampa do depósito de combustível para ev...

Страница 60: ...eção Fig 62 Mover o produto com o kit de rodas 1 Desligue o motor Consulte Desligar o produto na página 60 2 Substitua as lâminas de dentes pelas rodas Fig 63 3 Levante a lâmina de direção do solo com a barra de direção Fig 64 Manutenção Introdução ATENÇÃO Certifique se de que leu e compreendeu o capítulo sobre segurança antes de realizar tarefas de manutenção no produto Esquema de manutenção Limp...

Страница 61: ... seja possível limpá lo completamente CUIDADO Certifique se de que o filtro de ar de espuma está seco antes de o instalar Transporte e armazenamento Para o transporte em distâncias mais curtas consulte Mover o produto com as rodas de suporte TF230 na página 60 e Mover o produto com o kit de rodas na página 60 Deixe o produto arrefecer antes de o armazenar Utilize recipientes aprovados para o trans...

Страница 62: ...b sua inteira responsabilidade que as motoenxadas Husqvarna TF230 TF338 com os números de série 1447000096 TF230 1447000139 TF338 e seguintes o número de série seguinte é claramente indicado em texto simples na etiqueta de tipo estão em conformidade com os requisitos das DIRETIVAS DO CONSELHO 2006 42 CE relativa às máquinas de 17 de maio de 2006 2004 108 CE relativa à compatibilidade eletromagnéti...

Страница 63: ...rindere 7 Mâner 8 Manetă pentru schimbarea vitezelor 9 Bară de protecție 10 Controlul ambreiajului 11 Control accelerație 12 Întrerupător de pornire oprire 13 Capac superior 14 Suport cuțit cu dinți secundar 15 Suport cuțit cu dinți principal 16 Îmbinare conector 17 Consolă capac pentru dinți 18 Set de roți 19 Geantă pentru piese 20 Geantă pentru piese numai pentru cuțite cu dinți 21 Geantă pentru...

Страница 64: ...dată Instrucțiuni generale de siguranță AVERTISMENT Înainte de a utiliza produsul citiți și înțelegeți instrucțiunile de avertizare de mai jos Înainte de utilizare citiți toate instrucțiunile din acest manual al operatorului și de pe produs Asigurați vă că înțelegeți și respectați instrucțiunile Dacă aveți probleme sau întrebări privind produsul adresați vă distribuitorului Husqvarna pentru inform...

Страница 65: ...ță de siguranță dată de lungimea coloanei de direcție Feriți vă mâinile și picioarele de cuțitele rotative Motorul și sistemul de eșapament ating temperaturi înalte în timpul funcționării Pericol de vătămări corporale prin arsură în caz de atingere Utilizați produsul numai ziua sau în locuri bine iluminate Nu utilizați produsul pe pante cu înclinație mai mare de 20 Lucrați perpendicular pe pantă n...

Страница 66: ...uburilor piulițelor și șaibelor necesară pentru asamblarea cuțitelor cu dinți Fig 16 Respectați instrucțiunile din ilustrațiile de mai jos Nota Ilustrațiile prezintă numai asamblarea cuțitelor cu dinți de pe partea dreaptă Aceleași instrucțiuni sunt aplicabile și pe partea stângă Asigurați vă că marginile ascuțite sunt orientate în aceeași direcție la cuțitele cu dinți de pe partea stângă respecti...

Страница 67: ...ea mult carburant în rezervorul de carburant Carburantul se dilată atunci când se încălzește 4 Strângeți cu atenție capacul rezervorului de carburant pentru a preveni pericolul de incendiu 5 Curățați produsul și zona din jurul acestuia de carburantul vărsat 6 Îndepărtați produsul la cel puțin 3 m 10 ft de zona de realimentare cu combustibil și de sursa de combustibil înainte de a porni motorul Por...

Страница 68: ...cu dinți pentru roți Fig 63 3 Ridicați bara de prindere de la sol cu ajutorul mânerului Fig 64 Întreținerea Introducere AVERTISMENT Citiți și înțelegeți capitolul privind siguranța înainte de a efectua operații de întreținere asupra produsului Program de întreținere Curățați la intervale mai regulate dacă produsul este utilizat în medii cu mult praf Întreținerea este necesară numai dacă survin pro...

Страница 69: ...distanțe mai scurte consultați Pentru deplasarea produsului pe roțile de susținere TF230 la pagina 68 și Pentru deplasarea produsului cu ajutorul setului de roți la pagina 68 Lăsați produsul să se răcească înainte de a îl depozita Utilizați întotdeauna recipiente omologate pentru depozitarea și transportarea combustibilului Mențineți produsul într o zonă uscată și ferită de îngheț Asigurați vă că ...

Страница 70: ...atoarele Husqvarna TF230 TF338 cu numerele de serie 1447000096 TF230 1447000139 TF338 și ulterioare numărul de serie consecutiv este în mod clar specificat textual pe plăcuța de identificare respectă cerințele DIRECTIVELOR CONSILIULUI din 17 mai 2006 referitoare la utilaje 2006 42 CE din 15 decembrie 2004 referitoare la compatibilitatea electromagnetică 2004 108 CE Au fost aplicate următoarele sta...

Страница 71: ...7 Tutma yeri 8 Vites kolu 9 Tampon 10 Debriyaj kontrolü 11 Gaz kontrolü 12 AÇMA KAPAMA anahtarı 13 Araba koruma örtüsü 14 Çatal dişi bıçak tutucu ikincil 15 Çatal dişi bıçak tutucu birincil 16 Konektör mafsalı 17 Çatal dişi kapak braketi 18 Tekerlek kiti 19 Donanım çantası 20 Donanım çantası yalnızca çatal dişi bıçaklar için 21 Alet çantası Ürün üzerindeki semboller Şek 3 UYARI Dikkatli olun ve ür...

Страница 72: ...alıştırmadan önce bu kullanım kılavuzundaki ve ürün üzerindeki tüm talimatları okuyun Talimatları anladığınızdan ve bunlara uyduğunuzdan emin olun Ürünle ilgili herhangi bir problem veya sorunuz olursa lütfen daha fazla bilgi için Husqvarna bayinizle iletişime geçin İnsanların ya da eşyaların maruz kalabileceği tüm emniyetsiz durum veya risklerden operatör sorumludur Bu ürün çalışırken elektromany...

Страница 73: ...ır Ürünü yalnızca gün ışığında veya diğer iyi aydınlatılmış koşullarda kullanın Ürünü 20 den daha eğimli zeminlerde kullanmayın Eğimlerde yukarı veya aşağı doğru değil yatay olarak çalışın Üreticinin onayını almadan ürünün orijinal tasarımında hiçbir şekilde değişiklik yapmayın Daima orijinal yedek parça kullanın Onaylı olmayan değişikliklerin yapılması ve veya aksesuarların kullanılması ürünü kul...

Страница 74: ...tığından emin olun Şek 17 Şek 18 Şek 19 Şek 20 Şek 21 Şek 22 Çatal dişi bıçakların montajı TF338 Çatal dişi bıçakların montajı için gerekli cıvata vida somun ve rondelaların genel görünümü için resme bakın Şek 23 Aşağıdaki resimlerde yer alan talimatlara uyun Not Resimler yalnızca çatal dişi bıçakların sağ taraftan montajını gösterir Aynı talimatlar sol taraf için de geçerlidir Keskin kenarların s...

Страница 75: ...yakıt kaynağından en az 3 m 10 ft uzaklaştırın Ürünü çalıştırma 1 Yakıt musluğunu açın Şek 47 2 Jikle kontrolünü kullanarak jikleyi açın Şek 48 3 Vites kolunu boş vites konumuna getirin Şek 49 4 Gaz kontrolüyle tam gaz uygulayın Şek 50 5 AÇMA KAPAMA anahtarını AÇIK konuma getirin Şek 51 6 Çalıştırma ipi kolunu çekin UYARI Ürün çalışmaya başladığında 20 m lik güvenlik bölgesinde hiçbir insan veya h...

Страница 76: ...ım Kullanım öncesi günlük bakım Saat cinsinden bakım aralığı 20 saatte veya ay da bir 50 saatte veya 3 ayda bir 100 saat te veya 6 ayda bir 300 saat te veya yılda 1 Ürünü temizleme X Tüm somun ve vidaların sıkı olduğundan ve hasar gör mediğinden emin olun X Hava filtresini temizleyin Gerekirse parçaları değiştirin X X X Motor yağı seviyesini kontrol edin X Dişli kutusundaki yağ seviyesini kontrol ...

Страница 77: ...a açık alevler yangın çıkarabilir Ürünün üzerini örtün hasar ve kazaları önlemek için taşıma sırasında ürünü güvenli bir şekilde bağlayın Ürünün nakliyesi için onaylı bir araç kullanın Ürünü kaldırmayın Nakliye amacıyla ürünü araca yerleştirirken veya araçtan çıkarırken dikkatli olun Onaylı bir rampa kullanın Teknik veriler TF230 TF338 Çapalama genişliği mm 750 950 Çapalama derinliği mm 150 300 15...

Страница 78: ...ı makinelerle ilgili direktif 15 Aralık 2004 tarihli ve 2004 108 AT sayılı elektromanyetik uyumlulukla ilgili direktif Aşağıdaki uyumlulaştırılmış standartlar uygulanmıştır EN 709 1997 A4 2009 Husqvarna 20141210 Claes Losdal Geliştirme Müdürü Bahçe Ürünleri Husqvarna AB yetkili temsilcisi ve teknik dokümantasyon sorumlusu 78 1419 002 02 03 2020 ...

Страница 79: ...1419 002 02 03 2020 79 ...

Страница 80: ...om Original instructions Оригинални инструкции Αρχικές οδηγίες Instrucciones originales Instructions d origine Istruzioni originali Instruções originais Instrucţiuni iniţiale Orijinal talimatlar 1142200 38 2020 05 06 ...

Отзывы: