background image

4 – English

1 Introduction and safety regulations

1�1 General

This workshop manual gives a full description of how to 

do troubleshooting, repair and test of the product. It also 

gives safety instructions that the personnel must obey 

during repair work.

1�2 Revisions

If there are changes to the product, these are gradually 

introduced into ongoing production. These changes can 

have an effect on servicing and/or spare parts. This can 

cause sections of the workshop manual to become out of 

date. Servicing information is sent out for each change. 

To make sure that the repair and servicing instructions 

are complete and up to date, always read the workshop 

manual together with all servicing information applicable 

for the product.

1�3 Target group

This workshop manual is written for personnel with a 

general knowledge of how to repair and do servicing on 

the product.
All personnel that repair or do servicing on the product 

must read and understand the workshop manual.

1�4 Safety instructions

WARNING: All personnel that repair or do 

servicing on the product must read and 

understand the safety instructions�

1�4�1 General safety instructions

The service center that repairs the product must have 

safety devices that comply with local regulations.
Warnings and cautions are used to point out specially 

important parts of the workshop manual.

WARNING: Used if there is a risk of injury 

or death if the instructions are not followed�

CAUTION: Used if there is a risk of material 

damage if the instructions are not followed�

1�4�2 Special safety instructions

Do not use accessories and/or do changes 

that are not approved by the manufacturer� 

This can cause injury or death to the 

operator or other persons�

WARNING: Always use original spare parts 

and accessories�

WARNING: Use approved hearing protec-

tion� Noise from the product can result in 

permanent hearing loss�

WARNING: Use protective gloves� The tiller 

blades are sharp and can cause injury�

Introduction and safety regulations

Содержание TF 544

Страница 1: ...Workshop manual English TF544 ...

Страница 2: ......

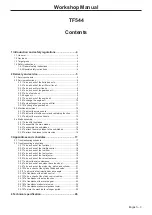
Страница 3: ...in blades 14 2 4 3 To assemble the sub blades 15 2 4 4 To attach the main blades to the sub blades 16 2 4 5 To attach the blades to the machine 16 3 Appendices and schedules 17 3 1 Troubleshooting schedule 17 3 2 Troubleshooting instructions 18 3 2 1 To do a check of the fuel level 18 3 2 2 To do a check of the throttle control 18 3 2 3 To do a check of the fuel filter 18 3 2 4 To do a check of th...

Страница 4: ...epair or do servicing on the product must read and understand the workshop manual 1 4 Safety instructions WARNING All personnel that repair or do servicing on the product must read and understand the safety instructions 1 4 1 General safety instructions The service center that repairs the product must have safety devices that comply with local regulations Warnings and cautions are used to point ou...

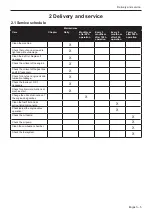
Страница 5: ... the air filter Replace if necessary X Check the oil level of the engine X Check the oil level of the gearbox and fill if necessary X Check for any fuel engine oil and lubrication leakage X Check the fuel level Fill if necessary X Check for abnormal vibrations at machine start X Change the oil and lubrication of the engine and gearbox X Clean the fuel filter and its surrounding components X Check ...

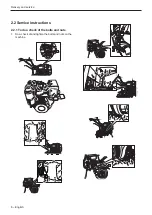
Страница 6: ...6 English Delivery and service 2 2 Service instructions 2 2 1 To do a check of the bolts and nuts 1 Do a check of and tighten the bolts and nuts on the machine ...

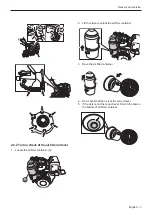
Страница 7: ... filter container A A 2 Lift the clasp to unlock the air filter container 3 Open the air filter container 4 Do a check that the oil is at the correct level 5 If the oil is not at the correct level fill oil in the hole in the bottom of air filter container Delivery and service ...

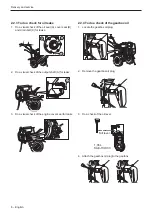
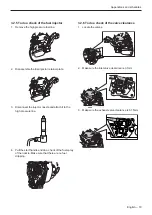
Страница 8: ...t C for leaks 2 A B C Do a visual check of the output shaft A for leaks 3 A Do a visual check of the engine cover seal for leaks 2 2 4 To do a check of the gearbox oil 1 Locate the gearbox oil plug 2 Remove the gearbox oil plug 3 Do a check of the oil level 4 Full level 1 65 L SAE 10W 30 Attach the gearbox oil plug to the gearbox ...

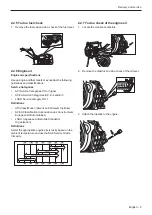
Страница 9: ...SO Service category DH 1 Definitions API Classification American Petroleum Institute ACEA Classification Association des Constructeurs Européens d Automobilies JASO Japanese Automobile Standards Organization Definitions Select the appropriate engine oil viscosity based on the ambient temperature and use the SAE Service Grade Viscosity Delivery and service 2 2 7 To do a check of the engine oil 1 Lo...

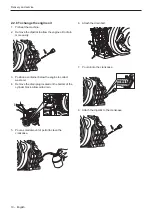
Страница 10: ... easily 3 Position a container below the engine to collect waste oil 4 Remove the drain plug located on the bottom of the cylinder block Allow oil to drain 5 Pour a small amount of petrol to clean the crankcase 6 Attach the drain bolt 7 Pour oil into the crankcase 8 Attach the dipstick to the crankcase Delivery and service ...

Страница 11: ...all the oil filter 7 Make sure the oil filter cap 2 is fully seated 8 Install and tighten the oil filter retaining bolt 1 9 Add new engine oil to the engine 2 2 10 To change the gearbox oil 1 Remove the gearbox drain bolt A to drain the oil A 2 Remove the gearbox dipstick 3 Pour a small amount of petrol to clean the gearbox 4 Attach the gearbox drain bolt 5 Pour oil into the gearbox Full level 1 6...

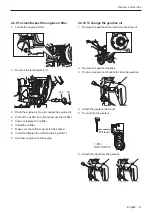
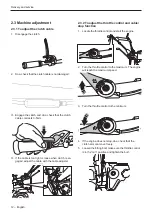
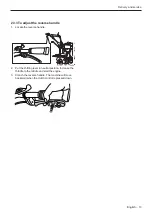
Страница 12: ...djust the cable with the cable adjuster 2 3 2 To adjust the throttle control and cable stop function 1 Locate the throttle control and start the engine 2 Turn the throttle control to the maximum The engine will reach the maximum speed 3 Turn the throttle control to the minimum 4 If the engine does not stop do a check that the clutch arm can move freely 5 Loosen the fitting bolt make sure the throt...

Страница 13: ... Locate the reverse handle 2 Put the shifting lever in neutral position Increase the throttle to the middle and start the engine 3 Clench the reverse handle The machine will move backward when the clutch control is pressed down Delivery and service ...

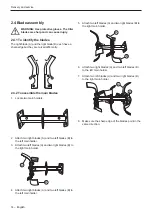
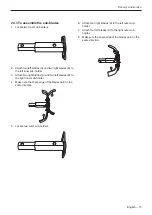
Страница 14: ... A and two left blades B to the left main holder 3 Attach two left blades A and two right blades B to the right main holder 4 A B Attach two right blades A and two left blades B to the left main holder 5 Attach two left blades A and two right blades B to the right main holder A B 6 Attach two right blades A and two left blades B to the left main holder 7 Attach two left blades A and two right blad...

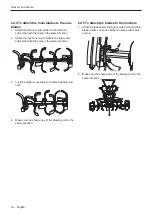
Страница 15: ... blades A and two left blades B to the right inner sub holder 4 Make sure the sharp edge of the blades point in the same direction B A 5 Locate two outer sub holders 6 Attach four right blades A to the left outer sub holder 7 Attach four left blades A to the right outer sub holder 8 Make sure the sharp edge of the blades point in the same direction A Delivery and service ...

Страница 16: ...ub holder with the holes in the same direction 3 Lock the holders in position with bolts washers and nuts 4 Make sure the sharp edge of the blades point in the same direction 2 4 5 To attach the blades to the machine 1 Attach a blade assembly to each side of the machine blade holder Lock each of them in place with a bolt and pin 2 Make sure the sharp edge of the blades point in the same direction ...

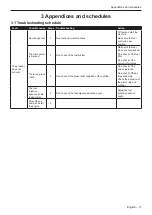
Страница 17: ...l system Make sure the fuel tubes are not blocked Do a check of the fuel filter Do a check of the amount of oil spray There is a press relief 3 Do a check of the press relief condition of the cylinder Do a check of the valve clearance Do a check of the air impermeability Check the abrasion of the piston ring and cylinder The fuel injection advance angle is abnormal 4 Do a check of the fuel injecti...

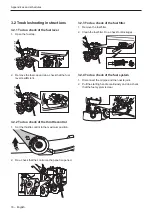
Страница 18: ...rol 1 Set the throttle control to the maximum position 2 Do a check that the control on the panel is opened Appendices and schedules 3 2 3 To do a check of the fuel filter 1 Remove the fuel filter 2 Clean the fuel filter Do a check for blockages 3 2 4 To do a check of the fuel system 1 Disconnect the oil pipe and the nozzle joint 2 Pull the starting handle continuosly and do a check that the fuel ...

Страница 19: ... injector nozzle and attach it to the high pressure line 4 Pull the start handle and do a check of the fuel spray of the nozzle Make sure that there are no fuel dripping 3 2 6 To do a check of the valve clearance 1 Locate the valves 2 Make sure the inlet valve clearance is 0 1mm 3 Make sure the exhaust valve clearance is 0 15mm Appendices and schedules ...

Страница 20: ...Adjust so there is a sligt drag on the feeler gauge when sliding it between the rocker arm and the valve cap 4 Hold the adjusting screw 2 while tightening the valve adjusting screw locknut 3 5 Do a check of the clearens again 3 2 8 To do a check of and clean the carbon dust 1 Do a check that no air is leaking 2 Clean the carbon dust from the valve and nozzle 3 Remove the carbon dust from the combu...

Страница 21: ...ween the piston rings to mismatch at least 90 degrees 3 2 10 To do a check of the cylinder head and valve 1 Do a check that the clinder surface is in good condition and do not have breakages or air holes 2 Do a check of the valves make sure they are installed in the correct locations 3 Do a check that the cylinder circles are in good condition and that the valves match the cylinder heads Appendice...

Страница 22: ...re that fuel is injected If it is not turn the flywheel once 5 Turn the flywheel slowly until fuel flows out of the pipe When the fuel begin to flow check that the angle on the flywheel is about 18 6 Repeat three or four times to make sure the reading is correct How to adjust the injection timing 1 Remove the fuel injection pump and base 2 Add or remove gaskets to adjust the advance angle Add one ...

Страница 23: ...he clutch control and cable 2 Disengage the clutch control If the blade rotation does not stop do a check of the clutch control and cable 3 2 13 To do a check of the clutch control cables 1 Disengage the clutch 2 Do a check that the clutch cable is not damaged 3 Engage the clutch and do a check that the clutch cable contracts 3 5mm Appendices and schedules ...

Страница 24: ...3 Tighten the gear handle bolt 3 2 16 To troubleshoot abnormal noise Type of noise Cause and action Clear and rhytmed knocking noise from the cylinder The oil injects too early Adjust the advance angle Unclear knocking noise from the cylinder The oil injects to late Adjust the advance angle Screeching noise from the engine The bush of the piston pin is too loose Change the bush Knocking sound that...

Страница 25: ...r Do a check of and clean the filter reduce the oil in the filter 2 The piston ring is jammed or mounted incorrectly Oil flows in the chamber Do a check of the piston ring and change it if it is necessary 3 The engine speed is too low The clearance between the piston and cylinder liner is too big The fuel flows in the combustion chamber Decrease the load 4 Too much engine oil is filled Do not fill...

Страница 26: ...ission Transmission type Direct clutch Transmission steps forward 2 Transmission steps reverse 1 Transmission oil capacity L 1 65 Transmission oil type SAE30 Capacity Cultivator type Front tine Number of tines 6 Tine diameter 360 mm 14 17 inch Working width 110 cm 43 31 inch Working depth 30 cm 11 81 inch Equipment Vertically adjustable handlebar Yes Horizontally adjustable handlebar Yes Foldable ...

Страница 27: ......

Страница 28: ...115 99 38 26 2018 12 14 ...

Отзывы: