background image

10

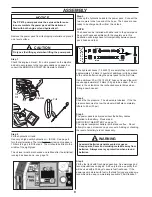
SERVICING THE BATTERY

Use the following procedure when removing, installing and 
attaching the battery cables.  

The battery is located in the support foot of the power pack.  
To access the battery you will need another person helping 
you.  

Step 1

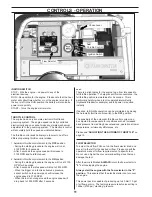
Remove the two M8 bolts using a 10 mm wrench.  Keep the 
two bolts nearby for Step 3

WARNING

- Connecting and disconnecting a battery can cause 
sparks and short circuits.  Do not short battery ter-
minals by allowing a wrench or any other object to 
contact both terminals at the same time. 
- A spark or fl ame can cause a lead acid battery to 
explode.
- Before connecting a battery, remove metal 
bracelets, wristwatch bands, rings, etc.  Use gloves 
and protective glasses or face shield when working 
with a battery.
- Install and remove the battery cables ONLY in the 
sequence described in this section.

Step 2

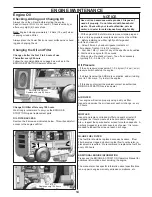
Have one person lift the power pack with the handle.  With the 
“battery box” no longer supporting the power pack it can be 
pivoted downward.  This will give you full access to the battery 
and cables.

Step 3


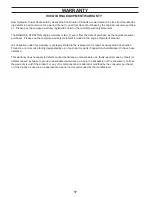
Secure the battery box in the “open” position by inserting the 
two M8 screws removed in Step 1 into the exposed holes in 
the battery box (see illustration).  Use one bolt on each side.  

The battery supplied as original equipment is maintenance 
free.  Do not attempt to open or remove caps or covers.  
Adding or checking the electrolyte level is not necessary.
Replace only with an equivalent maintenance free battery with 
the following specifi cations;

Case size: 

U1  

Min. CCA:  

230

CONNECTING A BATTERY
First

 - always install the RED (+) cable to the positive (+) 

terminal on the battery.  Secure the cable to the terminal with 
the 5/16” screw and nut. (13 mm or 1/2” wrench).

Second

 - install the BLACK (-) ground cable to the negative (-) 

terminal on the battery.  Secure the cable to the terminal with 
the 5/16” screw and nut.

DISCONNECTING A BATTERY
First

  - always disconnect the BLACK (-) ground cable from 

the battery.  (13 mm or 1/2” wrench).

Second

 - disconnect the RED (+) cable.

CHARGING A BATTERY

The only safe way to charge a battery is to completely remove 
the battery from the power pack.  A standard battery charger 
can be used with a charging power of 12 volt and 2 to 10 amp.  
Follow all instructions for your battery charger before hooking it 
up to the battery. 

JUMPER CABLES
DO NOT

 use jumper cables between the power pack and a 

secondary battery source such as a car.

If the battery is weak and can not start the engine either 
remove and recharge or replace the battery.  Do not attempt 
to use jumper cables.  There is no safe way to attach jumper 
cables.


Lift and support the 
power pack by pulling 
up on the handle.

Eye Protection

Explosion Danger

Protective Gloves

The battery box 
can be pivoted 
downward.

Содержание PP 418

Страница 1: ...e using the PP 418 Manuel d utilisation Veuillez lire attentivement ces instructions et assurez vous de bien les comprendre avant d utiliser la machine modèle PP 418 Manual del operador Lea cuidadosamente estas instrucciones y asegúrese de que las comprende bien antes de usar el PP 418 PP 418 ...

Страница 2: ...nformation below You can also find the closest location by searching the internet at www husqvarnacp com Husqvarna Construction Products will willingly be of service and provide you with advice as well as help you to use your product both efficiently and safely Additional manuals are available at NO CHARGE and can also be obtained on the internet site Husqvarna Construction Products 17400 West 119...

Страница 3: ... exposed to a noise level equal to or higher than 85 dB A Use hearing protection WARNING ASPHYXIATION HAZARD Running an engine in a con fined or badly ventilated area can result in injury or death due to asphyxiation or carbon monoxide poisoning WARNING CALIFORNIA PROP 65 Use of this product can expose you to materials known to the State of California to cause cancer and or birth defects or other ...

Страница 4: ...ontrol 13 Engine maintenance 14 Hydraulic maintenance 15 Technical specifications 15 Warranty 17 Conformity certificates 18 Lifting and Loading the PP 418 The Power Pack 418 weighs approx 135kg 298lb The safest way to move the power pack from a trailer to the work area is to hoist it using the lifting eyelet Never attach a lifting device to any other part of the machine Other parts are not designe...

Страница 5: ...e oil filter 14 J Ignition switch 11 K Throttle control switch 11 L Hour meter 11 M Pressure port 7 N Return port 7 O Flow selector 11 P Oil temperature and oil level gauge 9 Q Electric fuse 10 Amp R Large hydraulic filter 15 S Small hydraulic filter 15 T Automatic throttle adjustment 13 U Hydraulic oil filler cap V Hydraulic oil tank drain 15 W Engine oil drain 14 Engine model type and code Power...

Страница 6: ...HYDRAULIC OIL ISO 46 Part number 542 16 90 65 Part number 541 20 76 21 Part number 541 20 76 22 Part number 501 98 70 01 Part number 510 19 10 01 Part number 510 19 09 01 Part number 510 19 09 02 Part number 510 19 08 01 Part number 510 04 40 01 ...

Страница 7: ...r tools are Hydraulic Chain Saw Hydraulic Water Pump Hydraulic Breaker If you are unsure of the compatibility of any tool please consult the tool manufacturer or Husqvarna Construction Products NOTICE The direction of flow through the system is always male fitting into the female fitting This means that any extension hoses should be made up the same way If you have a male fitting in one end of a h...

Страница 8: ...ent of more than 10 E10 may cause starting and or performance problems It may also damage metal rubber and plastic parts of the fuel system as well as posing a fire hazard Do not use fuel that is older than 30 days Old fuel can cause running problems as well as fuel system damage The engine will not operate on gasoline marketed as E 85 85 ethanol OIL HANDLING WARNING Used oil is a hazardous waste ...

Страница 9: ...ity between power pack hoses and tool P O W E R P A C K M A N I F O L D Female Male Male Female Step 5 The power pack is delivered without the battery cables installed to the battery Please read SERVICING THE BATTERY on page 10 The original equipment battery is maintenance free Do not attempt to open or remove caps or covers Adding or checking the level of electrolyte is not necessary WARNING Lead...

Страница 10: ...nal equipment is maintenance free Do not attempt to open or remove caps or covers Adding or checking the electrolyte level is not necessary Replace only with an equivalent maintenance free battery with the following specifications Case size U1 Min CCA 230 CONNECTING A BATTERY First always install the RED cable to the positive terminal on the battery Secure the cable to the terminal with the 5 16 s...

Страница 11: ...e the engine speed to 3100 RPM When the tool is no longer used the engine speed will drop back to 1900 RPM after 5 seconds cont There is a slight delay for the engine to go from idle speed to full throttle operation To help prevent this inconvenience the full throttle position is maintained for 5 seconds This is particularly helpful when a tool is operated intermittently Hydraulic Breaker for exam...

Страница 12: ...k the hydraulic oil tank level should be checked Stop the engine and add hydraulic oil as needed WARNING ASPHYXIATION HAZARD Running an engine in a confined or badly ventilated area can result in injury or death due to asphyxiation or carbon monoxide poisoning STARTING PROCEDURE Before starting Always set the flow controller to 0 before starting Connect the hoses to the tool and to the power pack ...

Страница 13: ...the hoses and tool to be used Step 2 Turn the AUTOMATIC THROTTLE switch to the ON position Start the engine and let it idle for 1 minute The engine will now idle at 1900 RPM Step 3 Turn the FLOW SELECTOR to the proper setting for the tool Note If the oil is cold the back pressure in the system can trigger the full throttle function Step 4 Let the hydraulic oil warm up for one or two minutes It is ...

Страница 14: ...t correct the problem contact an authorized BRIGGS STRATTON service dealer OIL FILTER Replace every 100 hours Change Oil Filter after every 100 hours We strongly recommend to only use the BRIGGS STRATTON original replacement parts OIL FILTER ACCESS Remove the 6 screws as indicated below This will enable full access to the engine oil filter ENGINE OIL DRAIN Replace oil every 50 hours NOTICE AIR FIL...

Страница 15: ...aulic tools should not be operated with water contaminated oil If water contamination occurs you should replace the oil and filters In some cases it is feasible to remove the water contamination out of the oil The hydraulic hoses should also be emptied Procedure for removing the water 1 Install the hoses and connect the ends together 2 Start the engine and turn on the flow selector to the 40 liter...

Страница 16: ...ine BRIGGS STRATTON 18hp V twin Engine oil volume 1 4 liters 1 5 quarts Gasoline tank volume 11 4 liters 3 gal Hydraulics Hydraulic system Tool Open center valve Hydraulic system Power Pack Closed loop Pump type Variable displacement piston pump Flow output 20 30 40 liters min 5 8 10 gpm Pressure relief valve setting cracking 148 bar 2150 psi Main filter large 25 micron Pump filter small 25 micron...

Страница 17: ...ement included in the engine Operator s Manual Our obligation under this warranty is expressly limited to the replacement or repair at Husqvarna Construction Products or at a service facility designated by us of such part or parts if inspection shall disclose it to have been defective This warranty does not apply to defects caused by damage unreasonable use faulty repairs made by others or defects...

Страница 18: ...Road Application as relating to CARB standards Under construction equipment and in particular as a Hydraulic Power Pack Power pack hydraulic with engine power less than 19KW 25hp CARB standards do not apply to this machine For more information see the website http www arb ca gov msprog offroad preempt htm ...

Страница 19: ...19 ...

Страница 20: ...2008 31 510 02 98 01 Printed In U S A ...

Отзывы: