background image

English - 65

8. MAINTENANCE

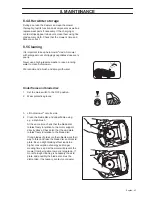
To replace the blades:

1.

Set the main switch to the 

OFF

 position.

2.

Wear protective gloves.

3.

Turn Automower

®

 upside down.

4.

Rotate the skid plate so that its hole aligns with 
the screw for the blade.

5.

Unscrew the blade. Use a straight slot or 
cross-tip screwdriver.

6.

Pry apart the skid plate and blade disc a little and 
remove the blade and screw.

7.

Screw tight the new blade.

Содержание AUTOMOWER 260 ACX

Страница 1: ...HUSQVARNA AUTOMOWER 260 ACX OPERATOR S MANUAL ...

Страница 2: ...3 8 Installation of the guide wire 30 4 Use 34 4 1 Charging a discharged battery 34 4 2 Using the timer 35 4 3 Use of SMS function 35 4 4 Starting Automower 35 4 5 Stopping Automower 35 4 6 Restart 36 4 7 Switching off Automower 36 4 8 Adjusting the cutting height 37 5 Control panel 38 5 1 Shortcuts 39 5 2 Select 40 5 3 Numbers 40 5 4 Main switch 40 6 Menu functions 41 6 1 Main menu 41 6 2 Automow...

Страница 3: ...B has a policy of continuous product development and therefore reserves the right to modify the design and appearance and function of products without prior notice This Operator s Manual deals with version 2 6x of the mower s control program ...

Страница 4: ...system is used in the Operator s manual to make this easier Text written in italics is a text that is shown on the mower s display or is a reference to another section of the Operator s manual Words written in bold are one of the buttons on the mower s keypad Words written in UPPERCASE and italics refer to the position of the main switch and the different operating modes on the mower IMPORTANT INF...

Страница 5: ...y start when the main switch is moved to the ON position and the correct PIN code has been entered Inspection and or maintenance must be carried out with the main switch set to OFF Keep your hands and feet away from the rotating blades Never place your hands or feet close to or under the body when Automower is in operation Do not ride on Automower Noise emission to the environment according to the...

Страница 6: ...hen working with the mower s underframe Never use a high pressure washer or even running water to clean Automower A warning box indicates a risk of personal injury exist especially when the stated instructions are not followed An information box indicates a risk of material damage exist especially when the stated instructions are not followed The box is also used where there is a risk of user erro...

Страница 7: ...ower works and behaves use the mower Never use Automower if persons especially children or pets are in the immediate vicinity Do not put anything on top of Automower or its charging station Do not allow Automower to be used with a defective blade disc or body Neither should it be used with defective blades screws nuts or cables Do not use Automower if the main switch does not work Always switch of...

Страница 8: ...ou intend to carry the mower 3 Carry the mower by the handle at the rear under the mower Carry the mower with the blade disc away from the body Maintenance Inspect Automower each week and replace any damaged or worn parts Check especially that the blades and blade disc are not damaged Replace all blades and screws at the same time if necessary so that the rotating parts are balanced see 8 Maintena...

Страница 9: ...s along the boundary wire To send out signals so Automower finds the charging station To charge Automower battery Transformer which is connected between the charging station and a 230V wall socket The transformer is connected to the wall socket via an integrated power cord and to the charging station via a 20 m long low voltage cable The low voltage cable must not be extended The low voltage cable...

Страница 10: ...ith electronics battery and motors 14 Skid plate 15 Blade disc 16 Charging station 17 Contact strips 18 LED for operation check of the boundary wire 19 Loop wire for the boundary wire and guide wire 20 Transformer with power cord 21 Low voltage cable 22 Staples 23 Connector for the loop wire 24 Nails for securing the charging station 25 Measurement gauge for help when installing the boundary wire ...

Страница 11: ... minutes Above 25 C both the mowing and charging times gradually drop Mowing technique The mowing system used by Automower is based on an effective and energy efficient principle Unlike normal lawn mowers Automower cuts the grass instead of striking it off We recommend you allow Automower to mainly mow in dry weather to obtain the best possible result Automower can even mow in the rain however wet...

Страница 12: ...make it easier for Automower to reach all parts of the garden you can manually set how the mower will leave the charging station see 6 5 Installation 3 on page 45 Automower 260 ACX is equipped with ultrasonic sensors that effectively sense both fixed and moveable obstacles that get in the mower s way When confronted with an obstacle the mower slows down to avoid an unnecessarily hard impact When A...

Страница 13: ... see page 52 Automower can enter a sleep mode to save power The display on the control panel is then completely dimmed The sleep mode is activated 25 minutes after the STOP button has been pressed and then not reset to the operating mode Automower is then activated by switching the main switch off and on The sleep mode can also be activated in the event of a fault occurring during mowing or chargi...

Страница 14: ...f leaving tracks in the grass after the mower The disadvantage is that the search times can be somewhat longer Search method 2 Follow boundary wire Automower runs irregularly until it reaches the boundary wire The mower then follows the boundary wire in to the charging station This search method is best for an installation that has an open lawn with wide passages wider than about 3 metres and no o...

Страница 15: ...ep slopes The advantage of this search method is that the search times are generally short The disadvantage is that the mower can leave tracks in the grass along the length of the guide wire 2 4 More than one Automower in a garden If you install more than one Automower in the same area of lawn each mower must have its own PIN code A complete installation including charging station is required for ...

Страница 16: ...g station 3 3 Charging the battery 3 4 Installation of the boundary wire 3 5 Connecting the boundary wire 3 6 Checking the installation 3 7 Linking Automower to the charging station 3 8 Installation of the guide wire To carry out a complete start up of Automower the charging station must be in position and connected the boundary wire connected and the mower connected to the charging station If you...

Страница 17: ...n page 56 If you are going to install a guide wire read 3 8 Installation of the guide wire see page 30 before choosing the position of the charging station The charging station must be positioned with a great deal of free area in front of it at least 3 metres It should also be positioned centrally in the working area so that Automower can easily find the charging station and quickly reach all part...

Страница 18: ...ansformer must be placed where it is well ventilated and is not exposed to direct sunlight It is also beneficial if the transformer can be placed under a roof It is recommended to use an earth fault breaker when connecting the transformer to the wall socket Do not put the charging station in a corner or pocket in the working area Avoid placing the charging station in a narrow passage narrower than...

Страница 19: ...g station to the ground using the supplied nails 3 Connect the low voltage cable to the charging station Only use original cable and transformer 4 Connect the low voltage cable to the transformer The connectors may be slightly difficult to connect as they are moisture proof 5 Connect the transformer s power cord to a 230V wall socket It is preferable to use an earth fault breaker as recommended IM...

Страница 20: ...e boundary wire The boundary wire can be installed in one of the following ways Securing the wire to the ground with staples It is preferable to staple down the boundary cable if you want to make adjustments to the boundary wire during the first few weeks of operation Bury the wire It is preferable to bury the boundary wire if you want to dethatch or aerate the lawn If necessary both methods can b...

Страница 21: ...d Maintains a maximum distance of 35 metres from Automower in the entire working area Ideally not longer than 500 metres For installations that need a longer boundary wire up to 800 metres a Signal Amplifier 522 42 58 01 which is available as an accessory is recommended The boundary wire is laid at different distances from obstacles depending on what the working area borders The picture below show...

Страница 22: ...l with the lawn it is possible to allow Automower to run a little over the path The boundary wire should then be laid 10 cm from the edge of the path When the working area is divided by a flat slab path that is level with the lawn it is possible to allow Automower to run over the path It can be an advantage to lay the boundary wire under the slabs The boundary wire can also be laid in the joint be...

Страница 23: ... the working area Use the boundary wire to demarcate areas inside the working area by creating islands around obstacles that can not withstand a collision for example flower beds and fountains Run the cable out to the area route it around the area to be demarcated and then back along the same route If staples are used the wire should be laid under the same staple on the return route When the bound...

Страница 24: ...tomower to follow the boundary wire through the passage without the need of changing the mower s default settings When the distance is less than 3 metres there are two options available that permit Automower to run through the passage 1 Install a guide wire When the distance between the boundary wires is less than 3 metres it is recommended to install a guide wire through the passage For more info...

Страница 25: ...conditions as the wheels can slip on the wet grass However the boundary wire can be laid across a slope steeper than 10 when there is an obstacle that Automower can be permitted to collide with for example a fence or a dense hedge Automower can mow areas inside the working area that slope up to 35 cm per distance metre 35 Areas that slope more must be demarcated by the boundary wire When any part ...

Страница 26: ...ting the wire off is reduced Make sure to lay the boundary wire tight to the ground and secure the staples close together with approximately 75 cm between each staple The wire must generally lie close to the ground so as not to be cut off before the grass roots have grown over it Use a hammer to knock down the staples in the ground Exercise care when knocking in the staples and make sure the wire ...

Страница 27: ...g station the right end of the boundary wire should be guided into the right hand hole and the cable s left end in the left hand hole Joining the boundary wire If the boundary wire is not long enough and needs to be spliced Use original solderless coupler It is waterproof and gives a reliable electrical connection To splice Insert both cable ends in the coupler Now press down the button on top of ...

Страница 28: ...ight up 2 Slide in the ends of the boundary wire in the lowermost holes on the charging station and catch them in the uppermost holes The right hand wire end should be inserted in the right hand hole and the left hand wire end in the left hand hole IMPORTANT INFORMATION The boundary wire must not be crossed when connecting to the charging station Therefore the right hand wire end must be connected...

Страница 29: ...ogether using a pair of pliers Press until you hear a click 5 Cut off any surplus boundary wire Cut 1 2 cm above respective connectors 6 Press the connector onto the contact pin marked A on the charging station IMPORTANT INFORMATION The right hand connector should be connected on the right hand contact pin on the charging station and vice versa ...

Страница 30: ...mower works it is not a problem However a Signal Amplifier 522 42 58 01 which is available as an accessory is recommended for breakdowns This permits a boundary wire of up to 800 metres 3 7 Linking Automower to the charging station 1 Open the control panel cover by pressing the STOP button 2 Place Automower in the charging station 3 Set the main switch to the ON position A start up sequence begins...

Страница 31: ...ns where the search methods Irregular and Follow boundary wire are not adequate for the mower to quickly and easily find the charging station A few examples of installations where a guide wire is recommended follow below Narrow passages In passages where the distance between the boundary wires is less than 3 metres it is recommended to install a guide wire through the passage This is a better solu...

Страница 32: ... a long time for Automower to find the charging station when it follows the boundary wire There is a risk of the mower following the outer edge of the working area 2 3 turns before it changes direction and starts to follow the loop at another spot Placement and connection of the guide wire In the text below the guide wires are called guide 1 and guide 2 as is the case on the rear of the charging s...

Страница 33: ...ng station and catch it in the upper hole Secure a connector on the guide wire Connect guide 1 to the contact pin on the charging station marked guide 1 If you intend to install guide 2 Insert the end of guide 2 into the lower left hand hole on the charging station and catch it in the upper hole Secure a connector on the guide wire Connect guide 2 to the contact pin on the charging station marked ...

Страница 34: ...ide wire in the passage Avoid laying the wire at sharp angles This can make it difficult for the mower to follow the guide wire 6 Run the guide wire to the spot on the boundary wire where you want to make the connection 7 Lift out the boundary wire 8 Cut off the boundary wire using a pair of wire cutters 9 Connect the guide wire to the boundary wire with the help of a solderless coupler Insert the...

Страница 35: ...sible Good contact is made when both the charging strips on the mower touch the centre of the contact strips on the charging station 2 Open the control panel cover 3 Set the main switch to the ON position Information about the charging process is shown on the display during the entire charging process WARNING Read the safety instructions before you start your Automower WARNING Keep your hands and ...

Страница 36: ...ssage to the preset mobile phone 4 4 Starting Automower 1 Press the STOP button to open the control panel cover 2 Set the main switch to the ON position 3 Enter the PIN code The default setting for the theft prevention function Time lock 4 1 2 on Automower is active The function requires the PIN code to be stated each time the main switch is moved to the ON position when this is not done correctly...

Страница 37: ...t time the STOP button or the keypad was pressed it is not possible to start Automower by just closing the cover To start 1 Press the YES button 2 Close the control panel cover 4 7 Switching off Automower 1 Press the STOP button 2 Set the main switch to the OFF position Always switch off Automower using the main switch if you intend to perform maintenance or move the mower outside of the working a...

Страница 38: ...the cutting height To adjust the cutting height 1 Press the STOP button to stop the mower 2 Open the cutting height adjustment cover Press down the catch button and then open the cover 3 Turn the knob to the required position The selected position is the marking on the knob that aligns with the arrow on the body Turn clockwise to raise the cutting height Turn anticlockwise to lower the cutting hei...

Страница 39: ...ton is pressed The clock shows the current time The text AUTO or MAN shows which operating mode has been selected The number of operating hours indicates the number of hours since the day of manufacture that Automower has been in operation The time that Automower has spent mowing or looking for the charging station is counted as operating time The clock icon shows when Automower should be or is sw...

Страница 40: ...he right hand side of the display as AUTO respective MAN Press the button to choose between AUTO the normal automatic operating mode where Automower mows and charges continuously MAN If you select MAN and close the control panel cover when Automower is on the lawn it will mow until the battery is discharged It will then stop and show the message Need manual charging The mower must then be moved ma...

Страница 41: ...ttings for example PIN code time or exit direction Also used to specify a number series as a shortcut to the different menus See more about number series in Number series on page 41 5 4 Main switch 7 Set the main switch in the ON position to start Automower Set the main switch in the OFF position when you are not using the mower or if you want to work on the blade disc When the main switch is set ...

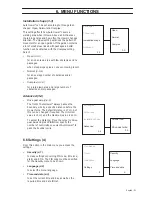
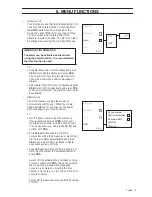
Страница 42: ...equent selections made in submenus are shown as a number series in the right hand corner of the display The first number in the series refers to the selection in the main menu The second number refers to the first sub menu etc You can use the number series as a shortcut to reach a specific function directly For example Press 2 2 in the main menu and the submenu Day timer is shown The headings on t...

Страница 43: ...ollow loop out Follow loop in Corridor width Boundary delay Guide 1 delay Area 1 Area 2 Area 3 Direction Distance Proportion Right Left Guide 1 Reversing dist Start angle 1 End angle 1 Boundary corridor Guide 1 corridor Timer override Day timer Week timer YES NO Start Time 1 Stop Time 1 Start Time 2 Stop Time 2 Reset all timers Mon Tue Wed Thu Fri Sat Sun Run all Charge then AUTO Show latest fault...

Страница 44: ...n Yes 6 4 Timer 2 The lawn should not be cut too often to obtain the best mowing result Consequently it is important to limit the operating time using the timer function if the working area is less than the mower s working capacity When Automower is allowed to mow too much the lawn may appear flattened Besides the mower is subjected to unnecessary wear The timer function is also an ideal means to ...

Страница 45: ...he cursor is on Yes Start time 1 2 2 2 Stop time 1 2 2 3 Start time 2 2 2 4 Stop time 2 2 2 5 Week timer 2 3 Use the YES button to select deselect the days you would like Automower to mow not mow Automower will mow on the days prefixed by a checkmark Mon 2 3 1 Tue 2 3 2 Wed 2 3 3 Thu 2 3 4 Fri 2 3 5 Sat 2 3 6 Sun 2 3 7 Run all 2 3 8 The function Run all selects all the days If you would like the m...

Страница 46: ... should run For examples of garden settings see 7 Garden example on page 56 Exit angles 3 1 Normally Automower leaves the charging station in a direction within the exit sector 90 270 where 90 is called the Start angle and 270 is called the End angle By setting the start and end angles you can set the direction in which Automower is to leave the charging station Reversing distance 3 1 1 Specify th...

Страница 47: ...harging station to reach a more remote area of the garden This function is very useful in gardens where the front and back are joined by a passage where the charging station cannot be placed When this function is activated Automower will follow the boundary wire or guide wire away from the charging station in the set direction It will start mowing when it reaches the area Up to five remote areas c...

Страница 48: ...he mower leaves the charging station according to the setting made for its function Exit angles 3 1 If a value of 20 is specified for Area 1 and 10 for Area 2 the remaining 70 is allocated to the selection under Exit angles 3 1 Follow loop in 3 2 2 This function is used to control how Automower searches for the charging station Automower always starts the search for the charging station in an irre...

Страница 49: ... either by following the guide wires or the boundary wire depending on which one it reaches first Different delay times can also be chosen for guide 1 and guide 2 The mower does not change the search method If the mower starts to follow the boundary wire it will not switch to follow a guide wire Corridor width 3 2 3 The Corridor width setting defines the distances from the mower s path to the boun...

Страница 50: ...t will run with half the mower inside the loop and half the mower outside As there are often flower beds hedges and walls along with the boundary wire Corridor width 0 is not normally recommended Should you still like to state this value the boundary wire must lay 50 cm from solid objects instead of the normal 40 cm Test IN 3 2 4 The Test IN 3 2 4 function is used to test how Automower finds its w...

Страница 51: ...will now leave the charging station directly according to the stated direction and start mowing after the stated distance Reset the Proportion values when testing is finished To find out the distance from the charging station to a remote area State a distance that easily exceeds the true distance The maximum distance that can be stated is 500 metres Set Proportion to 100 for the areas where the di...

Страница 52: ...e 3 4 2 The front of Automower always passes the boundary wire by a specific distance before the mower turns The default distance is 27 cm but this can be changed if required The minimum value is 15 cm and the maximum value is 50 cm To adjust the distance Move the cursor to Drive past wire and press YES Now specify the number of centimetres you want Automower to pass the boundary wire 6 6 Settings...

Страница 53: ...ting on Automower is 30 days but can be changed as required To Activate Move the cursor to Time lock and press YES Now move the cursor to Number of days and press YES Specify how many days you would like Automower to mow before it requests the PIN code Finish by pressing YES When the selected number of days has elapsed Automower completes mowing and charges the battery The message Enter PIN code i...

Страница 54: ...hone To Set the phone number Set the marker to Phone number and press YES Enter your mobile phone number including country code in one sequence e g 46 0 123456789 and confirm with YES Activate deactivate sending of SMS in conjunction with a fault message or alarm Set the marker to SMS at fault alarm and press YES Then select YES to activate or NO to deactivate sending of SMS Activate deactivate ti...

Страница 55: ... you can change the time and date on Automower You can also change the format selections you made when Automower was first started via this function Set time 4 3 1 Move the cursor to Set time and press YES Now enter the correct time and finish with YES Set date 4 3 2 Move the cursor to Set date and press YES Now enter the correct date and finish with YES Time format 4 3 3 Move the cursor to Time f...

Страница 56: ... 2 seconds Starting blade disc One long beep Blade disc blocked Short click sound A button on the keypad has been pressed Muffled long beep Incorrect input The mower is removed from the charging station manually while charging is in progress Short double beep A change to the setting has been made The mower is placed in the charging station manually ...

Страница 57: ...ere the settings deviate from the mower s default settings are shown in bold For further and more detailed information about the different settings see chapter 6 Menu functions on page 41 IMPORTANT INFORMATION The default setting for Automower has been chosen to work on as many different gardens as possible The settings only need to be adjusted when special installation conditions exist for exampl...

Страница 58: ...ours per day Exit angles 90 270 Search method Irregular and Follow guide wire in Delay Guide 1 4 minutes Guide 2 4 minutes and boundary wire 99 minutes Automower is never permitted to follow the boundary wire Corridor width Guide 1 20 Guide 2 20 Area 1600 m2 L shaped garden with the charging station placed in the large open area No guide wire is necessary Timer Operating time of 8 hours per day Ex...

Страница 59: ... Follow loop out Direction Guide 1 Distance 25 metres and Proportion 30 Search method Irregular and Follow guide wire in Delay Guide 1 3 minutes Guide 2 4 minutes and boundary wire 99 minutes Automower is never permitted to follow the boundary wire Corridor width Guide 1 3 Area 5000 m2 Rectangular garden with the charging station placed by an island A large part of the boundary wire is routed on a...

Страница 60: ...e 1 Distance 20 m and Proportion 25 Search method Irregular Follow guide wire in and Follow boundary wire in Delay Guide 1 4 minutes Guide 2 4 minutes and boundary wire 11 minutes Corridor width Guide 1 7 boundary wire 20 Area 4000 m2 Two guide wires are recommended Timer Operating time of 24 hours per day Exit angles 90 270 Follow loop out Area 1 Direction Guide 1 Distance 30 m and Proportion 15 ...

Страница 61: ...rea 1 Direction Guide 1 Distance 40 m and Proportion 20 Area 2 Direction Guide 2 Distance 30 m and Proportion 40 Search method Irregular Follow guide wire in and Follow boundary wire in Delay Guide 1 2 minutes Guide 2 2 minutes and boundary wire 11 minutes Corridor width Guide 1 8 Guide 2 8 and boundary wire 8 Proposals for installation and settings ...

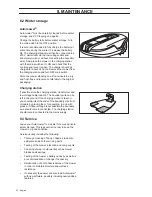
Страница 62: ...ze of the working area Type of grass Type of soil The presence of objects such as cones windfalls toys tools stones roots and the like The service life can vary greatly but is normally 2 4 weeks of operation over areas larger than 1 000 m2 and longer in smaller areas To replace the blades see 8 6 Replacing the blades on page 64 8 1 Battery The battery is maintenance free but has a limited life spa...

Страница 63: ... store the charging station transformer and low voltage cable indoors The boundary wire can be left in the ground If the charging station is taken in you should protect the ends of the boundary wire from moisture by placing them for example in a tin with grease If indoor storage is not possible the boundary wire should remain connected The charging station should remain connected to the mains supp...

Страница 64: ...rframe and blade disc 1 Set the main switch to the OFF position 2 Wear protective gloves 3 Lift Automower onto its side 4 Clean the blade disc and underframe using e g a dish brush At the same time check that the blade disc rotates freely in relation to the motor support directly above Check also that the skid plate rotates freely in relation to the blade disc If long blades of grass or other obje...

Страница 65: ...five blades on Automower 260 ACX that are screwed into the blade disc The blades have four edges to ensure a longer service life Two of the edges are equally worn as the blade disc rotates alternately to the left and alternately to the right When the edges 1 and 2 have become dull loosen the screw and turn the knife over so that edges 3 and 4 are facing outwards All five blades and screws must be ...

Страница 66: ...protective gloves 3 Turn Automower upside down 4 Rotate the skid plate so that its hole aligns with the screw for the blade 5 Unscrew the blade Use a straight slot or cross tip screwdriver 6 Pry apart the skid plate and blade disc a little and remove the blade and screw 7 Screw tight the new blade ...

Страница 67: ...has tripped Reset the miniature circuit breaker by removing the transformer s power cord from the wall socket wait 10 seconds and then reconnect the power cord in the wall socket again Boundary wire broken Check the signal given by the LED on the charging station If it flashes the loop is damaged Repair the broken cable using an original waterproof coupler The connection between Automower and the ...

Страница 68: ...ght in something Free the mower and rectify the reason for the lack of drive If it is due to wet grass wait until the lawn has dried before using the mower No contact in charging station Automower makes poor contact with the contact strips in the charging station Check that Automower has docked correctly in the charging station Charging station blocked The contact between the charging strips and c...

Страница 69: ...oved and the grass and foreign objects removed See 8 5 Cleaning on page 63 Automower runs at the wrong time The clock on Automower needs to be set Set the clock see Time and date 4 3 on page 54 The start and stop times for mowing are incorrect Adjust the start and stop time settings for mowing see 6 4 Timer 2 on page 43 Automower vibrates Unbalanced blade disc or damaged blades Inspect the blades ...

Страница 70: ...an health which could otherwise be caused by inappropriate waste handling of this product For more detailed information about recycling of this product please contact your local council office your household waste disposal service or the shop where you purchased the product Data Automower 260 ACX Dimensions Length 80 cm Width 71 cm Height 31 cm Weight 13 5 kg Electrical system Battery NiMH special...

Страница 71: ...007 relating to electromagnetic compatibility 2004 108 EC and applicable supplements of May 8 2000 relating to noise emissions in the environment 2000 14 EC of December 12 2006 relating to equipment within certain voltage limits 2006 95 EC Information regarding noise emissions and the cutting width see 10 Technical data The following standards have been applied EN 292 2 EN 61558 1 1997 A1 A11 incl...

Страница 72: ...AUTOMOWER is a trademark owned by Husqvarna AB Copyright 2009 HUSQVARNA All rights reserved 115 13 08 26 ...

Отзывы: