


Use only those fasteners recommended for
use with this tool. Fasteners not identified
for use with this tool by the tool
manufacturer are able to result in a risk of
injury to persons or tool damage when
used in this tool.
WARNING:
!
06
07
OPERATION
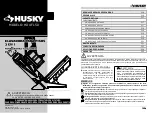
LOADING CLEAT NAILS
Pull the Pusher(A) back to the end of magazine.
Lock pusher in the place by using the Lock
button(C). Then pull the Magazine side shelter(B)
back.
Place full clip of desired Fasteners into magazine
from the side. Up to 100 cleat nails can be loaded
into magazine. Be noted that, when loading the L
cleat nails, the side with the L head should be in
the left of the Magazine side shelter(B). Press the
Lock button(C), then the Pusher(A) set back to
make the Magazine side shelter(B) down back.
The tool may fire when it first connected to
the air resource. Always connect the tool
to the air resource before loading fasteners
to prevent injury from unintended cycling.
Always make sure the tool's magazine is
empty at the beginning of each work
session, before connecting to an air
resource.
WARNING:
!
LOADING STAPLES
Pull the Pusher(A) back to the end of magazine.
Lock pusher in the place by using Lock button(C).
Then pull the Magazine side shelter(B) back.
Place a full clip of 1/2" Crown Staples in the
magazine from the top. Up to 90pcs can be
loaded into the tool.
Press the Lock button(C), then the Pusher(A)
sets back to make the Magazine side shelter(B)
down back.
CHANGE THE FOOT PLATE
The tool is equipped with a factory pre-installed
3/4" foot plate(D).
And an additional uninstalled 5/8" foot plate.
To change the plate:
Disconnect the tool from the air resource.
Empty the magazine completely.
Fire the tool into a piece of scrap wood to
ensure there is no compressed air or fasteners
left in the tool.
Set the tool on its side to expose the four
screws(E).
Remove the four screws(E), then, remove the
foot plate.
Align the four screw holes in the replacement
foot plate with the four threaded mounting holes.
Using the four screws you removed just now,
secure the replacement foot plate to the tool.
Ensure the correct Foot Plate is installed by
firing into a scrap piece of flooring and checking
for proper fastener placement.
⒈
⒉
⒊
⒋
⒌
⒍
⒎
⒏
⒈
⒉
⒈
⒉
⒊
Magazine side
shelter (B)
Lock button (C)
Pusher (A)
The tool may fire when it is first
connected to the air resource. Always
connect the tool to the air resource
before loading fasteners to prevent injury
from unintended cycling.
WARNING:
!
The tool may fire when it is first
connected to the air resource. Always
connect the tool to the air resource
before loading fasteners to prevent injury
from unintended cycling.
WARNING:
!
UNLOADING CLEAT NAILS AND
STAPLES
Unloading is the reverse of loading. Always
disconnect the air resource before unloading.
Always unload all fasteners before removing
tool from service.
WARNING:
!
FEATURES
SPECIFICATIONS
Operation pressure:
Nails capacity:
Tool weight:
Air inlet:
Fasteners:
70-115psi
L: 100pcs
T: 100pcs
U
10.25 lbs
1/4"NPT
1-1/2" to 2"
: 90pcs
FEATURES
REVOLUTIONARY 3 IN 1 DESIGN
ANODIZED ALUMINUM MAGAZINE
DURABLE CONSTRUCTION
MALLET INCLUDED
For use with Staples, T-Cleats and L-Cleats.
For long lasting durability.
Light weight and durably constructed of high-
strength aluminum and heat treated steel parts.
NO-MAR DESIGN
AIR FILTER
Keeps interior components debris free, extending
tool life.
Provides increased protection from marring
when working with a finished flooring surface.
Do not attempt to modify this tool or
create accessories not recommended for
use with this tool. Any such alteration or
modification is misuse and could result in
hazardous condition leading to possible
serious personal injury.
WARNING:
!
Compatible with Generic Brands 1/2" Staples,
T-Cleats, & L-Cleats.
16Ga.
16Ga.
15-1/2 Ga.


