background image

OPERATION

15

Testing the Shade

Check the Power Cord


Check the headrail to ensure the cord is not visible. 

Test the Shade Using the Programming Button

Testing the shade with the programming button will allow you to ensure that the motor and 
power source are working correctly. 


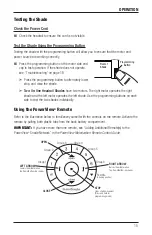
Press the programming button on the motor side end 
cap to test operation. If the shade does not operate, 
see  “Troubleshooting” on page 18.


Press the programming button to alternately lower, 
stop, and raise the shade.


Two-On-One Headrail Shades

 have two motors. The right motor operates the right 

shade and the left motor operates the left shade. Use the programming buttons on each 
side to test the two shades individually.

Using the PowerView

®

 Remote

Refer to the illustration below to familiarize yourself with the controls on the remote. Activate the 
remote by pulling both plastic tabs from the back battery compartment.

IMPORTANT:  

If you have more than one remote, see “Adding Additional Remote(s) to the 

PowerView

®

 Shade Network” in the 

PowerView Motorization Remote Control Guide

.

Programming

Button

Front of

Shade

Group 1

Group 2

OPEN

CLOSE

Group 3

Group 4

Group 5

Group 6

Favorite

(Shading position)

LEFT ARROW

Lowers the middle rail on 
Top-Down/Bottom-Up shades

RIGHT ARROW

Raises the middle rail on 
Top-Down/Bottom-Up shades

STOP

Stops shade movement
(Press and hold for 
programming mode)

Содержание Vignette Modern Roman Shades

Страница 1: ...Installation Operation Care Vignette Modern Roman Shades Stacking Style PowerView Motorization...

Страница 2: ...ckets Optional 14 Operation Testing the Shade 15 Using the PowerView Remote 15 Resetting the Shade If Necessary 17 Troubleshooting 18 Care Removing the Shade 22 Cleaning Procedures 22 Child Safety War...

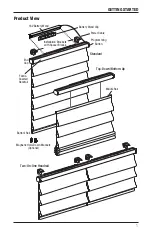
Страница 3: ...ail Standard Magnetic Hold Down Brackets Optional End Cap Installation Brackets with Spacer Blocks Power Cable Programming Button 18V Battery Wand Battery Wand Clip Fabric Covered Headrail Top Down Bo...

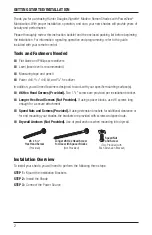
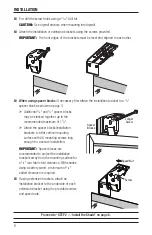
Страница 4: ...fasteners designed to work with your specific mounting surface s 6 Hex Head Screws Provided Two 11 2 screws are provided per installation bracket Longer Hex Head Screws Not Provided If using spacer bl...

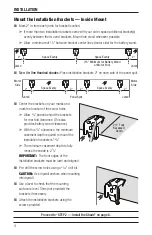
Страница 5: ...vided for each panel Mounting Types and Window Terminology If the installation brackets are mounted correctly the rest of the installation process follows easily To prepare for this important first st...

Страница 6: ...also provides battery wand clearance With this 3 4 allowance the minimum casement depth required to mount the installation brackets is 15 8 The minimum casement depth to fully recess the shade is 23...

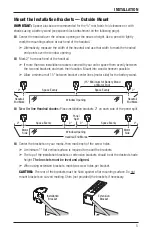
Страница 7: ...15 between bracket center lines motor side for the battery wand Two On One Headrail shades Place installation brackets 2 on each side of the panel split Center the brackets on your marks then mark eac...

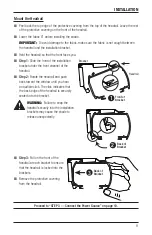
Страница 8: ...gether up to the recommended maximum of 11 2 Attach the spacer blocks installation brackets to a flat vertical mounting surface with 6 mounting screws long enough for a secure installation IMPORTANT S...

Страница 9: ...e to allow for the 3 4 rear fabric fold clearance CAUTION The rear of the extension brackets must be flush against a flat mounting surface Do not mount the extension brackets on the curve of the arch...

Страница 10: ...the battery wand Step 1 Hook the battery wand clip onto the back channel of the headrail Step 2 Rotate the clip down until it snaps into place CAUTION Be sure the power cable does not become pinched...

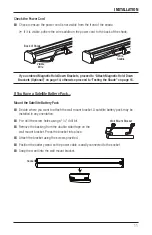
Страница 11: ...on bracket under the front channel of the headrail Step 2 Rotate the headrail and push back toward the window until you hear an audible click The click indicates that the back edge of the headrail is...

Страница 12: ...upply see the instructions that came with the unit Mount the Battery Wand into the Battery Wand Clips Align the battery wand with its socket toward the motor end on the shade Push the battery wand str...

Страница 13: ...ttery Pack Mount the Satellite Battery Pack Decide where you want to attach the wall mount bracket A satellite battery pack may be installed in any orientation Pre drill the screw holes using a 3 32 d...

Страница 14: ...eed to Testing the Shade on page 15 If You Have an 18V DC Power Supply Connect the Power Supply Plug the power cable from the shade into the extension cable Plug the other end of the extension cable i...

Страница 15: ...operate independently The daisy chain feature is only available with the 18V DC power supply option With two shades route the power cables from each shade to the Y connector using an extension cable...

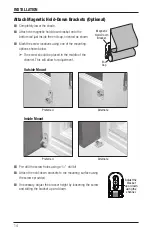
Страница 16: ...e screw should be placed in the middle of the channel This will allow for adjustment Pre drill the screw holes using a 3 32 drill bit Attach the hold down brackets to the mounting surface using the sc...

Страница 17: ...left motor operates the left shade Use the programming buttons on each side to test the two shades individually Using the PowerView Remote Refer to the illustration below to familiarize yourself with...

Страница 18: ...will light to show they are selected Multiple group buttons may be selected at a time To deselect a group press the group button again The backlight for that group button will go out Press CLOSE to l...

Страница 19: ...de at hunterdouglas com operating systems motorized powerview motorization manuals Resetting the Shade If Necessary Basic Reset The basic reset is used to reset the shade s travel limits Bottom Up sha...

Страница 20: ...ge 16 to program the shade to a group Problem The shade will not snap into the installation brackets Solution If the shade has a battery wand check that the wand is not interfering with the installati...

Страница 21: ...a group Check that the correct group number is selected Check that the batteries in the remote are correctly inserted and are fresh The LEDs that backlight the remote should come on full bright when...

Страница 22: ...abric folds are wrinkled creased or gather unevenly Solution Similar to clothing Vignette shades may require dressing throughout the life of the shade Dress the fabric by opening and closing your shad...

Страница 23: ...lowered keep tension on the cord and gently lower the bottom rail Lock button Turn the cam lock button 1 4 turn clockwise to lock Problem Two On One Headrail Shades Only The center gap is not even fro...

Страница 24: ...following cleaning options are available Dusting Regular light dusting with a feather duster is all the cleaning needed in most circumstances Vacuuming Use a hand held vacuum with low suction for mor...

Страница 25: ...e bottom to the top making sure to get steam under each fabric fold Be careful not to saturate the fabric with steam Allow the shade to dry completely before raising it In lieu of steaming commerciall...

Страница 26: ...e to get to cords NOTE The warning labels on the bottom rails of corded window coverings contain important safety information These warning labels are designed to be permanent in accordance with the i...

Страница 27: ...uency RF Exposure Guidelines This equipment should be installed and operated keeping the radiator at least 20 cm or more away from person s body RF Exposure requirements are met when installed in mobi...

Страница 28: ...LIMITED WARRANTY Hunter Douglas window fashion products are covered for defects in materials workmanship or failure to operate for as long as the original retail purchaser owns the product unless shor...

Отзывы: