background image

INSTALLATION

4

Attach the Side Tracks 

WARNING:  

Adhesive on the back of the side tracks is to be placed onto the 

mounting surface one time only.  Do not attempt to remove and re-apply the side 
tracks. The adhesive will not provide full mounting strength once removed and 
re-applied. If the side tracks are removed, new adhesive must be used.  Failure to 
properly use the side track adhesive may result in injury or property damage.

IMPORTANT:  

Do not remove the adhesive backing yet.


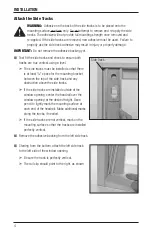
Test fit the side tracks and check to ensure both 
tracks are true vertical, using a level.


The side tracks must be installed so that there  
is at least 

1

/

8

" space for the mounting bracket 

between the top of the side track and any 
obstruction above the side tracks. 


If the side tracks are installed outside of the 
window opening, center the headrail over the 
window opening at the desired height. Use a  
pencil to lightly mark the mounting surface at  
each end of the headrail. Make additional marks 
along the tracks, if needed.


If the side tracks are not vertical, mark on the 
mounting surface so that the tracks are installed  
perfectly vertical. 


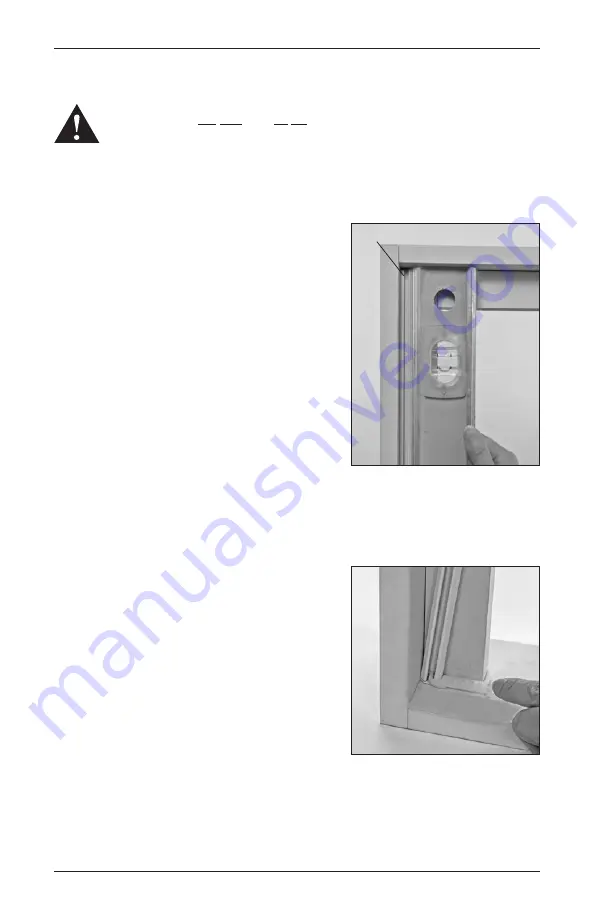
Remove the adhesive backing from the left side track.


Starting from the bottom, attach the left side track  
to the left side of the window opening. 


Be sure the track is perfectly vertical. 


The rail clip should point to the right, as shown.

Side Track

Содержание Duette

Страница 1: ...Installation Operation Care Duette Honeycomb Shades TrackGlide with LiteRise System ...

Страница 2: ...r respective owners Getting Started Product View 1 Tools and Fasteners Needed 2 Installation Prepare for the Installation 3 Attach the Side Tracks 4 Attach the Mounting Brackets 6 Install the Shade 7 Level the Rail s If Necessary 8 Operation Operate the Shade 9 Troubleshooting 10 Care Removing the Shade If Necessary 11 Removing the Side Tracks If Necessary 11 Cleaning Procedures 12 ...

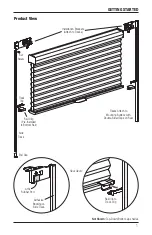
Страница 3: ...w Side Track End Cap Tracks Attach to Mounting Surface with Double Sided Tape on Rear Track Clip Set Screw Installation Brackets Attach to Tracks Rail Clip Pre Installed to Bottom Rail Rail Clip to Track Clip Adhesive Backing on Side Track Affix Rubber Pad Rear Views ...

Страница 4: ... Please thoroughly review this instruction booklet and the enclosed packing list before beginning the installation Tools and Fasteners Needed 3 32 Allen wrench provided Flat blade screwdriver Isopropyl alcohol Level laser level is recommended Measuring tape and pencil Set screws Provided One set screw is used in each side track to keep mounting brackets in place Set Screw Two Provided ...

Страница 5: ...surface may result in injury or property damage Peel back 3 4 of adhesive backing from the back of the side tracks Adhere end caps to the back of the side tracks Insert the track clip into the side tracks With the end caps on the bottom the track clips should face inward toward each other NOTE For Top Down Bottom Up shades insert two clips into each track Slide the track clips until they rest on t...

Страница 6: ...ks must be installed so that there is at least 1 8 space for the mounting bracket between the top of the side track and any obstruction above the side tracks If the side tracks are installed outside of the window opening center the headrail over the window opening at the desired height Use a pencil to lightly mark the mounting surface at each end of the headrail Make additional marks along the tra...

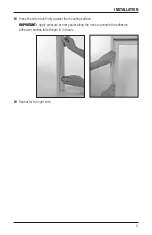
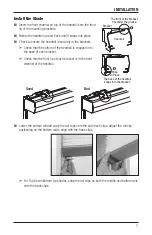
Страница 7: ...ON 5 Press the side track firmly against the mounting surface IMPORTANT Apply pressure at every point along the track to activate the adhesive Adhesive reaches full strength in 24 hours Repeat for the right side ...

Страница 8: ...g bracket until the back of the bracket touches the mounting surface While supporting the mounting bracket with one hand push the bracket upwards to eliminate any gap remaining then secure the bracket to the track using the provided set screw and 3 32 Allen wrench NOTE The bracket is not locked to the side track until the shade is installed Repeat for the right side Back Side of Mounting Bracket L...

Страница 9: ... base of each bracket Check that the front lip of each bracket is in the front channel of the headrail Lower the bottom rail and snap the rail clips onto the side track clips Adjust the rail clip positioning on the bottom rail to align with the track clips For Top Down Bottom Up shades snap the rail clips on both the middle and bottom rails onto the track clips The back of the headrail snaps into ...

Страница 10: ...the Easy Adjust key Turn the key clockwise to raise that side of the rail or counter clockwise to lower it One quarter turn of the key equals approximately 1 4 IMPORTANT The Easy Adjust key must be fully inserted to avoid stripping the mechanism Do not pull down on the rail while turning the key If there are more than two pockets adjust the outer pockets first Then adjust inner pockets as necessar...

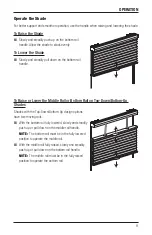
Страница 11: ...or Lower the Middle Rail or Bottom Rail on Top Down Bottom Up Shades Shades with the Top Down Bottom Up design options have two moving rails With the bottom rail fully lowered slowly and steadily push up or pull down on the middle rail handle NOTE The bottom rail must be in the fully lowered position to operate the middle rail With the middle rail fully raised slowly and steadily push up or pull d...

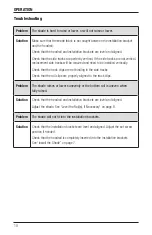
Страница 12: ... Check that the track clips are not binding in the side tracks Check that the rail clips are properly aligned to the track clips Problem The shade raises or lowers unevenly or the bottom rail is uneven when fully raised Solution Check that the headrail and installation brackets are level and aligned Adjust the shade See Level the Rail s If Necessary on page 8 Problem The shade will not fit into th...

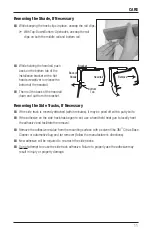
Страница 13: ...f Necessary If the side track is recently attached within minutes it may be pried off with a putty knife If the adhesive on the side track has began to set use a hand held heat gun to locally heat the adhesive and facilitate the removal Remove the adhesive residue from the mounting surface with a solvent like 3M Citrus Base Cleaner or automotive bug and tar remover follow the manufacturer s direct...

Страница 14: ...t and dirt off shades Ultrasonic Cleaning Specify that a mild detergent solution be used IMPORTANT Never immerse the headrail into the solution Allow the shade to dry in the completely lowered closed position Injection Extraction Cleaning This type of professional cleaning injects a cleaning solution into the fabric and extracts the dirty solution in the same motion Use only the dry method of inje...

Страница 15: ......
Страница 16: ... LIMITED WARRANTY Hunter Douglas window fashion products are covered for defects in materials workmanship or failure to operate for as long as the original retail purchaser owns the product unless shorter periods are provided below All internal mechanisms Components and brackets Fabric delamination Operational cords for a full 7 years from the date of purchase Repairs and or replacements will be m...

Отзывы: