background image

PB

2

1886

1886

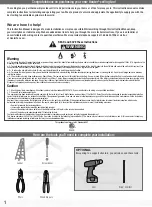
Do not discard the hardware bags or mix parts from 
different bags. Make note of the symbol printed on 
each hardware bag. The symbols can be used to 
identify the appropriate hardware for each step.

x4

x15

x5

x15

x2

x2

For installing the hanger bracket and wiring the fan

For installing the blades

For installing the light fixture

bag

bag

bag

Hunter Pro Tip:

Find a part that is missing or damaged?

Don’t take it back to the store. Let us make it right. Visit us at HunterFan.com or call us at 

1.888.830.1326.

Spare Parts

For your convenience,  

you may receive extra fasteners.

bag

Bulb

Glass

Light Kit

Hood

Motor

Blade Screw

Grommet

Blade

Wood Screw

WIre Nut

Washer

We recommend that you pull everything out of the box and lay it out. We have 
grouped the drawn components below with the hardware you’ll need for those 
parts. The screws below are drawn to scale to make it easier to identify what 
piece of hardware is needed to install each component.

Here is what comes in your box:

Light Kit Screw

bag

M3745-01 r060619

x2

x2

For installing the canopy

Canopy

Canopy Screw

Ceiling Bracket

bag

Downrod

Extra 

Downrod

Remote Components

Remote Control

Remote Cradle

x3

Содержание 50030

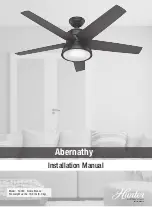
Страница 1: ...Installation Manual 2019 Hunter Fan Co Model 50030 Noble Bronze Fan weight 2 lbs 19 9 lbs 9 0 kg Abernathy PG3768 r060619 ...

Страница 2: ... cell battery If a new or used lithium button coin cell battery is swallowed or enters the body it can cause severe internal burns and can lead to death in as little as 2 hours Always completely secure the battery compartment If the battery compartment does not close securely stop using the product remove the batteries and keep it away from children If you think batteries might have been swallowed...

Страница 3: ...m or call us at 1 888 830 1326 Spare Parts For your convenience you may receive extra fasteners bag Bulb Glass Light Kit Hood Motor Blade Screw Grommet Blade Wood Screw WIre Nut Washer We recommend that you pull everything out of the box and lay it out We have grouped the drawn components below with the hardware you ll need for those parts The screws below are drawn to scale to make it easier to i...

Страница 4: ... Support Structure Ceiling Outlet Box required Angled Mounting If you have a flat ceiling Hang your fan by a standard downrod Some fans come with a shorter downrod for a Low Profile installation Support Structure Ceiling Outlet Box required Standard Mounting A little more information on Angled Mounting For optimum performance and appearance a longer downrod should be used with your Hunter ceiling ...

Страница 5: ...nrod Follow below if you are using the downrod that came pre assembled in your box Need to install a longer or shorter downrod Check out the guide at the end of this manual 8 3 8 C U T S T R I P not to scale Pass all wires to one side of horizontal bar in downrod assembly Hand tighten the downrod at least 4 5 full turns until it stops Trim the wires coming from the fan so that 8 inches remain comi...

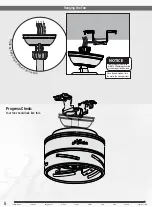
Страница 6: ... c a n o p y o v e r d o wnrod and wires Place the downrod ball into the slot in the ceiling bracket NOTICE To prevent damage to fan ALWAYS lift holding either the fan housing or the downrod Ceiling Bracket Downrod Hanging Fan Wiring Canopy Blades Light Glass Remote Cradle Remote ...

Страница 7: ...rom the ceiling to the white wire from the fan Connect the white grounded wire from the ceiling to the white wire from the fan Cap the blue wire from the fan You will not need it for single switch wiring Connect the second ungrounded light wire from the ceiling to the blue wire from the fan Connect the black ungrounded wire from the ceiling to the black wire from the fan Connect the three groundin...

Страница 8: ... installation Red Flag KEEP x2 Fixture Screw Carefully remove the light fixture from the light fixture hood Put the grommets found in the hardware bag onto the blade screws found in the hardware bag Then install the blade screws to secure each blade to the fan Ceiling Bracket Downrod Hanging Fan Wiring Canopy Blades Light Glass Remote Cradle Remote Installing the Canopy x2 Lift the canopy into pla...

Страница 9: ... and twist counterclockwise to lock the hood assembly into place Connect the plug to the lower switch housing Make sure to line up the colored markings on the connectors and that the connectors latch Insert the third screw found in the hardware bag into place and then tighten all three screws NOTE Check to ensure proper engagement Attach the globe by lifting and turning clockwise one third of a fu...

Страница 10: ...et Press the cradle bracket against the wall and hold firmly for 30 seconds Preparing the Remote ON Turn Power Phillips Head Screw Battery Door To access the battery compartment remove the small Phillips head screw that secures the battery door to the transmitter assembly The battery should be installed with the positive side up Replace with a CR2032 battery when necessary The remote control is al...

Страница 11: ... failure to follow Hunter instructions accidental damage caused by the fan owner or related parties modifications to the fan improper or incorrectly performed maintenance or repair improper voltage supply or power surge use of improper parts or accessories failure to provide maintenance to the fan or acts of God e g flood ORIGINAL PURCHASER S SOLE AND EXCLUSIVE REMEDY FOR A CLAIM OF ANY KIND WITH ...

Страница 12: ...o remove standard downrod pipe Follow steps 6 10 to reassemble with new downrod 1 2 3 4 5 6 7 8 9 10 WARNING FAN FALL HAZARD To prevent SERIOUS INJURY or DEATH ALWAYS follow the downrod assembly instructions exactly VERIFY the downrod is assembled correctly by firmly pulling on the hanger ball ...

Отзывы: