background image

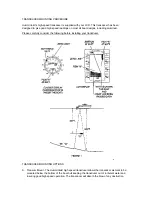
TESTING THE INSTALLATION 


After installing your Platinum ID, transducer, and cables, you should test the installation. 

Testing should be performed on the water, since that is the only way to check your transducer's 
performance. 


With your boat at idle, press the POWER button to turn the unit on. The Platinum ID 

performs a self-test on its electronics, then automatically selects the right depth range and 
sensitivity level for conditions. 


Momentarily, you'll see the reading start to "march" across the screen from right to left. 


Increase your boat speed to ensure that you get a continuous bottom reading as the boat 

moves. Your Platinum ID and its transducer are designed to operate at up to 75 mph; however, 
use caution when operating any boat at high speed. 


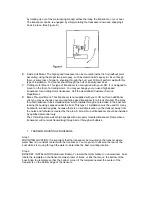
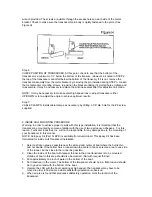
If the Platinum ID performs well at idle or slow speeds, but the display is not continuous 

at higher speeds, the transducer is not installed properly. Air bubbles or turbulence from the boat 
hull are passing across the transducer face, blocking the transmitting signal. By following the 
instructions in "Mounting the Transducer," you can make simple adjustments that should fix the 
problem. 
 
NOTE: If other problems occur, see "Troubleshooting" later in this manual for tips from the 
Humminbird engineers. If you don't find the solution there, call our Customer Service Hotline. 


USING THE PLATINUM ID 


This section provides complete information on operating the Platinum ID through its front 

panel controls. You are encouraged to read this information completely as you first learn to use 
the Platinum ID; doing so will ensure you make the most of its many features and functions. 


The first part of this section explains the use of the built-in simulator, which you can use 

to practice selecting functions through the front panel. The remaining instructions, which can be 
followed while using the simulator or in actual operation, explain each function and are organized 
according to the front panel layout. 


Содержание Platinum ID 600

Страница 1: ......

Страница 2: ...uding aluminum Please carefully consider the following before installing your transducer TRANSDUCER MOUNTING OPTIONS A Transom Mount The Humminbird high speed transducer allows the transducer element...

Страница 3: ...bronz thru hull transducer has a threaded stem which installs through a hole drilled in the boat hull leaving the housing exposed under the boat This type of installation must be used for many boats...

Страница 4: ...use a silicone sealant between the screwhead and bracket in order to prevent leaking See Figure C Step 2 BRACKET INSTALLATION Fiberglass Boats If your boat has a stepped transom located below and und...

Страница 5: ...cally in the three slots found in the bracket It is important to use a silicone sealant between the screwhead and bracket in order to prevent leaking Step 3 TRANSDUCER PIVOT ASSEMBLY Assemble the pivo...

Страница 6: ...the bracket Slide the O ring on to the headed pin and insert it through the two parts Assemble by screwing the x3 8 allen head screw into the end of the pin and tighten See Figure G Step 5 ANGLE ALLIG...

Страница 7: ...h this type installation it is important that the transducer be mounted by someone familiar with the use of two part epoxy adhesives For this reason Techsonic Industries Inc will not be responsible fo...

Страница 8: ...ye of the transducer The bubbles will disappear in a short time or can be removed by rubbing the transducer eye with your fingers while the transducer is in the water 4 If your instrument should fail...

Страница 9: ...Install the mounting knobs and tighten snugly The unit can now be swiveled and tilted to any desired position...

Страница 10: ...cket can also be mounted directly to the dash without the swivel mount however this method is not recommended since the unit cannot be rotated INSTALLING THE CABLES Your LCR comes equipped with Hummin...

Страница 11: ...ole cover after determining the necessary wire length from the hole The power cable has a red lead to the positive post and the black lead to the negative post Install a 1 amp fuse between the red cab...

Страница 12: ...er is not installed properly Air bubbles or turbulence from the boat hull are passing across the transducer face blocking the transmitting signal By following the instructions in Mounting the Transduc...

Страница 13: ...kly become and Platinum ID expert PLATINUM ID FUNCTIONS The Platinum ID offers several functions that you can adjust with the front panel buttons Note that to select something with a button you must p...

Страница 14: ...y on the screen long enough press the STOP button to hold the menu on the screen NOTE The last function you select remains active that is you can adjust it without having to press SELECT again For exa...

Страница 15: ...s of measurement between miles per hour MPH or knots ARTS This selection also affects Trip Log where recorded distance will be displayed in statute miles Bill or nautical miles NM 3 Selecting Sensitiv...

Страница 16: ...Factory Setting OFF The Fish Alarm alerts you with a chirping sound whenever the Platinum ID detects fish or another object not attached to the bottom To activate it select FISH ALARM and press the ON...

Страница 17: ...adjust zoom depth before activating zoom in which case the zoom range will be shown with horizontal dotted lines 7 Using Bottom Lock Factory setting OFF Bottom Lock provides an up close view like Zoo...

Страница 18: ...rovide faster updates while slower Display Speeds provide more detailed information 11 Trip Log Factory Setting Off The Platinum ID Trip Log provides a full screen of information on current conditions...

Отзывы:

Похожие инструкции для Platinum ID 600