-
Any accessories such as the NMEA output cable should be routed before installing the NS
10.
MOUNTING THE RECEIVER
Deck Mount
Follow the instructions below if you are deck mounting the
receiver: (Figure 3)
1. Once you have located a mounting position that
affords maximum satellite visibility to the receiver,
make sure you can gain sufficient access to the lower
side of the deck to insert the mounting bolt and tighten
it. The maximum thickness of the mounting surface
should not exceed 3/8”.
2. Mark the mounting point with a pencil and remove the
receiver.
3. Using a 1” hole saw or wood bit, drill a hole at the
marked point.
4. Insert the receiver cable through the 1” rubber gasket, then the hole.
5. Position the receiver over the hole and hold it in place.
6. Insert the 1’-14 mounting bolt over the cable end from the bottom side of the deck and screw
it into the receiver base.
7. You may turn the receiver to tighten fully.
8. Connect the extension cable to the receiver cable and route to the NS 10.
Note: If the mounting surface is rough, or irregular, use silicone sealant to ensure a water tight
joint.
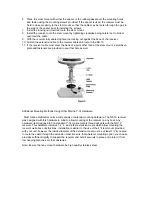
4” Stem Mount
Follow the instructions below if you are stem mounting
the receiver: (Figure 4)
1. Once you have determined a location which affords
maximum satellite visibility to the receiver, mark the
location with a pen or pencil.
2. If access to the lower side of the mounting surface is
possible, you may choose to route the receiver cable
through the surface. If access is not possible or
desirable, a ¼” ABS spacer is provided to allow routing
of the cable to the side of the stern mount. (Figure 5)
3. Using the stem mount as a template, mark the three
mounting holes on the mounting surface.
4. Remove the stem mount and drill a 1/8” hole at each of
the three marked points.
5. If you have decided to route the cable through the
mounting surface, drill a fourth hole at the center point
of the three mounting holes, ½” diameter, and insert
the cable through the gasket, and then the hole.
Содержание NS 10
Страница 1: ......


