background image

89

Fish ID+™

Settings: Off, On; Default = Off

Fish ID+™

uses advanced signal processing to interpret sonar returns and will

display a Fish Symbol when very selective requirements are met. When a fish is
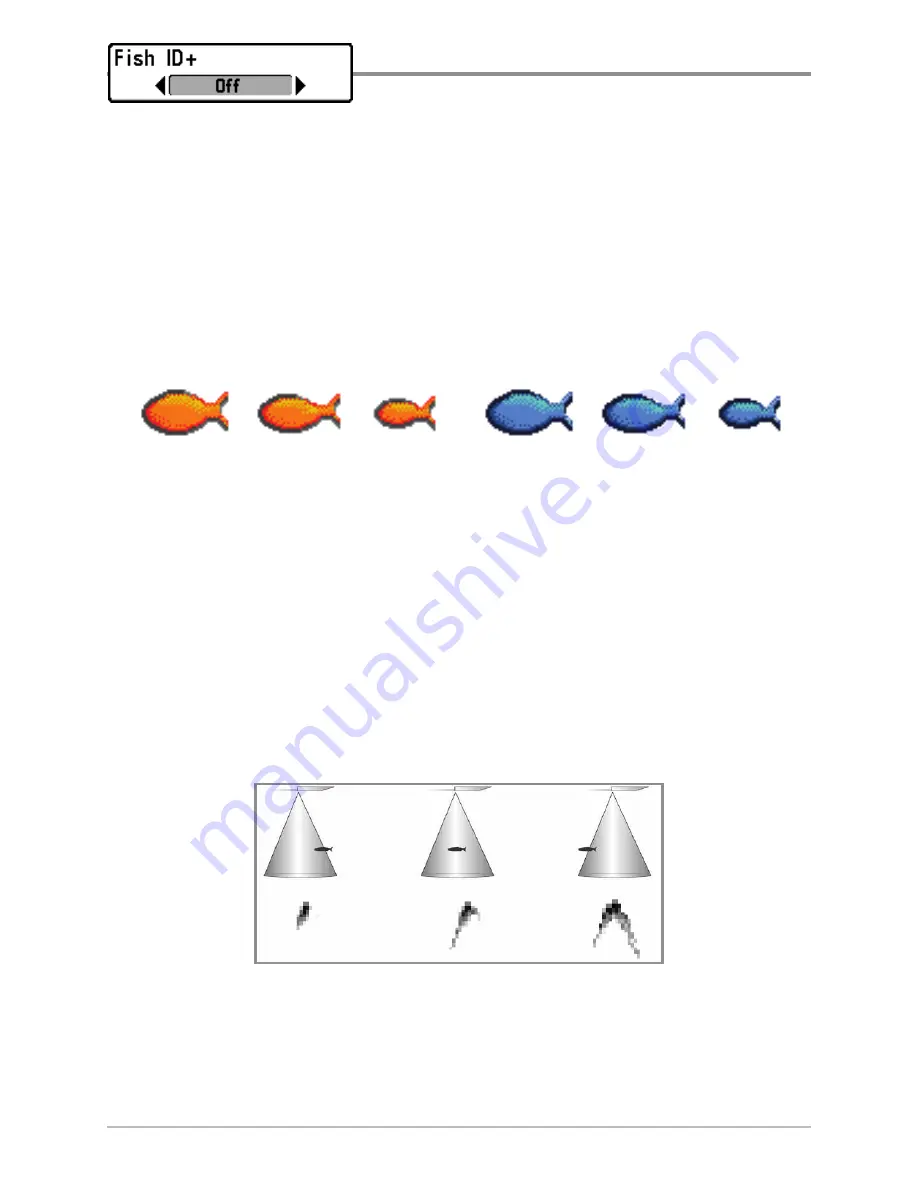
detected, a fish icon and its depth are displayed above the return that has been
classified as being a fish. Three different fish size icons represent the intensity of
the sonar return and provide an indicator of relative fish size.

DualBeam PLUS™

sonar models represent targets detected in the 200 kHz

narrow beam as Orange Fish Symbols and targets detected in the 83 kHz wide
beam as Blue Fish Symbols.

When Fish ID+™ is turned off

, the Fishfinder shows only the raw sonar

returns on the display. These returns will often result in “arches“ forming on the
display, indicating potential targets. Due to the transducer beam angle, the
distance to a fish decreases as the fish moves into the beam, and then
increases as it moves out again, creating a Fish Arch when this distance change
is shown on the display. Boat speed, chart speed, and the position of the fish
within the sonar beam greatly affect the shape of the arch.

Transducer Cone and Fish Arches

200 kHz, Narrow Beam

Orange Fish Symbols

83 kHz, Wide Beam

Blue Fish Symbols

Sonar Menu Tab

Содержание 385ci Combo

Страница 1: ...531730 2EN_A 385ci Combo Operations Manual 385ci Combo Operations Manual...

Страница 2: ...y be performed by authorized service personnel Any modification of the serial number or attempt to repair the original equipment or accessories by unauthorized individuals will void the warranty WARNI...

Страница 3: ...rchased ROHS STATEMENT Product designed and intended as a fixed installation or part of a system in a vessel may be considered beyond the scope of Directive 2002 95 EC of the European Parliament and o...

Страница 4: ...esentation 11 Views 13 Sonar View 15 Sonar Zoom View 16 200 83 kHz Split Sonar View 17 Big Digits View 18 Circular Flasher View 19 Snapshot and Recording View 24 Bird s Eye View 31 Chart View 32 Chart...

Страница 5: ...FO Key 50 MENU Key 50 4 WAY Cursor Control Key 50 MARK Key 51 GOTO Key 52 ZOOM Key 52 EXIT Key 53 SD Slot 53 The Menu System 54 Start Up Options Menu 55 Normal 55 Simulator 56 System Status 56 Self Te...

Страница 6: ...Digits Views only 70 Lower Range 71 Color Palette Circular Flasher Ice Fishing Mode only 72 Cancel Navigation only when navigating 72 Navigation X Press Menu Navigation views only 73 Waypoint Name on...

Страница 7: ...al purchase SD Card Snapshot and Recording View only 79 Delete All Recordings optional purchase SD Card Snapshot and Recording View only 79 Pings Per Second optional purchase SD Card Snapshot and Reco...

Страница 8: ...ced 93 Max Depth Advanced 93 Water Type Advanced 94 Ice Fishing Mode 94 Navigation Menu Tab 95 Current Track 96 Saved Tracks 96 Waypoints 97 Routes 98 Chart Orientation 98 North Reference 98 Waypoint...

Страница 9: ...06 Depth Highlight optional purchase LakeMaster charts only 106 Depth Highlight Range optional purchase LakeMaster charts only 107 Water Level Offset optional purchase LakeMaster charts only 107 Shall...

Страница 10: ...rnational only 115 Date Format Advanced International only 115 NMEA Output Advanced 116 Sonar 116 Demonstration 117 Sound Control 117 Screen Snapshot 117 Views Menu Tab 118 Troubleshooting 119 Fishfin...

Страница 11: ...in this Table of Contents which list with Temp Speed only require the purchase of separate accessories You can visit our Web site at humminbird com to order these accessories online or contact our Cus...

Страница 12: ...e isn t a transducer attached to the control head NOTE See Start Up Options Menu for more information If a functioning transducer is connected Normal operation will be selected automatically at power...

Страница 13: ...on size and composition of an object Sonar is very fast A sound wave can travel from the surface to a depth of 240 ft 70 m and back again in less than 1 4 of a second It is unlikely that your boat can...

Страница 14: ...alance between depth performance and resolution Low frequencies 83 kHz are typically used to achieve greater depth capability The power output is the amount of energy generated by the sonar transmitte...

Страница 15: ...equal to your depth In 20 feet of water the wider beam covers an area 20 feet wide DualBeam PLUS sonar returns can be blended together viewed separately or compared side by side DualBeam PLUS is idea...

Страница 16: ...quency gives you the option of two beams and both beams will cover the bottom and provide high definition The 20 degree center beam provides the highest definition while the 60 degree beam provides wi...

Страница 17: ...civilians may also take advantage of its highly accurate position capabilities typically within 4 5 meters depending on conditions This means that 95 of the time the GPS receiver will read a location...

Страница 18: ...ver Cursor Dialog Box Indicates cursor depth on the display and the depth of the bottom directly below the cursor The Latitude and Longitude of the cursor position the distance to travel to the cursor...

Страница 19: ...y at the same depth Cursor Available in Freeze Frame and can be positioned in the Sonar View to provide depthofasonarreturnandbottomdepthbelow the cursor Low Sonar Intensity Return High Sonar Intensit...

Страница 20: ...Time Sonar RTS Window appears on the right side of the display in the Sonar View only The RTS Window updates at the fastest rate possible for depth conditions and shows only the returns from the bott...

Страница 21: ...rsor Press any arrow on the 4 WAY Cursor Control key and the screen will freeze and a cursor will be displayed Use the 4 WAY Cursor Control key to move the cursor over a sonar return and the depth of...

Страница 22: ...ment or flat rock appears as a thinner line across the display A Soft Bottom such as mud or sand appears as a thicker line across the display Rocky Bottoms have a broken random appearance The sonar re...

Страница 23: ...returns in blue and strong returns in red WhiteLine highlights the strongest sonar returns in white resulting in a distinctive outline This has the benefit of clearly defining the bottom on the displ...

Страница 24: ...the following pages Navigation views Bird s Eye View Chart View Chart Sonar Combo View GPS Diagnostic View see Start Up Options Menu Sonar views Sonar View Sonar Zoom View 200 83 kHz Split Sonar View...

Страница 25: ...or not you are navigating The digital readouts on the Sonar View can be customized See Setup Menu Tab Select Readouts for more information 1 Press the MENU key twice to access the tabbed Main Menu the...

Страница 26: ...ill change based on the Select Readouts settings or the optional purchase accessories attached see Setup Menu Tab Select Readouts Freeze Frame Use the 4 WAY Cursor Control key to freeze the display an...

Страница 27: ...e depth changes the zoomed view updates automatically The Full Range View is displayed on the right side of the screen The Full Range View includes the Zoom Preview Box which shows where the zoomed vi...

Страница 28: ...nar View to make side by side comparisons between the sonar returns from both beams Depth is displayed in the upper left hand corner The Digital Readouts in the Split Sonar View cannot be customized t...

Страница 29: ...the Fishfinder NOTE The digital readouts in the Big Digits View cannot be customized The Triplog shows distance traveled average speed and time elapsed since the Triplog was last reset Big Digits Vie...

Страница 30: ...traditional flasher format When Ice Fishing Mode is on the Circular Flasher View displays the sonar data in traditional flasher format with additional features including Zoom and Depth Cursor Set the...

Страница 31: ...itional flasher format Flasher X Press Menu Press the MENU key once in the Circular Flasher View Use the X Press Menu to set the Sensitivity Upper Range and Lower Range Depth and temperature are alway...

Страница 32: ...ress the MENU key once in the Circular Flasher View Use the X Press Menu to set the Sensitivity Upper Range Lower Range and Color Palette Color Palettes The color preview bar in the center of the disp...

Страница 33: ...e see Sonar Menu Tab 2 Activate Press the DOWN Cursor key and the purple cursor line will appear on the display 3 Adjust the Cursor Press the UP or DOWN Cursor keys repeatedly until you reach the chos...

Страница 34: ...ppear on the display 3 Adjust the Zoom Range Press the RIGHT or LEFT Cursor keys repeatedly to adjust the zoom range and select the area you want to magnify The zoomed view is shown on the right side...

Страница 35: ...se the UP and DOWN Cursor keys to scroll through the saved Screen Snapshots and Recordings The active file is highlighted with arrows Press the RIGHT Cursor key to view the file Snapshot and Recording...

Страница 36: ...int will also be created at the boat or active cursor location The screen snapshot shares the same file name PNG Delete a Screen Snapshot 1 From the Snapshot and Recording View press the UP or DOWN Cu...

Страница 37: ...t the view is a saved screen snapshot and not a live view If you press the INFO key and the snapshot file connected to the icon is not saved on the installed SD card the chart information box will dis...

Страница 38: ...e boat location and the recording shares the same file name SON Stop recording 1 In any view press the MENU key once to open the Snapshot and Recording X Press Menu 2 Highlight Stop Recording and pres...

Страница 39: ...cording s Sensitivity Upper Range Lower Range and the Playback Speed See Snapshot and Recording X Press Menu for details Stop Playback 1 Press the MENU key once to open the Snapshot and Recording X Pr...

Страница 40: ...ording feature but any active navigation is cancelled and thumbnails and icons disappear when Playback begins or ends Playback is paused automatically at the end of the recording Freeze Frame Press th...

Страница 41: ...layed Name of recording Time and Date recording started Position where recording started Current Ping Rate Average Ping Rate Amount of time remaining to play Playback speed icons Amount of time remain...

Страница 42: ...to the sides or even behind the boat Press the RIGHT or LEFT Cursor keys to turn the eye point right or left Press the UP Cursor key to move the eye point forward and press the DOWN Cursor key to mov...

Страница 43: ...ts and the current route when navigating are overlaid on the chart Shift Pan Use the 4 WAY Cursor Control key to shift pan the chart to another area Zoom Press the ZOOM keys to zoom in and out Info Pr...

Страница 44: ...View with Active Cursor shown with Optional Purchase Navionics Cartography Cartography Active Cursor Latitude and Longitude Position of Cursor Depth Map Scale Distance to the Cursor and Bearing to Cur...

Страница 45: ...nd Sonar View on the right side of the screen To change the width of the Sonar Window press the MENU key once and select Sonar Window from the X Press Menu Combo View Sonar Window Speed of Boat Bearin...

Страница 46: ...at shape pointed in the direction of motion always up in the Course Up orientation Viewing Cartography In the Chart or Combo Views there are several cartography related functions that you can access u...

Страница 47: ...he 4 WAY Cursor Control key to select the Nearest Port the Nearest Tide Station or the Nearest Current Station and see information about any of these objects NOTE The built in UniMap does not contain...

Страница 48: ...ition of the station and the current changes for today Two graphs are also presented that show the time direction and flow speed of the current changes for the 24 hour time period of today s date You...

Страница 49: ...waypoints together by using the GOTO key A route represents your intended navigation and shows the shortest path from each waypoint to the next As you travel a route staying on the route line is the...

Страница 50: ...When the cursor snaps onto the icon the full size waypoint name and icon will be displayed You can also press the ZOOM key until you can see the individual waypoints on the screen See Navigation Menu...

Страница 51: ...Waypoints submenu Program a specific position as a waypoint To create a waypoint that is NOT your current position from the Waypoints submenu select Create and press the RIGHT Cursor key Use the 4 WAY...

Страница 52: ...field to field and the UP and DOWN Cursor keys to change values once you are in a field In the Waypoint Name Latitude and Longitude fields press the UP and DOWN Cursor keys to change the letter or nu...

Страница 53: ...us instructions you can add more waypoints to create a longer multi segment route Skip a waypoint From the Navigation X Press Menu select Skip Next Waypoint and press the RIGHT Cursor key If there is...

Страница 54: ...ts list Select a waypoint and press the RIGHT Cursor key The grid can also be rotated to any heading by adjusting the Grid Rotation setting on the Navigation Main Menu Remove Target or Trolling Grid P...

Страница 55: ...n Route list and press the RIGHT Cursor key to access the Waypoint In Route submenu From this submenu you can move the waypoint up or down in the route order or delete it from the list Delete a saved...

Страница 56: ...ar the current track From the Navigation X Press Menu select Clear Current Track and press the RIGHT Cursor key The track will be removed from the display and permanently deleted Edit Delete or Hide S...

Страница 57: ...You can also purchase SD cards with additional chart information for a particular location When you install the SD cards in your control head your 300 Series Fishfinder will retrieve that chart and d...

Страница 58: ...key The Confirm dialog box will appear To confirm export press the RIGHT Cursor key once more To cancel export press the LEFT Cursor key NOTE If an SD card is not installed an error message will be di...

Страница 59: ...at you see on the display Refer to the following illustration and see Key Functions for more information Screen MARK key 1 7 EXIT key 8 ZOOM key GOTO key 2 9 POWER LIGHT key 10 3 4 5 6 7 8 9 10 1 INFO...

Страница 60: ...utdown occurs properly and any menu settings will be saved your Fishfinder should always be turned off using the POWER LIGHT key Adjust the Backlight or the Display Background Color Press the POWER LI...

Страница 61: ...Press the MENU key twice in any view to access the Main Menu which is organized under tabbed headings to help you find a specific menu item quickly 4 WAY Cursor Control Key LEFT RIGHT UP or DOWN Curso...

Страница 62: ...y function works if you have the GPS receiver connected Active Cursor The waypoint will be marked at the cursor location Without Active Cursor The waypoint will be marked at the boat location If Scree...

Страница 63: ...highlight a waypoint Press the RIGHT Cursor key to begin navigation ZOOM Key The Zoom key has multiple functions depending on the situation In any of the Chart Views or the Sonar Zoom View press the Z...

Страница 64: ...Freeze Frame is active press the EXIT key to return to a scrolling display If the Cursor is active press the EXIT key to remove the cursor from the display SD Slot The multi media card SD slot on you...

Страница 65: ...Status X Press Menu The X Press Menu provides a shortcut to the most frequently used settings and the options on the X Press Menu correspond with the current view Main Menu The Main Menu is a standard...

Страница 66: ...wing pages Also see Power on the Unit for additional information Normal Use Normal for on the water operation with a transducer connected If a functioning transducer is connected Normal operation will...

Страница 67: ...ortant to select Simulator manually from the Start Up Options Menu as opposed to letting the Fishfinder enter Simulator automatically as it will if a transducer is not connected and you do nothing dur...

Страница 68: ...oard PCB serial number software revision total hours of operation and the input voltage Accessory Test lists the accessories connected to the system NOTE The speed accessory will be detected only if t...

Страница 69: ...so reports the current position local time and date and other numeric information The current GPS Fix Type is reported as No Fix 2D Fix 3D Fix or Enhanced An Enhanced fix has been augmented using info...

Страница 70: ...Cursor keys to change the menu setting NOTE The X Press Menu will collapse temporarily and the screen will update if it is affected by your menu setting change which allows you to see the effects of y...

Страница 71: ...ighlight a menu tab 3 Press the DOWN or UP Cursor keys to select a specific menu option under that tab 4 Press the RIGHT or LEFT Cursor keys again to change a menu setting A down arrow at the bottom o...

Страница 72: ...information If you press MENU or EXIT to leave the Main Menu and then return to the Main Menu at a later time the menu will open to the same tab as the last time the Main Menu was displayed Note for...

Страница 73: ...er Mode setting 1 Press the MENU key twice to access the Main Menu 2 Press the RIGHT Cursor key until the Setup tab is selected 3 Press the DOWN Cursor key to highlight User Mode on the Setup main men...

Страница 74: ...63 Sonar Tab Normal Mode Sonar Tab Advanced Mode Main Menu...

Страница 75: ...frequently used settings Press the MENU key once while in any of the Sonar Views to access the Sonar X Press Menu NOTE Menu options can be expanded or simplified by setting the Fishfinder User Mode t...

Страница 76: ...terest If the sensitivity is adjusted too high the display may become too cluttered Decrease the sensitivity to eliminate the clutter from the display that is sometimes present in murky or muddy water...

Страница 77: ...er right corner of the screen to indicate the unit is in Manual mode Adjust the Upper and Lower Range together to view a specific depth range especially when looking for fish or bottom structure NOTE...

Страница 78: ...e Chart Speed setting the RTS Window will update at the maximum rate possible for the depth conditions Bottom Range Sonar Zoom View only when Bottom Lock is On Settings 10 60 feet 2 10 fathoms or 3 20...

Страница 79: ...rdless of changes in depth This flattens out the bottom contour but is effective at showing fish on or near the bottom Cancel Navigation only when Navigating Settings Follow screen instructions to act...

Страница 80: ...r Flasher View to access the Flasher X Press Menu NOTE Menu options will vary depending on system settings such as whether you are currently navigating NOTE Menu options can be expanded or simplified...

Страница 81: ...ll sonar frequencies Upper Range Advanced Sonar Split Sonar Circular Flasher and Big Digits Views only Settings 0 to 990 ft or 0 to 327 m International Models only Default 0 Upper Range sets the shall...

Страница 82: ...Upper and Lower Range together to view a specific depth range especially when looking for fish or bottom structure NOTE A minimum distance of 10 feet will be maintained between the Upper and Lower Ra...

Страница 83: ...olor preview bar See Views Circular Flasher View for more information Choose from the following color palettes Palette 1 Green weak Yellow medium Red strong Palette 2 Yellow weak Green medium Red stro...

Страница 84: ...t to your most frequently used settings Press the MENU key once while in the Bird s Eye Chart or Combo View to access the Navigation X Press Menu NOTE Menu options will vary depending on system settin...

Страница 85: ...ows you to delete a waypoint from the saved waypoints list Target allows you to apply a target to a waypoint selected from the saved waypoints list Grid allows you to apply a trolling grid to a waypoi...

Страница 86: ...ext waypoint from the current route This menu option will only appear when you are currently navigating a route Cancel Navigation only when Navigating Settings Follow screen instructions to activate C...

Страница 87: ...ubmenu for the most recently created waypoint You must have pressed the MARK key at least once since you last powered up the Fishfinder for this menu option to appear NOTE See Introduction to Navigati...

Страница 88: ...ides access to the snapshot management and sonar recording functions Press the MENU key once while in the Snapshot and Recording View to access the Snapshot and Recording X Press Menu NOTE For more in...

Страница 89: ...he control head is actively recording Delete Image optional purchase SD Card Snapshot and Recording View only Settings Press the RIGHT Cursor key and follow screen instructions Delete Image allows you...

Страница 90: ...tional purchase SD card is installed and Snapshot and Recording View is on the screen Pings Per Second optional purchase SD Card Snapshot and Recording View only Settings 1 10 AUTO Default AUTO Pings...

Страница 91: ...d and Recording Playback is active NOTE You can also change playback speed in the Snapshot and Recording View using the LEFT and RIGHT Cursor keys although you cannot skip to the beginning or end of a...

Страница 92: ...ck of a sonar recording from any view This menu option is only available when an optional purchase SD card is installed and Recording Playback is active NOTE During playback the amount of time memory...

Страница 93: ...e Main Menu The Alarms tab will be the default selection NOTE When an alarm is triggered you can silence it by pressing any key The alarm will be silenced and will not be triggered again until a new i...

Страница 94: ...ll sound when a large sized fish is detected Low Battery Alarm Settings Off 8 5V 13 5V Default Off Low Battery Alarm sounds when the input battery voltage is equal to or less than the menu setting The...

Страница 95: ...3000 ft 10 to 1000 m International Models only Default 300 ft 100 m Off Course Alarm allows you to set how far the boat is allowed to move off course before the Off Course Alarm will sound during navi...

Страница 96: ...before the Arrival Alarm will sound Drift Alarm Settings Off 25 to 3000 ft 10 to 1000 m International Models only Default Off Drift Alarm allows you to set the size of a perimeter around the boat s a...

Страница 97: ...ss the Main Menu and then press the RIGHT Cursor key until the Sonar tab is selected NOTE Menu options can be expanded or simplified by setting the User Mode to Advanced or Normal See Main Menu User M...

Страница 98: ...ts View The RTS Window in the Sonar View and the Circular Flasher View will only show the returns from the 200 kHz narrow beam When set to 200 kHz only the returns from the 200 kHz narrow beam will be...

Страница 99: ...w sonar returns on the display When Max Mode is selected you will see the maximum sonar information available within the transducer beam so more fish arches and better jig tracking are shown Choose Cl...

Страница 100: ...nge Fish Symbols and targets detected in the 83 kHz wide beam as Blue Fish Symbols When Fish ID is turned off the Fishfinder shows only the raw sonar returns on the display These returns will often re...

Страница 101: ...Sensitivity is used in conjunction with Fish ID Fish ID must be on for Fish ID Sensitivity to affect the ability of the Fishfinder to identify sonar returns as fish Real Time Sonar RTS Window Settings...

Страница 102: ...ginal Palette Cyan weak to Red strong Palette 1 Navy Blue weak Purple medium Yellow strong Palette 2 Navy Blue weak Green medium Yellow strong Palette 3 Navy Blue weak to Red strong NOTE To change the...

Страница 103: ...for adjusting the sensitivity of the 83 kHz sonar returns in the 200 83kHz Split Sonar View The 83kHz sensitivity can be adjusted without affecting the sensitivity of the 200 kHz returns shown in the...

Страница 104: ...High settings may actually hinder your unit s ability to find the bottom Max Depth Advanced Settings AUTO 10 to 1000 ft 3 to 330 m International Models only Default AUTO Max Depth controls the maximu...

Страница 105: ...ent to account for this difference Ice Fishing Mode Settings Off On Default Off Ice Fishing Mode controls how information is displayed in the Circular Flasher View When Ice Fishing Mode is off the Cir...

Страница 106: ...the Navigation tab is selected NOTE Menu options will vary depending on system settings such as whether you are currently navigating NOTE Menu options can be expanded or simplified by setting the Use...

Страница 107: ...olid Line or Wide Line and if a line choose a color Saved Tracks Settings Edit Delete Default Saved Tracks allows you view the Saved Tracks submenu See Introduction to Navigation Edit Delete or Hide S...

Страница 108: ...to delete a waypoint from the saved waypoints list Cursor To allows you to move the cursor quickly to a waypoint from the saved waypoints list Go To allows you to select a waypoint and start navigati...

Страница 109: ...route from the saved routes list and use it as your current route Routes can be traveled in either the forward or reverse direction When you select a route navigation begins immediately Info provides...

Страница 110: ...n Add a Waypoint Target or Trolling Grid for information NOTE This feature may appear as either Trolling Grid Rotation or Grid Rotation depending on your model Trackpoint Interval Settings 1 second 5...

Страница 111: ...gs Various Default WGS 84 Map Datum allows you to change the map coordinate system used by the Fishfinder to match those of a paper map Course Projection Line Settings Hidden Visible Default Visible C...

Страница 112: ...ed with caution Delete All Nav Data allows you to delete all saved Tracks Waypoints and Routes Continuous Navigation Mode Settings Off On Default Off Continuous Navigation Mode allows you to continue...

Страница 113: ...vanced or Normal See Main Menu User Mode for details NOTE When a map from an optional purchase SD card is installed the Chart Menu Tab will change to display menu options that correspond with the acti...

Страница 114: ...have built in charts or a map card If you select Auto your unit will select a chart automatically Set Simulation Position Advanced Settings Press the RIGHT Cursor key and follow screen instructions t...

Страница 115: ...ction The Map Offset should be cleared if a different map is to be used NOTE The cursor must be active in order for this procedure to work If the cursor was not active before you began this procedure...

Страница 116: ...ryways and navigation routes in addition to the Basic information Underwater shows depth contours fishing areas underwater wrecks tides and currents in addition to the Basic and Navigation information...

Страница 117: ...nes are visible or hidden in the Chart Views Contour Lines are also affected by the Water Level Offset setting Depth Colors optional purchase LakeMaster charts only Settings Off 1 10 Default Off Depth...

Страница 118: ...10 m International Models only Default 0 Water Level Offset allows you to change the level of the water being read from the control head The displayed numbers on the Contour Lines will adjust from th...

Страница 119: ...he RIGHT or LEFT Cursor keys to select a sort option for the list Scroll Press the UP or DOWN Cursor keys to scroll through the list As each lake is highlighted you can view information about the lake...

Страница 120: ...109 Chart View with LakeMaster Shallow Water Highlight Water Level Offset Contour Lines Depth Highlight Chart Menu Tab...

Страница 121: ...he RIGHT Cursor key until the Setup tab is selected NOTE Menu options will vary depending on which accessories are attached to the unit NOTE Menu options can be expanded or simplified by setting the U...
Страница 122: ...Models Meters Kilometers Meters Nautical Miles Feet Statute Miles Feet Nautical Miles Default Meters Kilometers Units Distance selects the units of measure for all distance related readouts This menu...
Страница 123: ...et Settings Press the RIGHT Cursor key and follow screen instructions Triplog Reset resets the Triplog to zero and will appear in the menu if a Temp Speed Accessory is connected and the paddlewheel ha...
Страница 124: ...readouts from supported accessories such as GPS Receiver or Temp Speed Each data window can be empty or contain one of the following information categories Course Time Date Navigation Triplog Position...

Страница 125: ...to 10 0 degrees Default 0 Temp Offset will adjust the temperature readout by the amount entered Speed Calibration Advanced with Temp Speed only Settings 20 to 20 Default 0 Speed Calibration will adjus...

Страница 126: ...Format selects the format of the latitude and longitude position display Time Format Advanced International only Settings 12 hour 24 hour Default 12 hour Time Format changes the time format used by th...

Страница 127: ...e following NMEA sentences are output when NMEA Output is turned On DPT Depth MTW Water Temperature GLL Lat Lon Position GGA GPS Fix Data RMC Recommended Minimum Specific GNSS Data VTG Course Over Gro...

Страница 128: ...vates the screen snapshot function When Screen Snapshot is enabled pressing the MARK key creates a saved screen snapshot on the optional purchase SD card installed in your unit s card slot All active...

Страница 129: ...til the Views tab is selected This menu tab allows you to set the available views to hidden or visible in the view rotation The view will be removed from the view rotation if it is set to Hidden and w...

Страница 130: ...sion from the battery terminals or wiring or actually replacing the battery if necessary Fishfinder Defaults to Simulator with a Transducer Attached A connected and functioning transducer will cause t...

Страница 131: ...air and water flowing around the transducer cavitation may be interfering with the interpretation of sonar data See your Installation Guide for suggestions on adjusting the transducer position Electri...

Страница 132: ...To determine whether the boat s engine is the source of the noise increase the RPMs while the boat is in neutral and stationary to see if the noise increases proportionately if noise appears when you...

Страница 133: ...rovides real time speed and temperature readouts as well as a valuable Triplog function NOTE If an external Temperature Speed TS W or Temperature TG W accessory is connected AND a transducer with temp...

Страница 134: ...nt 10 20 VDC LCD Matrix 320 V x 240 H Transducer XNT 9 20 T Transducer Cable Length 20 ft 6 m Current Draw 425 mA IPX Rating IP67 Waterproof Submersible 1 m for 30 minutes and dust tight NOTE Humminbi...

Страница 135: ...the sonar beam Precision sonar beams such as the Humminbird 20 beam have a smaller dead zone than wider sonar beams Decibel The measurement for sound pressure level or intensity of the sonar return Se...

Страница 136: ...nt systems Either method is acceptable but it is important when comparing power outputs to make sure that the same measurement system is being used for both outputs because P T P numbers are 8 times h...

Страница 137: ...er is provided by a speed paddlewheel and is the measurement of the flow past the boat which may vary depending on current speed and direction Speed Through Water is most critical for anglers using do...

Страница 138: ...gy from the transmitter into sound energy and that forms the sonar beam in turn Internally the transducer consists of one or more piezo electric disks that expand by very minute amounts to create the...

Страница 139: ...nt direction the boat is traveling measured in degrees from North i e 321 where 000 is North 090 East 180 is South 270 is West When the Course Over Ground is equal to Bearing the boat is said to be On...

Страница 140: ...i e WGS84 It is important to select the correct Map Datum setting in your fishfinder when comparing GPS position to a paper chart to avoid slight position inaccuracies Almost all electronic charts us...

Страница 141: ...5 of the time With SA inactive the GPS is accurate to within 45 meters 95 of the time Currently SA is inactive and the consumer can enjoy the greater precision GPS provides however the DoD reserves th...

Страница 142: ...hrough correction signals broadcast from Federal Aviation Administration WAAS satellites stationed over the USA These secondary signals are automatically received by the standard Humminbird GPS Receiv...

Страница 143: ...g ways By Telephone Monday Friday 8 00 a m to 4 30 p m Central Standard Time 1 800 633 1468 By e mail typically we respond to your e mail within three business days service humminbird com For direct s...

Отзывы: