


17
INSTALLING THE MOUNT ON A WOOD FRAME ROOF
9. Detach the strut from the mounting plate and repeat step 4
through step 8 for the top center hole. Reattach the strut
when done.
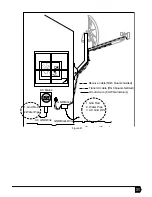
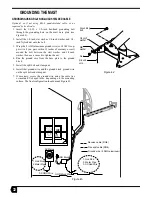
10. Slip the long 25-inch strut collar over the mast until it fits as
shown in Figure 19.
11. Secure the collar to the mast by using a 7/16-inch socket
wrench to tighten the Nylock nut installed on the bolt.
12. Position the strut so that its mounting plate center holes are
on center of the rafter or truss immediately to the left (or to
the right if you prefer). The 25-inch strut should be at
approximately a 90° angle to the 18-inch strut. At the same
time, minimize any angle formed between the 25-inch strut
and the centerline of the mast base plate (see Figure 19).
13. Repeat step 3 through step 9 for the two screws holding the
25-inch strut mounting plate.
14. Re-plumb the mast. If you had to loosen the adjustment nuts
to plumb the mast, snug them again to 18 ft.-lbs.
Note: The mast must be plumb before you can proceed. If you cannot
plumb the mast, repeat the steps above or find another installation
site.
Continue with section “Installing the AZ/EL Cap Onto the
Satellite Dish” on page 21.
Figure 19


