HuddleCamHD 3X Gen2 Скачать руководство пользователя страница 9


Page 

8

 of 

15


Ver 1.6 11/20


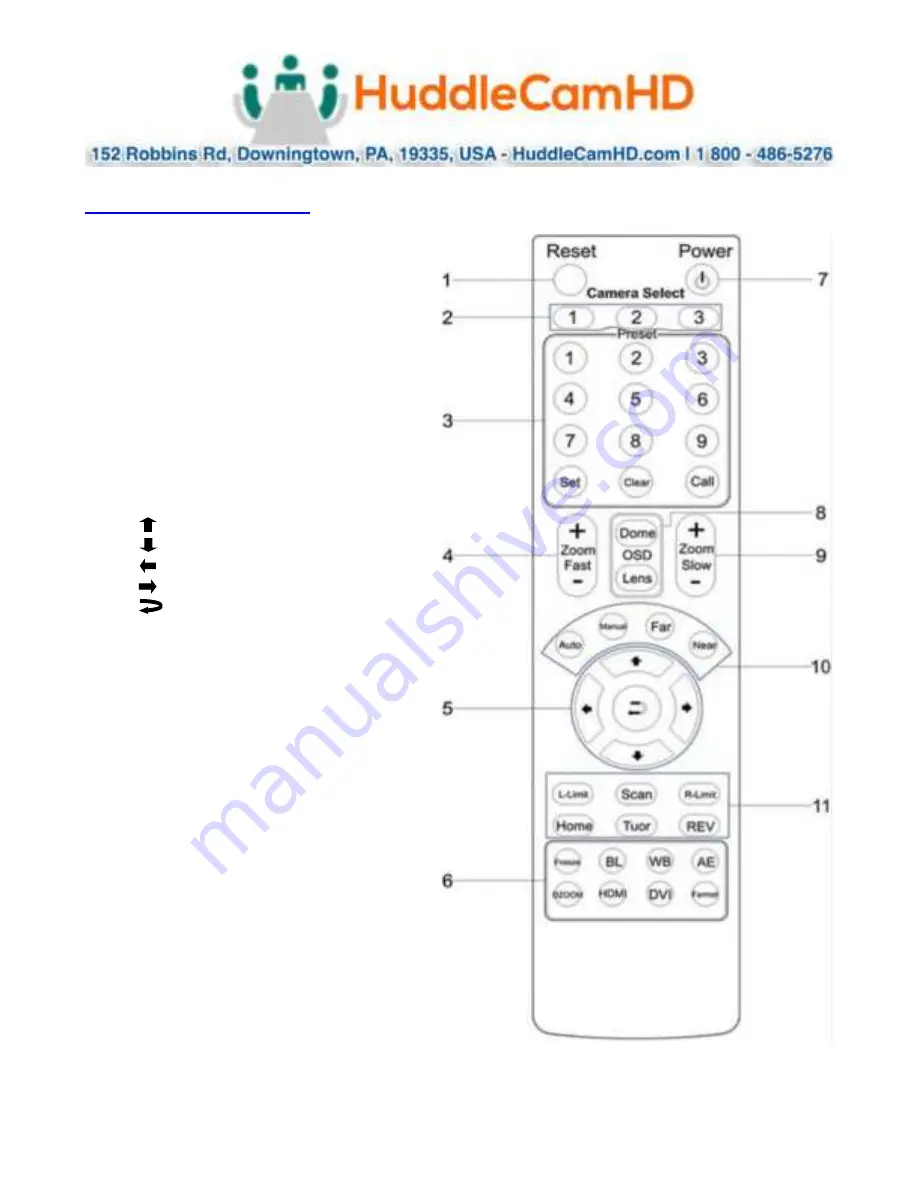
IR Remote Controller 

   (Note: Some buttons do not operate for all camera models)


1.


Reset:


Restarts the camera and restores it 


to Factory Default settings.


(

Note: 

Will delete all memory).


2.


Camera Selection


Select Camera ID: 1, 2 or 3


3.


Preset Positions


1-9: Preset Positions


Set: Setting Preset Position


Clear: Clear Preset Position


Call: Call Preset Position


Note

: To Set / Call preset position 1, you 


should press number key “1”, then press Set / 


Call to Set or Call the position.


4.


Fast Zoom in/out Control Zone


+: Zoom in quickly


-: Zoom out quickly


5.


Pan/Tilt Controller


Move Up


Move Down


Move Left


Move Right


Auto Pan


6.


Additional Function Zone


Freeze: Image Freeze


BL: Back-light Compensation


WB: White Balance


AE: Auto Exposure


D Zoom: Digital Zoom


HDMI: Swap to HDMI video output


DVI: Swap to DVI video output


Format: Swap between different formats


7.


Power Supply Switch


Power On / Off button


8.


OSD Menu Zone


Dome OSD: Enter Pan Tilt Zoom OSD menu


Lens OSD: Enter lens OSD menu


9.


Slow Zoom In/Out Zone


+: 

Zoom in slowly


 -: Zoom out slowly


10.


Focus Control Zone


Auto: Turn on auto focus


Manual: Turn on manual focus


Far: Set focus at farther distance


Near: Set focus at nearer distance


11.


Pan/Tilt Function Zone


L-Limit: Set left boundary limit scanning position


Scan: Enable Boundary Scanning (Auto Panning)


R-Limit: Set right boundary limit scanning position


Home: Go to camera’s Home position


Tour: Enable automatic patrol tour of presets


Rev: Enable image flip for ceiling mounting


Содержание 3X Gen2

Страница 1: ...Please check HUDDLECAMHD com for the most up to date version of this document Ver 1 6 11 20 HuddleCamHD 3x USB 2 0 PTZ CAMERA INSTALLATION OPERATION MANUAL...

Страница 2: ...ong electromagnetic sources Do not aim the camera at bright light sources e g bright lights the sun etc for extended periods of time Do not clean the camera with any active chemicals or corrosive dete...

Страница 3: ...ical Description 1 Front View 1 Lens 2 IR Receiver To receive IR remote controller signal 3 Power LED Blue LED lights when unit is powered LED is dark for Stand By status 4 IR Receiver To receive IR r...

Страница 4: ...3 0 port as USB 2 0 device 6 DC12V In Socket Only use the power adapter supplied with this camera 7 IR Receiver To receive IR remote controller signals 8 RS232 IN Port For hard wired remote control f...

Страница 5: ...Page 4 of 15 Ver 1 6 11 20 3 Bottom View 1 Tripod Wall Mount Ceiling Mount Will accept 1 4 20 bolt from 3rd party tripod wall or ceiling mount...

Страница 6: ...Page 5 of 15 Ver 1 6 11 20 Cable Connection Info VISCA RS 232C IN Reference VISCA RS 485 In Reference VISCA RS 485 IN...

Страница 7: ...s visible on the screen The Dome OSD Menu is as follows Protocol o Dome Address Default 1 1 7 o Dome Protocol Default VISCA VISCA PELCO D o Baud Rate Default 9600 2400 4800 9600 38400 Pan Tilt o IR Ad...

Страница 8: ...0 1 300 1 350 1 425 1 500 1 600 1 725 1 1000 1 1250 1 1500 1 1750 1 2000 1 2500 1 3000 1 3500 1 4000 1 6000 1 10000 o ANTI Flicker Default 60 50 60 Color o Hue Default 50 1 100 o Saturation Default 50...

Страница 9: ...l Function Zone Freeze Image Freeze BL Back light Compensation WB White Balance AE Auto Exposure D Zoom Digital Zoom HDMI Swap to HDMI video output DVI Swap to DVI video output Format Swap between dif...

Страница 10: ...ice NOTE Failure to follow this sequence may result in no connection to PC Care Of The Unit Remove dust or dirt on the surface of the lens with a blower commercially available Installation Instruction...

Страница 11: ...elow specifications Note Tripod must stand on a level surface Wall Mount Installation The camera includes a wall mount allowing you to mount the camera to a wall Follow the figures below to mount your...

Страница 12: ...Gbps bandwidth required for uncompressed HD video so check bandwidth specs Always connect the HuddleCamHD camera directly to the device in order to associate the UVC drivers before attempting to use a...

Страница 13: ...t recognized the HuddleCamHD camera as an imaging device in which case you may see a new unknown device Westbridge or CYTFX3 labeled device show up in Device Manager s Universal Serial Bus Controllers...

Страница 14: ...onnected device in System Information on a MAC See screenshot below In this example you can see the HuddleCamHD camera in use connected as a fully functional USB 3 0 device HuddleCamHD as well as a US...

Страница 15: ...played on the screen Retry after exiting the menu Pan tilt or zoom range limit was reached Try to pan tilt zoom in the other direction Remote control not working The camera select button on the remote...

Страница 16: ...nterface Mini DIN 8 RS232 IN RS485 IN Pelco D IN Control Signal Config Dome On Screen Display Menu Baud Rate 2400 4800 9600 38400 bps Power Supply Interface DC 12V 2A Electrical Index Power Supply Ada...

Отзывы: