Huck ALCOA 212 Скачать руководство пользователя страница 19

212

Series Tooling                                                                                  Alcoa Fastening Systems

17

D

ISASSEMBLY

See applicable illustrations.

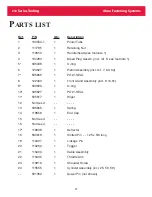
For parts identification, refer to applicable fig-
ures, tables and parts lists. Numbers in paren-
theses ( ) are reference numbers shown in man-
ual.

The following procedure is for complete disas-
sembly of tool. Disassemble 

ONLY

those compo-

nents necessary to replace damaged or worn O-
rings, QUAD rings, back-up rings and other com-
ponents.

1. Disconnect tool from air source.

2. Unscrew Retaining Nut (2) and remove Nose 

Assembly. Remove Pintail Tube (1).

3.  Unscrew Bleed Plug (4) including O-ring (5) 

from top of Handle/Head (3). Turn tool over 
and allow fluid to drain into container - - tool 
may be cycled to clear tool more completely.
Discard fluid.

4. Pull Deflector (17) off End Cap (14).

5. Using wrench, unscrew End Cap (14). Slide 

out Spring (13)

6.

CAUTION - - to prevent damage to Piston 
Seals and Gland Seals when removing 
them - - install 

OPTIONAL

POLY-SEAL

Insertion Tool (121694-212).

Thread POLY-SEAL Insertion Tool, 121694-
212, into head/handle.

7. Slide Spacer, 123112-2, over piston rod.

8. Thread Piston Assembly Tool, 123111-2, onto

piston.

9. Push complete piston from front using brass

drift - -allow clearance for 
piston as it exits tool.

10.Remove Piston Assembly Tool, Spacer, and

POLY-SEAL Insertion Tool.

11.Inspect Piston (6) for wear, scoring or dam-

age. Replace when necessary. Remove 
Retaining Ring (64) and Washer (63). Hold 
tool securely with bottom up.

12. Remove three Button Head Screws (51) with 

1/8 hex key. Remove Muffler End Cap (50) 
and Bottom Exhaust Gasket (48). Remove
Muffler (47) with O-ring (46) from end cap.

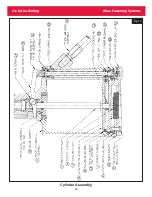
13. Remove Retaining Ring (45) from Cylinder 

(24).

14. Screw Button Head Screws (51) back into 

Cylinder Head (43). Carefully pull on 
screws to remove Cylinder Head (43).

!

!

WARNING
Be sure air hose is disconnected before
cleaning or when replacing worn or
damaged tool components. Tool may
be actuated if not disconnected and
cylinder is under pressure. Severe
personal injury may result.

WARNING

Never cycle tool without bleed plug
installed and tightened, the bottle
installed and tightened in tool head, or
the fillport held over a suitable con-
tainer. 

If fluid is present it will spray

out of tool. Severe eye injury may
result.

Air pressure MUST be set at 20

- 40 psi.

Содержание ALCOA 212

Страница 1: ...11 09 2009 HK838 INSTRUCTION MANUAL 212 PNEUDRAULIC INSTALLATION TOOL...

Страница 2: ......

Страница 3: ...ium strength blue threadlocker is designed for locking and sealing threaded components It can be applied smoothly and will now be the HUCK recommended standard for these applications For best results...

Страница 4: ...This page is intentionally blank...

Страница 5: ...ble refer to ANSI Z87 1 1989 6 Disconnect primary power source before doing maintenance on Huck equipment 7 If any equipment shows signs of damage wear or leakage do not connect it to the primary powe...

Страница 6: ...ons 9 Maintenance 10 11 Good Service Practices 10 Preventive Maintenance 11 Tool Maintenance 11 Standard tools 11 Nose Assembly Maintenance 11 Filling and Bleeding Procedure 12 14 How To Measure Strok...

Страница 7: ...sembly is required for each fastener type and size Nose assemblies must be ordered separately Weight 8 50 pounds 3 0 kg Length of Head 1 9 00 inches 228 mm Width of Head 1 1 44 inches 37 mm Edge to Ce...

Страница 8: ...212 Series Tooling Alcoa Fastening Systems 6 Fig 1 Outline Drawing...

Страница 9: ...uffler at bottom of tool Air piston rod is a hydraulic piston pressurized fluid is forced into head moving pull piston rearward When fastener installation is completed trigger is released Air pressure...

Страница 10: ...rom tool 7 Remove retaining nut 8 Use pintail tube s as specified on NOSE ASSEMBLY DATA SHEET and or FIGURE 2 9 Select nose assembly from SELECTION CHART for fastener to be installed or see Huck repre...

Страница 11: ...st be held against work and at right angles to it Depress trigger hold trigger depressed until fastener is installed and pintail breaks Release trigger Tool will go into its return stroke Tool nose ar...

Страница 12: ...ue force DISASSEMBLY and ASSEMBLY proce dures outlined in this manual should be followed Rub SLIC TITE TEFLON thread compound or equivalent on pipe plug threads and quick con nect fitting CAUTION Do n...

Страница 13: ...ce as necessary CAUTION Always replace seals and back up rings when tool is disassembled for any rea son Nose Assembly Maintenance To extend jaw life Disassemble nose assembly periodically clean and i...

Страница 14: ...ill Empty Tool new or rebuilt as Applicable 1 Attach the tool air source momentarily to seat air piston at bottom of cylinder disconnect tool With fillport facing up lay tool on its side 2 With a scre...

Страница 15: ...nction and installation in a single stroke or cycle tool with stall nut fully threaded onto piston to load up tool Measure stroke again Remove plug and top off fluid Reinstall plug and cycle again mea...

Страница 16: ...tool on its side Remove fill bottle Top off fluid in fillport Install bleed plug and tighten with screwdriver 10 Connect airline to tool There is a choice of two procedures for measuring the stroke wi...

Страница 17: ...move forward with piston See FIGURE 4 and measure X dimension This is the tools stroke 5 If stroke is less than 812 refer to appropri ate previous section Follow filling and top ping off instructions...

Страница 18: ...indicated by asterisks in PARTS LIST 1 Tool fails to operate when trigger is depressed a Throttle valve O ring 53 or O ring 54 worn or damaged b Broken throttle cable 2 Tool does not complete fastene...

Страница 19: ...de Spacer 123112 2 over piston rod 8 Thread Piston Assembly Tool 123111 2 onto piston 9 Push complete piston from front using brass drift allow clearance for piston as it exits tool 10 Remove Piston A...

Страница 20: ...d over and drain hydraulic fluid into container Discard fluid Note Do not attempt to remove Oil Damper Valve 56 57 no service is required on these parts 18 Remove Throttle Arm 22 Detach ball end of Ca...

Страница 21: ...5 Assemble Gland Assembly see FIGURE 12 Note Cup of POLY SEAL 32 must face toward top of tool when installed in Gland 29 Use new replacement POLY SEAL 32 Spacer and SPIRO LOX Retaining Ring 34 6 CAUT...

Страница 22: ...Insertion Tool Thread POLY SEAL Insertion Tool 121694 212 into head handle 19 Thread Piston Assembly Tool 123111 2 onto partially assembled piston 20 Push gland assembly onto piston rod 21 Push wiper...

Страница 23: ...212 Series Tooling Alcoa Fastening Systems 21 Fig 5 Handle Assembly...

Страница 24: ...212 Series Tooling Alcoa Fastening Systems 22 Fig 6 Piston Assembly Fig 9 Front Gland Assembly Caution Assemble seals as shown Caution Assemble seals as shown...

Страница 25: ...212 Series Tooling Alcoa Fastening Systems 23 Fig 10 Piston and Gland Removal...

Страница 26: ...212 Series Tooling Alcoa Fastening Systems 24 Fig 11 Piston and Gland Insertion assembly...

Страница 27: ...212 Series Tooling Alcoa Fastening Systems 25 Fig 12 Gland Assembly...

Страница 28: ...212 Series Tooling Alcoa Fastening Systems 26 Fig 13 Cylinder Assembly...

Страница 29: ...64 7 505865 1 POLY SEAL 8 122430 1 Front Gland Assembly incI 9 10 61 9 503806 1 O ring 10 505827 1 POLY SEAL 11 505817 1 Wiper 12 Not Used 13 505946 1 Spring 14 119658 1 End Cap 15 Not Used 16 Not Us...

Страница 30: ...6 1 POLY SEAL 33 123906 1 Spacer 34 506565 1 Retaining Ring 35 Not Used 36 501090 1 Back up Ring 37 500784 1 O ring 38 116408 1 Bumper 39 116636 1 Piston Assembly incI 40 40 501460 1 QUAD Ring 41 1118...

Страница 31: ...60 115436 1 Air Hose 61 121377 1 Damper Tube 62 122432 1 Gland Cap 63 506654 1 Washer 64 506653 1 Retaining Ring 1 For replacement of machined handle head only Handle head 119653 and Bleed Plug Assemb...

Страница 32: ...are W S Shamban Co series S 11248 single turn TEFLON MS 28774 or equivalent The dash numbers correspond to the O ring AS 568 dash numbers 6 Material for O rings and QUAD rings a Ref nos 15 30 31 40 37...

Страница 33: ...oducts described above and Huck shall inspect products for which such claim is made Tooling Part s and Other Items not manufactured by Huck HUCK MAKES NO WARRANTY WITH RESPECT TO THE TOOLING PART S OR...

Страница 34: ...0 Us Par Vigny France 33 1 30 27 9500 FAX 33 1 34 66 0600 For the Long Haul A Global Organization Alcoa Fastening Systems AFS maintains company offices throughout the United States and Canada with sub...

Отзывы: