3
3
Installing the Mounting Bracket
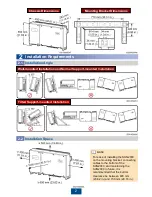
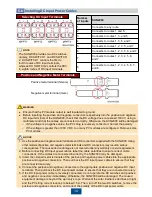
2. Install expansion bolts.
The SUN2000 mounting bracket has four groups
of tapped holes, each group containing four
tapped holes. Mark any hole in each group based
on site requirements and mark four holes in total.
Two round holes are preferred.
The SUN2000 is delivered with M12x60
expansion bolts and M12x40 bolt assemblies. If
the bolt assembly length does not meet the
installation requirements, prepare M12 bolt
assemblies by yourself and use them together
with the delivered M12 nuts.
Before installing the mounting bracket, remove
the security torx wrench from the mounting
bracket and set it aside.
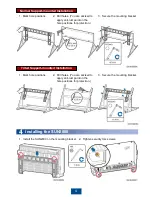
3. Secure the mounting bracket.
Wall-mounted Installation
1. Mark hole positions.
To prevent dust inhalation or contact with eyes, wear safety goggles and an anti-dust mask
when drilling holes.
Wipe away any dust in or around the holes and measure the hole distance. If the holes are
inaccurately positioned, drill holes again.
Level the head of the expansion sleeve with the concrete wall after removing the bolt, spring
washer, and flat washer. Otherwise, the mounting bracket will not be securely installed on
the concrete wall.
Avoid drilling holes in the water pipes and power cables buried in the wall.
NOTE
NOTICE
DANGER


