background image

2

The S600-E series switches use forced or natural heat dissipation mode. If multiple switches are installed in a 
cabinet/rack, leave at least 1 U distance between each two switches (1 U = 44.45 mm). This distance is 
recommended for switches using forced heat dissipation, and is required for switches using natural heat 
dissipation. 

Grounding the switch helps protect it from lightning, electromagnetic interference, and electrostatic discharge, 

and is the prerequisite for a PoE switch to provide power for a PD.

M4

1

2

Port side faces down

Expansion bolt

4 Installing the Chassis

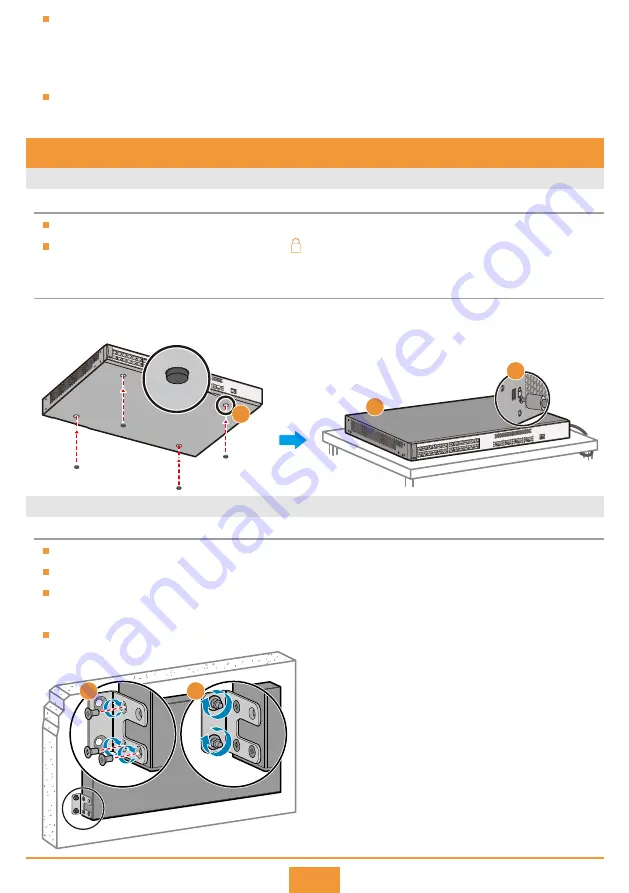
Scenario 1: Desk Mounting

Scenario 2: Wall Mounting

Do not stack fanless switches on top of or closely next to each other.

S600-E series switches provide a security slot (      ) near the panel on a side of the chassis. You can install a 

security lock (separately purchased) in this slot to protect the switch against theft.

Before You Start

Installation Procedure

Attach four rubber pads to the bottom.

Place the chassis on a desk.

Use M4 screws to fix the mounting brackets on 

both sides close to the port side.

Use a hammer drill with 

φ

8 drill bit to drill holes 

on the wall, and fix the switch on the wall with 

expansion bolts. 

Connect the ground cable to the ground point.

Step 1

Step 2

Step 1

Step 2

Step 3

(Optional) Install a security lock.

Connect the ground cable to the ground point.

Step 3

Step 4

1

3

2

Before drilling holes in a wall, make sure there are no power cables in the wall to avoid electric shock.

The port-side panel must face down to protect the ports from water damage.

Ensure that there are no flammable or explosive materials near the switch and no obstructions within 100 mm 

around the switch. 

The expansion bolts need to be purchased separately.

Before You Start

Содержание S652-E

Страница 1: ...de S600 E Education Network Series Switches Issue 03 2018 07 30 Part Number 31507973 Questo manuale d istruzione è fornito da trovaprezzi it Scopri tutte le offerte per Huawei S652 E L3 o cerca il tuo prodotto tra le migliori offerte di Switch ...

Страница 2: ...properly and use them to protect idle optical ports NOTE NOTE The installation cable connection and login methods for S600 E series switches are similar This document uses S628 E as an example Figures in the document are for reference only and may be different from actual devices 2 Safety Guidelines To ensure personal and equipment safety observe all the safety precautions on the equipment and in ...

Страница 3: ...the chassis You can install a security lock separately purchased in this slot to protect the switch against theft Before You Start Installation Procedure Attach four rubber pads to the bottom Place the chassis on a desk Use M4 screws to fix the mounting brackets on both sides close to the port side Use a hammer drill with φ8 drill bit to drill holes on the wall and fix the switch on the wall with ...

Страница 4: ...f chassis and the M6 lug with a larger hole to the ground point on the cabinet rack Step 2 Step 3 Step 4 Step 5 Before You Start An S600 E series chassis is 1 U high and its width is standard It can be installed in a standard 19 inch cabinet rack The cabinet rack must have reliable ground points to ground the switch A separately purchased non standard cabinet rack must have sufficient space for ch...

Страница 5: ...to the chassis M6 lug to the protection ground External power source 4 5 6 M4 lug the end with a smaller hole M6 lug the end with a larger hole Use an AC power cable complying to the local standards The AC terminal locking latch is not delivered with the switch Jack reserved for AC terminal locking latch Power cables and network cables laid indoors or buried underground and cannot be routed aerial...

Страница 6: ...and the admin user level is set to 15 automatically Configure an IP address for the computer which is in the same network segment as the default IP address of the switch Start the web browser on the computer enter https 192 168 1 253 in the address box and press Enter to display the initial login page Enter the default user name admin and default password admin huawei com and select the language o...

Страница 7: ...t IP address is not in the same network segment as 192 168 1 253 24 you cannot log in to the switch again using the web management system You need to configure another IP address for your computer to make the computer and switch reachable from each other The Quick Config function has been added to the web EasyOperation edition since V200R010 You can quickly finish the configurations of VLAN isolat...

Страница 8: ...duct model and version to find its documentation Log in to Huawei enterprise support community http support huawei com ecommunity and post your questions in the community 7 Obtaining Product Documentation and Technical Support Huawei Enterprise Technical Support 7 Copyright Huawei Technologies Co Ltd 2019 All rights reserved No part of this document may be reproduced or transmitted in any form or ...

Отзывы: