6
2 Installing Chassis
Install the Chassis with RRUs
b
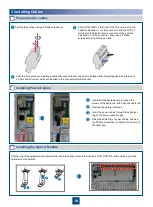
Install the main bracket, and install the OSN 810 on the main bracket. Then use an inner hexagon torque screwdriver to
tighten the captive screw into the connection holes on the top of the conversion bracket and main bracket for the OSN 810,
with a torque of 5 N·m (44.25 lbf·in.).
Install the metal sheet for fixing the RRUs and
OSN 810.
(1) Screw
(2) Metal sheet
Insert the removed screw into the hole on the top of
the neighboring RRU and use an M6 torque
screwdriver to tighten the screw to 5 N·m .
Use an M6 Phillips screwdriver to loosen the
screw on the metal sheet farther from the
handle of the OSN 810 and remove the screw.
Use an M6 Phillips screwdriver to loosen the screw
on the metal sheet closer to handle of the OSN 810.
Then rotate the metal sheet to align the vacant hole
in the metal sheet with a hole on the top of the
neighboring RRU.
NOTE
The OptiX OSN 810 can be installed on the right or left side of an RRU. Ensure that the front side of the OptiX OSN
810 faces outwards and the cabling cavity can be opened.
Cabling cavity
Main bracket


