


11
Installing the OSN 810 on an IFS06
f
2 Installing Chassis
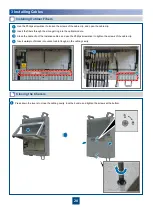
Disassemble the OSN 810 mounting brackets.
(1) Main bracket (2) Square-neck bolt (3) Pole installation bracket (4) Auxiliary bracket
(5) Flat washer (6) Spring washer (7) Nut (8) Plastic cap
Use an M6 inner hexagon torque screwdriver to remove the four inner hexagon screws on
the pole installation bracket, and remove the main bracket from the pole installation bracket.
Use an M10 torque wrench to loosen the nuts on the two square-neck bolts, and remove
the plastic cap, nuts, spring washers, flat washers, square-neck bolts, and pole installation
bracket from the auxiliary bracket.
Use the M10x50 bolts delivered with the IFS06 to secure the pole installation bracket to the IFS06, and then use an M10
torque socket wrench to secure the bolts to 30 N·m (265.52 lbf·in.).
Ensure that the arrows on the pole installation bracket are pointing up.
An Indoor Floor Installation Support (IFS06) is used for installing indoor RRUs. It is an accessory of RRUs.
If the OSN 810 is applied indoors and works with RRUs, you can install the OSN 810 on an IFS06 rack.
NOTE


