background image

12

6

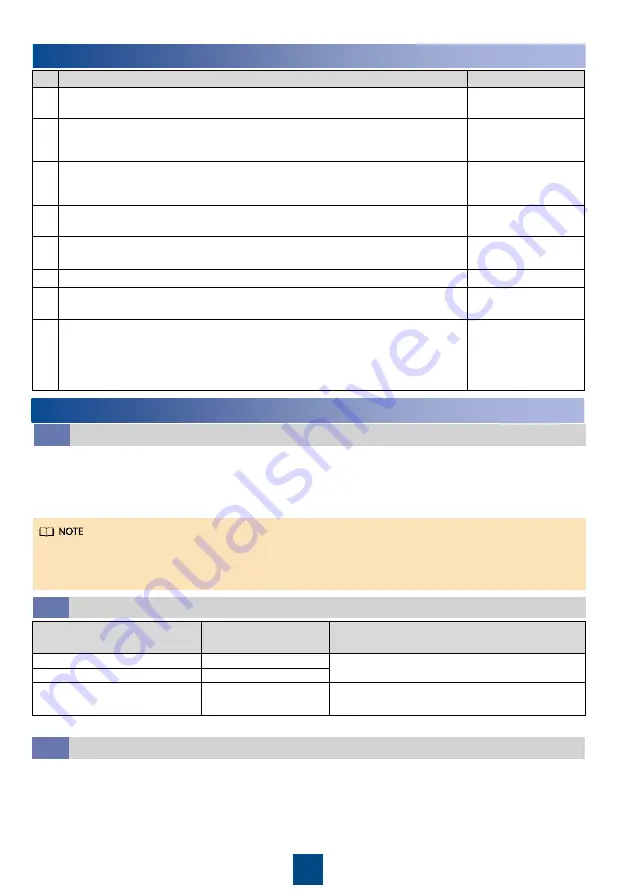
Verifying the Installation

No. Check Item

Check Result

1

All water pipes are properly and securely installed, and free from leakage, 

blockage, and sharp turns.

Passed 

Failed

2

The liquid level detector is level. The water pan is free from foreign 

matter such as cable remains and thermal insulation foam. Cables are 

securely bound and not in the water pan.

Passed 

Failed

3

The distance between two chilled water pipes outside the cabinet is 

sufficient (recommended distance: longer than 25 mm), the hose is 

tightly wrapped with insulation foam, and joints are secured using glue.

Passed 

Failed

4

The pipeline system has passed the pressure preservation and air 

tightness tests.

Passed 

Failed

5

The needle valve plugs are secured (torque of 0.45

±

0.05 N•m), and 

screw caps are tightened.

Passed 

Failed

6

The cabinet is reliably grounded.

Passed 

Failed

7

The power cables and signal cables are correctly connected and properly 

separated. Strong-current and weak-current cables are separately bound. 

Passed 

Failed

8

The chilled water valve and its actuator are securely installed. The chilled 

water connector joints have been wrapped with thermal insulation foam, 

and no metal or hose is exposed. Cables are securely connected to the 

chilled water valve actuator. The actuator manual button is reset (ejected 

state).

Passed 

Failed

7

System Power-On

1. Turn on the smart cooling product switch in the power distribution cabinet and the AC1 and AC2 

switches on the smart cooling product. 

2. After the device is powered on for the first time, the LCD displays the 

Quick Settings 

screen. Log 

in as the admin user, and set parameters as instructed, such as language, date format, date, time, 

and time zone. If the device is not powered on for the first time, the home screen is displayed.

Users are classified into 

admin

and 

operator

. The preset password is 

000001

for both types of 

users. 

After powering on, the smart cooling product is in shutdown mode.

Power-On

7.1

If a T/H sensor outside the cabinet is installed, enable it. Path: 

Settings

System Settings

Common Settings

or 

Settings

System Settings

T/H Sensor

(Optional) Enabling the T/H Sensor Outside the Cabinet

7.3

(Optional) Setting the T/H Control Type

7.2

Application Scenario

Recommended T/H 

Control Type

Remarks 

Cold aisle containment 

Cold aisle control 

If cold aisle T/H sensors are not configured, 

you can also choose the supply air control. 

Hot aisle containment 

Cold aisle control 

Non-aisle containment 

Return air control 

If cold aisle T/H sensors are configured, 

you can also choose the cold aisle control. 

Path: 

Settings

System Settings

Common Settings

or 

Settings

System Settings

T/H Sensor.

Содержание NetCol5000-C065

Страница 1: ...e 13 Heat exchanger 2 Preparing Materials Materials Configured with the Equipment Fuse combined hexagon head bolts M12x90 OT ground terminal of the power cable to the indoor unit and single cord end terminal of the power cable to the indoor unit cable tie Engineering Procurement Humidifier water inlet pipe Rigid pipe G 3 4 inch rigid pipe connector with internal threads plastic materials such as P...

Страница 2: ... pipe hole Φ103 mm 5 Chilled water outlet pipe hole Φ103 mm 6 Power cable hole Φ43 mm 7 Signal cable hole Φ43 mm Top view of the bottom plate Top view of the top plate Unit mm Front Rear 3 Installing the Equipment 1 Read the NetCol5000 C 030 032 065 In row Chilled Water Smart Cooling Product User Manual 2019 or instructions before installing the NetCol5000 C 2 You are recommended to use tools that...

Страница 3: ...as been injected with 0 2 0 6 MPa of nitrogen before delivery If no nitrogen is discharged contact Huawei technical support 2 You can open or close the exhaust valve using a flat head screwdriver Removing the Pallet 3 3 The connectors are secured to the equipment with M6 screws and secured to the pallet with M12 screws Leveling the Cabinet 3 4 Level ...

Страница 4: ...fier water inlet pipe 2 Keep a clearance of at least 25 mm between pipes Secure the pipes to supports every a certain distance 3 Clean the water inlet engineering pipes to avoid impurities entering into the humidifier 4 A reducing valve must be installed if the inlet water pressure exceeds 0 7 MPa 5 Pipes should be wrapped with thermal insulation foam along the route Pipe Layout 4 1 ...

Страница 5: ...inch adapter with inner screw threadNote1 Matched with the adapter the pressure resistance should be at least 0 7 MPa Note 1 1 When plastic materials such as PA66 are used the recommended torque is 5 N m 2 When metal materials are used the recommended torque is 10 N m A sealing washer must be used when an union is used Secure the drainpipe properly ...

Страница 6: ... G 1 1 2 inch port with inner threads reserved device port 2 Direct connection of external teeth 3 Sealing ring 4 Nut 5 Aluminum plastic pipe with an inner diameter of 41 mm 1 G 1 1 2 inch port with inner threads reserved device port 2 Seamless steel pipe with a G 1 1 2 inch external threaded connector ...

Страница 7: ...24 hours Injecting Water to Expel Nitrogen 4 7 Clean the main pipe beforehand to avoid blockage of the heat exchanger due to foreign construction matter Close the isolation valve on the water inlet and outlet pipes before the cleaning 1 Open the general water supply valve 2 Press the button on the side of the actuator and manually rotate the valve handle to the maximum in the specified direction C...

Страница 8: ...oute the power cable along the rear door post and use cable ties to secure the cable to the post every 150 200 mm 1 Connect the equipotential cable 2 Connect the power cable Optional Connecting the Water Sensor 5 2 1 Connect the temperature and humidity T H sensor cable T H sensors in the aisle should be installed at the door frame inside the server cabinet and 1 5 m above the ground 33 U After th...

Страница 9: ... humid 25 ON OFF OFF ON ON OFF Optional Connecting the Teamwork Network Cable 5 4 Main control board ports The smart cooling product supports both FE teamwork networking and CAN teamwork networking hand in hand 1 T H_1 T H RS485 communications port used for connecting to the external temperature and humidity sensor 2 T H_2 T H RS485 communications port used for connecting to the external temperatu...

Страница 10: ...rk CAN resistor for the first and last smart cooling products to Yes on the screen Connect one end of the FE network cable to the FE port on the main control module connect the other end to the POE port on the smart ETH gateway CAN teamwork networking cable 1 Prepare the 8 pin standard network cable the cable pin sequence requirements are shown below 2 Connect the CAN_OUT port of each smart coolin...

Страница 11: ... the FE teamwork network cable RS485 Monitoring Network Cable Modbus RTU Protocol 1 Make the COM network cable by referring to the following figure If there is no teamwork control connect the COM_IN port on each smart cooling product to the customer s monitoring system 2 Group smart cooling products for monitoring based on performance requirements and connect the monitoring network cables In CAN n...

Страница 12: ...ted to the chilled water valve actuator The actuator manual button is reset ejected state Passed Failed 7 System Power On 1 Turn on the smart cooling product switch in the power distribution cabinet and the AC1 and AC2 switches on the smart cooling product 2 After the device is powered on for the first time the LCD displays the Quick Settings screen Log in as the admin user and set parameters as i...

Страница 13: ...en Requirement control is set to Anti competitive running the master smart cooling product synchronizes operating data parameters such as the T H control type temp set point humid set point for the master smart cooling product to the slave smart cooling product and all the precision smart cooling products in the group refer to the mode delivered by the master smart cooling product When Requirement...

Страница 14: ...er of running air conditioners in this group 6 2 standby Rotation function Enable Requirement control Enable The table uses 8 smart cooling products in MAC_CAN teamwork as an example No 1 2 3 7 8 Item Teamwork group no 1 1 1 1 1 Air conditioner address 1 2 3 7 8 Teamwork function Enable Enable Enable Enable Enable Networking mode MAC_CA N MAC_CA N MAC_CA N MAC_CA N MAC_CA N MAC_CA N Number of air ...

Страница 15: ...gs Comm Settings WIFI Settings on the home screen and set WiFi password Start Insert the WiFi module to the USB port on the main control board Tap Login after the parameters are set Tap OK Then the device starts Connect WiFi by your mobile phone Offline Boot Offline Boot or Online Boot can be selected for the first startup Online Boot Open the Service Expert app Tap Startup Offline Activation on a...

Страница 16: ...d to stop the smart cooling product contact Huawei technical support engineers to evaluate risks After the risk is accepted choose Settings System Settings System Control and set the Water overflow alarm action to Inactivity or Only indoor fan running or Humidification stopped If the in cabinet water overflow alarm is generated the humidifier will stop by default If you do not need to stop the hum...

Отзывы: