background image

4. 


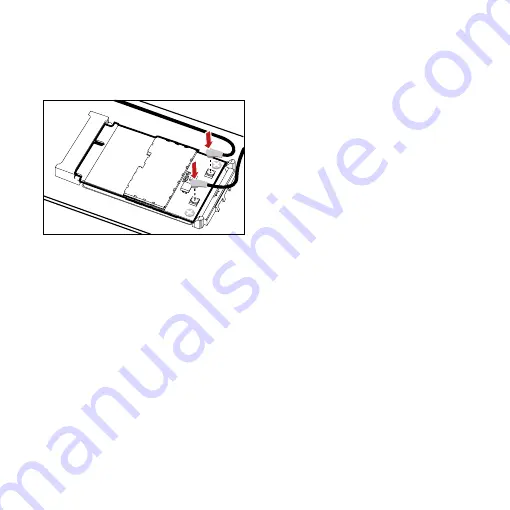
Insert the connector of the main antenna into the MAIN antenna interface (M

of the EM660 according to the indication on the label of the EM660. Insert the 

connector of the auxiliary antenna into the AUX antenna interface (A) of the 

EM660 in the same way. 


Note: 

„


Insert the antenna connectors vertically into the antenna interfaces of the 
EM660. 

„


Do not pinch the antenna cable or damage the connectors. Otherwise, the 
wireless performance of the EM660 may be reduced or the EM660 cannot 
work normally. 

„


Ensure that the antenna cables are routed through the channel in the frame of 
the PC and do not lay across the raised edges of the frame. 


13 

Содержание EM660

Страница 1: ...actions are approved by respective copyright holders under licenses Trademarks and Permissions and are trademarks or registered trademarks of Huawei Technologies Co Ltd Other trademarks product service and company names mentioned are the property of their respective owners Notice Some features of the product and its accessories described herein rely on the software installed capacities and setting...

Страница 2: ...NUAL TO THE MAXIMUM EXTENT PERMITTED BY APPLICABLE LAW IN NO CASE SHALL HUAWEI TECHNOLOGIES CO LTD BE LIABLE FOR ANY SPECIAL INCIDENTAL INDIRECT OR CONSEQUENTIAL DAMAGES OR LOST PROFITS BUSINESS REVENUE DATA GOODWILL OR ANTICIPATED SAVINGS Import and Export Regulations Customers shall comply with all applicable export or import laws and regulations and will obtain all necessary governmental permit...

Страница 3: ...i Table of Contents Getting to Know the EM660 2 Requirements for the PC 3 Preparing the EM660 4 Installation Guide 4 Safety Information 10 ...

Страница 4: ... precautions for using Huawei EM660 EVDO Rev A Module hereinafter referred to as the EM660 You are recommended to read the manual before using the EM660 The signal strength and the transmission rate are affected by the actual environment Getting to Know the EM660 The following figure shows the appearance of the EM660 The actual product may differ 1 3 2 2 13 ...

Страница 5: ...al antenna which connect with laptop The max gain which is allowed of external antenna is 850M 4 28dBi 1900M 3 6dBi Requirements for the PC To use the EM660 the PC must meet the following requirements WWAN Mini PCI Express interface Windows 2000 SP4 Windows XP SP2 and Windows Vista Mac OS X 10 4 and 10 5 with latest upgrades The hardware of your PC must meet or exceed the recommended system requir...

Страница 6: ... SIM card slot on the main board of the PC Note In certain cases your PC may be disassembled only by the professionals Before you install the EM660 onto the main board of the PC consult the PC manufacturer or read the user manual of the PC Installation Guide Installing the EM660 onto the Main Board of the PC 1 Insert the Mini PCI Express connector of the EM660 into the WWAN Mini PCI Express interf...

Страница 7: ...2 Press downwards to fix the EM660 in the module slot 3 Use a screwdriver to fix the EM660 onto the main board of the PC with two screws provided in the EM660 packing box 13 ...

Страница 8: ...rface A of the EM660 in the same way Note Insert the antenna connectors vertically into the antenna interfaces of the EM660 Do not pinch the antenna cable or damage the connectors Otherwise the wireless performance of the EM660 may be reduced or the EM660 cannot work normally Ensure that the antenna cables are routed through the channel in the frame of the PC and do not lay across the raised edges...

Страница 9: ...Removing the EM660 from the Main Board of the PC 1 Disconnect the antenna cables from the EM660 You can lift the connectors with a small screwdriver 2 Remove the two screws with the screwdriver 13 ...

Страница 10: ...iver of the EM660 1 Insert the disk into the disk drive of the PC 2 The OS automatically starts the installation wizard Note If the auto run program does not respond find the AutoRun exe file under the disk path Then double click AutoRun exe to run the program 3 Follow the prompts of the installation wizard 4 After the program is installed the shortcut icon of the management program is displayed o...

Страница 11: ...se Start Control Panel 2 Find the management program and click Add Remove Program to uninstall the management program Note It is recommended to restart the PC after the uninstallation to ensure that the management program is completely uninstalled ...

Страница 12: ...roblems consult your service provider If you are using an electronic medical device consult the doctor or device manufacturer to confirm whether the radio wave affects the operation of this device Area with Inflammables and Explosives To prevent explosions and fires in areas that are stored with inflammable and explosive devices do not use your wireless device and observe the rules Areas stored wi...

Страница 13: ... over the air bag or in the air bag deployment area Otherwise the wireless device may hurt you owing to the strong force when the air bag inflates Observe the rules and regulations of airline companies When boarding switch off your wireless device Otherwise the radio signal of the wireless device may interfere with the plane control signals Safety of Children Do not allow children to use the wirel...

Страница 14: ...s of the others Care and Maintenance It is normal that your wireless device gets hot when you use or charge it Before you clean or maintain the wireless device stop all applications and power off the wireless device Use your wireless device and accessories with care and in clean environment Keep the wireless device from a fire or a lit cigarette Protect your wireless device and accessories from wa...

Страница 15: ...ing approvals and notices apply in specific regions as noted Federal Communications Commission Notice United States Before a wireless device model is available for sale to the public it must be tested and certified to the FCC that it does not exceed the limit established by the government adopted requirement for safe exposure FCC Statement This device complies with Part 15 of the FCC Rules Operati...

Страница 16: ...13 Version V100R001_01 Part Number 3101 ...

Отзывы: